How to send and test WordPress emails on localhost?
One of the initial things you can learn about WordPress and its usage is its installation on localhost. Working with WordPress and its plugins, extensions, themes and templates can be convenient if you have WordPress installed on your own computer.
It is otherwise called the setting up of localhost or local server environment for development, testing and checking purposes.
Once, you have your WordPress installed on your personal PC or Computer, you might want to try a variety of options and controls it offers you.
One of the primary features you can familiarize with is the procedure of sending and testing emails in a localhost.
You can use email sending functionality for a range of reasons, starting from emails as a notification for a new user registration, reset of a password, automatic updates to sending out emails when something happens on your website, for example, a new post is published.
While the functionality of WordPress to send emails is of primary importance for your website, in this article let’s go through the stages of how a WordPress site owner can send and test emails in a localhost.
For certain reasons, using the default method of sending WordPress emails can be a daunting task with lots of errors. Basically, PHP mail function is responsible for sending emails generates from your WP website.
However, your WP hosting server is not properly configured to exercise this functionality. Another basic reason is that the major WP hosting companies use different methods to restrict email spam.
Under such conditions, one of the productive ways to send and test emails in localhost is via SMTP method.
Getting SMTP functionality and setting it up in your WordPress can be somehow laborious, but it’s worth it. Once you have the job done, you are to enjoy boundless of its advantages. It will bring you more stabilized and dependable framework to work on and send your emails freely.
Let’s start with the necessity of finding and installing the relevant plugin. You can use the plugin called WP Mail SMTP / (Alternative way is via the plugin named Easy WP SMTP).
It will let you configure wp_mail() function to use SMTP instead and send and test emails in localhost with the help of SMTP server.
After the installation and activation of the plugin, you need to go to its setting page to get started. Select Settings, then Email for certain configuration options.
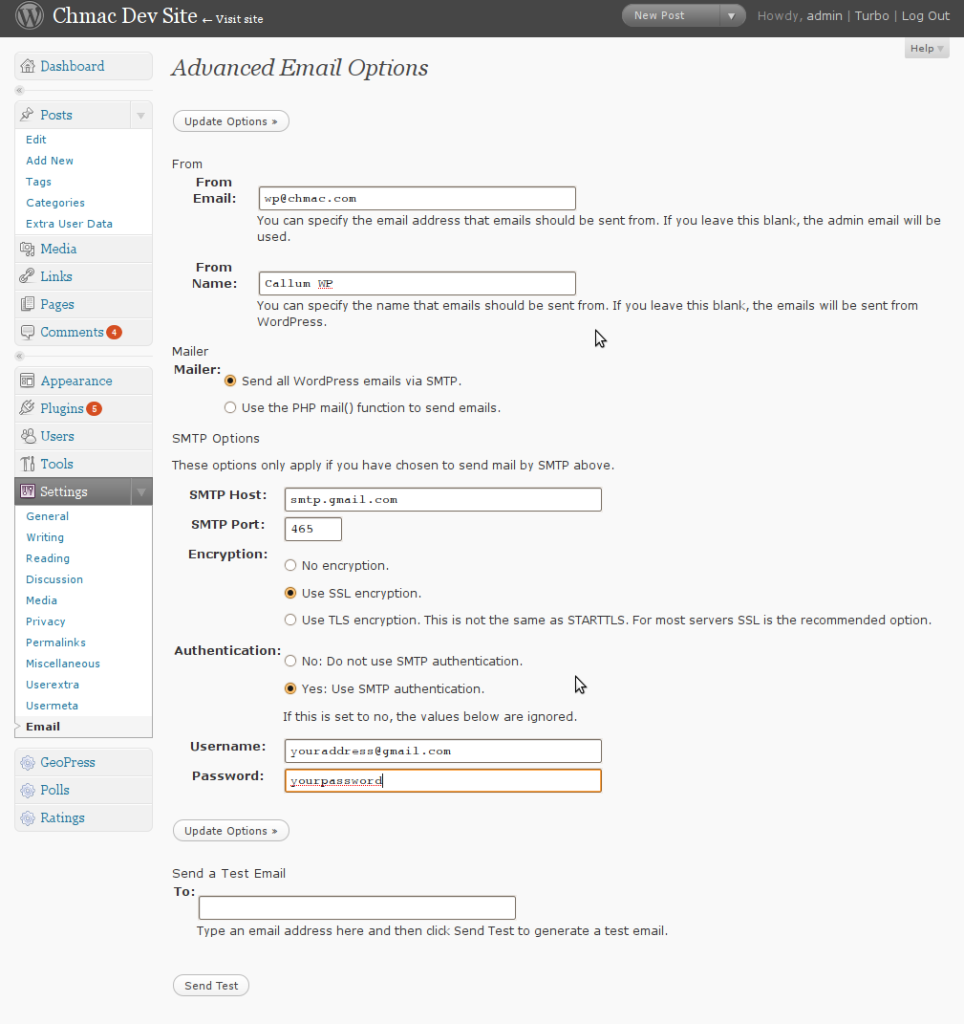
At this point, you will be provided with Advanced Email Options. Let’s take a quick look at each of them and find out what they configure.
From Email: Specify the email to send your emails from
From Name : Specify the name you would like your emails to be sent from
Mailer : Choose to Send all WordPress emails via SMTP
Return Path : Choose to set the return-path to match the From Email or not
SMTP Host : The hostname of you SMTP Server
SMTP Port : The port on which your server works
Encryption: Choose between no encryption, use SLL encryption and Use TLS encryption
Username and Password: The Username and Password of your SMTP server respectively.
When you are done with those options, click Save and the basic configuration is done! However, there is an additional small task to complete to finalize the process. You need to go to your Gmail account settings and enable Access for less secure Apps.
Actually, this method will smoothly work with the majority of email providers. In case you are using your host to create emails, SMTP integration with WordPress will also work stunningly.
In this case you need to go to cPanel, find Email section and configure SMTP settings from there. You don’t need to worry about unexpected issues, since you are well aware of what you are giving access to.
Once the above specified steps are taken and the required configuration is completed, it’s time to send and test emails when you are on localhost. For this we have Testing and Debugging Settings section to use.
Fill the required information, like the email address of the recipient, subject of email (like test, for testing or whatever you wish), as well as the text of message (again optional). Click Send Test Email and check the results.
You can use your own email to quickly check whether everything is working properly. Enter your email in the recipient section and check whether you receive the relevant mail.
Another option is to leave a post comment and check whether you receive email notification. Naturally, this method works if you have activated Email Me Whenever Anyone Posts a Comment setting.
The next well developed and easy to digest plugin ready to enable you to send and test emails in localhost is called Postman SMTP Mailer-Email Log. (You can find it in WordPress repository of plugins:
https://wordpress.org/plugins/postman-smtp/). It is an improved and updated version of other SMTP methods which is in full compliance with modern security standards.
All in all, it comes with easy installation and setup processes for the WordPress user of any background. The installation and activation processes are as usual, including finding the relevant plugin via the Plugins menu.
Then you need to select “Start the Wizard” and you’ll find the needed instructions to eliminate possible errors in configuration.
With this plugin you may also manually configure password authentication and oauth 2.0 authentication. However, these will need a higher level of coding knowledge and will be convenient for advanced WP users.
As for the other pluses of Postman SMTP Mailer-Email Log, it grants you with connectivity test to reveal any setup errors catering to server, International Alphabets, HTML Mail and Multipart support, as well as SMTPS and STARTTLS security Support.
As for other compatible and highly reliable plugins to send and test emails in a localhost, you can find SMTP Mailer Plugin by Mail Bank among them (https://wordpress.org/plugins/wp-mail-bank/). This one is also preferable for its easy installation process and further configuration options providing you with a simple way of sending your emails while using PHP mailer or SMTP server.
Well there are many developers and i think almost all of them who like to work on local server in their machine and then take their work online.
Similarly WordPress developers also like to keep their work local on localhost. The only problem working on localhost is that contact forms or anything related to emails can’t be tested and hence only for this part placing the entire code online seems a bit of trouble.
Comes to the rescue: WP Mail SMTP
Download this plugin into your localhost and activate the plugin.
Inside Settings>Email you can configure the plugin.
Place From Email (can be your gmail,hotmail or any email address you want to use), From Name.
In mailer section select Send all Wordpress emails via SMTP.
Return Path you can check.
For SMTP settings of gmail, yahoomail, outlook and hotmail refer to the below links and i am sure you will be able to set up using those settings.
Gmail: http://email.about.com/od/accessinggmail/f/Gmail_SMTP_Settings.htm
Outlook: http://email.about.com/od/Outlook.com/f/What-Are-The-Outlook-com-Smtp-Server-Settings.htm
Hotmail: http://email.about.com/od/accessinghotmail/f/Windows_Live_Hotmail_SMTP_Settings.htm
Yahoomail:
http://email.about.com/od/accessingyahoomail/f/Yahoo_Mail_SMTP_Settings.htm
Once settings have been saved, kindly click on test message and check if test message is working.
NOTE: It is really important to have an active internet connection to check SMTP Mails. However advantage is you can check emails using localhost now and do not need to place the site LIVE for checking emails.
When you are using WordPress then you are already aware that there are many functionalities that are available to you.
The users most often get worried about connecting their devices and WordPress in a manner that they can create a great support. They are always looking for support systems which can help them in doing things right and adding to the functions they enjoy and increasing the functionality of the website.
The idea of WordPress is to ensure that they provide support to users in all small and big queries the use of the support system is thus highly popular.
Now think about when you have to send mail from localhost you will find it confusing. It is not so and there are simple support steps available to make the whole process easy and time-saving for you.
When you have WordPress on your system then you would definitely want to try so many things on it. One of the most popular and required features is sending emails. There are many occasions where these emails are sent out
1. New user registration alert.
2. Reset of password
3. Update emails for generating awareness.
4. Information about the website
5. Call to action
Now you would definitely want to send an email using great content and will be disappointed to see it thrown in the spam folder. It is very common that the emails send via PHP mail functions are open to such threats. The use of the email localhost by WordPress thus becomes a suitable option here.
The send mail from localhost using the plug-in is the best-known source till now. You will start by installing the plug-in like any other plug-in.
Go to WordPress and the to add plug-in- choose WP mail SMTP and install. You will then have to activate the plug-in on the local server. Now for the configuration you should go to settings and then email.
You will see a screen here with the first option ‘from email’ you will have to enter your Gmail address here. The next is ‘your name’ this is the name which will be used as the sender’s name.
You can write WordPress here as right now you are testing the whole process. This step will help you with easy identification. The next is the mailer option; here choose ‘send all WordPress emails via SMTP.
The next step now is to configure the Gmail’s SMTP server to send emails. The field where SMTP server is mentioned enter smtp.gmail.com for entering 587 in the port field. The encryption can be set to TLS and then click on yes to the authentication along with that provide Gmail address and password.
Save all the changes you have made and then send mail from localhost using the message box at the bottom. This text message must be in you inbox in no time and when you successfully have received the message then you know that everything is working fine.
The steps would differ slightly from other mail accounts but the process is all the same.


Good
reat list and I already have a lot of these and love them! I found the blog because I was looking for the comment luv plugin and here it is! Thanks so much for putting this together!
Regards