WordPress has established itself as a robust platform not only for blogging but also for advanced content management.
Table of Contents
WordPress 4.7.3 which is the recent version of WordPress comes multiple post types.
Some of the popular post types are general post, page, attachment, and navigation menu.
Besides these, there is a need to use custom post types in WordPress as per the demand of your website.
For example, if you have a review site, you need to use custom post types in WordPress so that reviewing anything can become easy and the representation of the post becomes personalized.
It will help in better branding, better user experience and most importantly, you can use this custom post type template every time and complete your post instantly.
How To Use Custom Post Types In WordPress (Using Plugin)
Using a plugin to do anything is the easiest way in WordPress, especially those who do not want to uses codes to solve their problems. The process is rather safe because amateur WordPress users can create a mess while editing files and inserting the required code.
Step 1 – Install The Plugin and Get The Menu Option
The plugin to use custom post types in WordPress 4.7.3 is named Custom Post Type UI. Therefore, go to Plugins option from the Dashboard and click on Add New. Search for the plugin in the new screen, install and activate it.
Once the activation is done, you need to come back to your Dashboard. You will find that a new menu option named CPT UI has been added to the left menu.
Step 2 – Understanding Custom Post Type and Custom Taxonomy
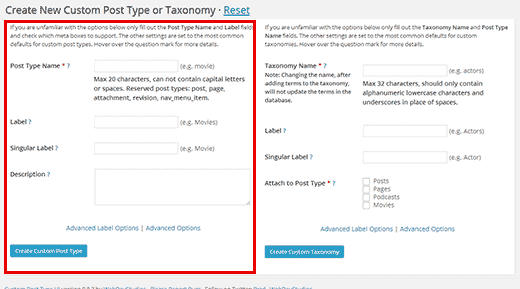
Place your mouse point of the menu option CPT UI and click on Add New option from the drop down. In the next screen, you will find two columns.
One is for creating custom post type (left) and the other is for creating custom taxonomy (right). As stated earlier, custom post type is a customized post template for creating a regular post in a personalized way.
On the other hand, a custom taxonomy is for representing a group of posts. For example, the default taxonomy in WordPress is category and tags and they group different articles together.
Similarly, you can create your own taxonomy for your review site like Topics – books, movies, products, services which would be more like a category or something like Rating where posts of different ratings can be grouped together and shown to the visitors for better user experience.
Step 3 – Adding New Custom Post Type
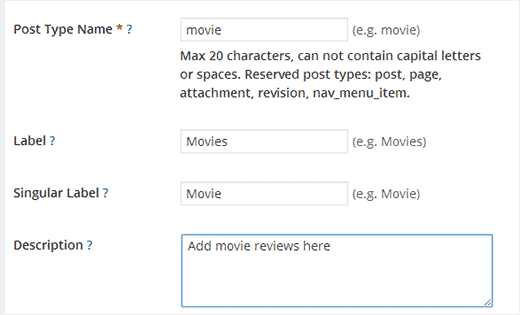
Moving on from the explanation, in the existing screen, use the left column to create a custom post type. You have to provide a name within 20 characters.
The next field is the label which is going to appear on the left menu of the Dashboard just like Page or Post option. The label is generally in plural form and in the next field, you have to provide the singular form of that.
Finally, write the description properly with the keyword. Click on Create Custom Post Type button and you will have access to it from the Dashboard. You can check out different advanced options as well for more customization.
How To Use Custom Post Types In WordPress (Manually)
The drawback of using a plugin for such a core work is that if there are any glitches in the plugin, all the posts might get affected. Even a bigger problem is that if the plugin gets uninstalled somehow then all the posts will be lost except the text part. Therefore, it is always recommended to do it manually so that no such issue arises.
Adding Basic Code To Serve The Purpose
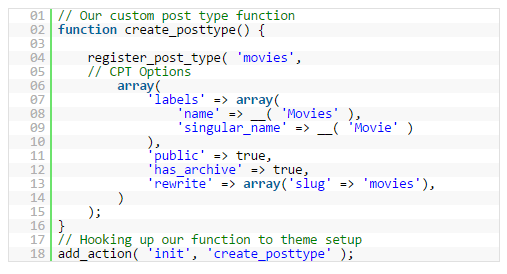
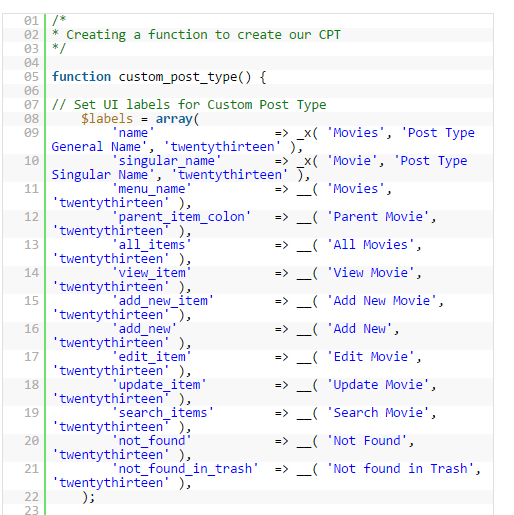
For that, you need to go to your Dashboard and then to Appearance. Click on Editor and in the next screen, locate functions.php from the left side. Go to the end of the code already present and write the following basic code.
From the code snippet, you can see that labels have ‘Movies’ as the post type which you can change along with its singular form. There are other parameters like public, archive, and slug which you may like to modify as per your requirement. But you can add much more with coding as the possibilities are truly limitless.
Adding Advanced Code For Better Personalization and Features
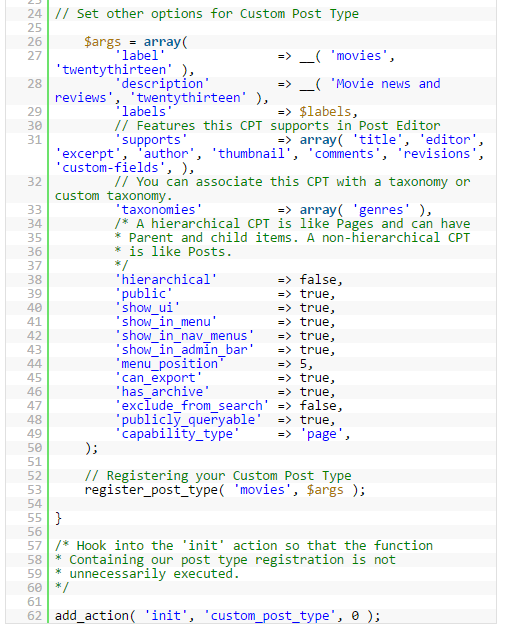
If your custom post type does not have all the features like the normal post type WordPress offers then it is a crime. If you are a slightly advanced user, you should use the following code instead of the above on.
But make sure you understand the code well else you can mess things up while customizing the code to enter labels and other parameters as per your requirement.
As you can see, it has options for revision, adding featured image and various other custom fields which are going to make your post professional and personalized. There is an option named Hierarchical which you can set to True if you want your custom post to behave like Pages.
Furthermore, you will notice that it has a custom taxonomy called Genres which you can change as per your requirement. If you do not want it, you can delete or make the line as a comment in case you want to activate it in future.
How To Display Custom Posts in WordPress 4.7.3
Once the creation of custom post type is done using the above method, you need to display them. First, create a few custom posts so that it appears well on the site and you can also check what you have created. Then go to Appearance from Dashboard and click on Menus.
You need to create a menu option and place the link of Custom Post Types’ URL in it. It is most likely to be http://yoursitename.com/movies. Instead of movies, it can be anything that you have modified it to be.
The URL structure can also be something else based on the permalink settings you have. Therefore, check it before using it and create the menu option.
By default, custom posts would not appear on the homepage and you need to write the following code in the functions.php file for the same.
That’s all. You can now have different types of custom posts to enhance the user experience and make you look unique.

