Why to do Wix To WordPress Migration?
Wix is an excellent platform for free and easy-to-use website building. However, its features are limited. We can migrate Wix to WordPress.
Table of Contents
Nevertheless, WordPress works like magic. It lets you create websites with a few steps, and it also helps non-technical people make websites.
However, migrating your Wix website to WordPress feels tough, but you must follow accurate steps, the work happens automatically. If you are a beginner and want to create a website, the Wix platform is the best choice!
But with time your business will grow, here WordPress, a mastery of websites comes into play.
To make your dream business big, you need WordPress for website builders. In this blog, we have shared about the migration process of Wix to WordPress. So, sit patiently and read a full blog.
What are the benefits of migration from Wix to WordPress?
Wix is no doubt an outstanding website builder, it is easygoing and sets standards for beginners. But when your brand grows, features are limited, and upgrading would have cost highly.
So, the most demanding and easygoing alternative website builder is WordPress. It is also helpful for newcomers but with a wide range of features and works like magic. As this website builder is open source, you can add many themes and plugins as per your requirements, and make it innovative and trendy. Another advantage of using WordPress, it allows any hosting provider you want.
On the other hand, with Wix, you can use only apps, themes, and tools made by their developers, with no customizable options.
If you want to migrate a Wix website to WordPress, it opens the doors to many features and functionalities that cannot happen in Wix.
There are tons of up-to-date themes and plugins, you can integrate booking segments and online stores. And you want specific designs and layouts? Your wish must be fulfilled, as there are lots of plugins and themes available.
To migrate Wix to WordPress, you can be more creative and innovative with your websites but within a simple step.
Limitations of Using Wix and Other Website Builders
By using the Wix platform website building has become easy and user-friendly indeed. Yet there are a lot of limitations for customizations.
Cannot include forms to blog posts
Wix cannot offer you any forms for your blog posts. If you want to know the numbers and all the information about the visitors, you have to make a new page and create a form on it. And you can add links to your blog posts.
It seems unwanted for visitors to create a new page, much traffic gets irritated with it.
You can’t swap the HTML of your Website.
If you are a Wix platform user, you cannot access HTML of your website. Though, you can add some features to use Velo by Wix, and can include Custom HTML editor tags from the editor.
Nevertheless, For your big business and to create strong brand visibility, you should select a WordPress website. It provides you easy going user experience, flexibility, and a wide range of features.
Wix vs WordPress: Quick Overview
| Wix | WordPress | |
| Website Design | 800+ pre-designed templates, AI-generated custom design | 11,000+ free themes, excluding options from third-party marketplaces, site editor for code-free theme edits |
| Ease of Use | Beginner-friendly interface, includes a free domain for one year and hosting | Extensive setup process, more complex dashboard |
| Customization | Drag-and-drop editor | Theme editor, third-party page builders |
| Pricing | Free plan available, Premium plans start at $16/month | Free core software, Hostinger WordPress hosting starts at $2.99/month |
| Third-Party Extensions | 300+ free tools on the Wix App Market | 59,000+ free plugins |
| Blogging | Supports blog post templates and layouts, often requires third-party commenting systems | Flexible block editor, native commenting system, Gutenberg block editor allows creating beautiful layouts |
| eCommerce | Basic eCommerce features at $27/month | Free WooCommerce plugin, WooCommerce hosting starts at $3.99/month |
| SEO | Improve basic SEO from the dashboard, Wix SEO Wiz tool | Advanced SEO tools, including control over the site’s structure, many SEO plugin options, WordPress has built-in SEO features and is overall more SEO friendly |
| Customer Support | 24/7 customer support team, Wix Help Center and the forum community, great customer support | Customer support from the hosting provider, forums and helpful documentation |
| Security | Built-in updates and other security measures | Depends on the web hosting, many security plugins are available |
Key Differences and Considerations:
Customization & Design: WordPress offers more themes and detailed customization and flexibility. Wix does not allow users to switch to a different design after launch. WordPress gives more control over the site’s layout and design.
Ease of Use: Wix is more user-friendly and perfect for beginners. Wix has a simple-to-use editor. WordPress has a more complex dashboard.
Blogging: WordPress outshines Wix as a blogging platform. WordPress has tailored features, dynamic editing capabilities, seamless comment management, and plugin choices make it far superior to Wix.
SEO: WordPress has built in SEO features and is overall more SEO friendly.
Pricing: WordPress offers flexible plans from multiple hosting providers, while Wix has recurring payment plans.
Content Management: WordPress is a content management system, which means it’s great at storing, organizing, and presenting a huge amount of content.
Ideal User: Wix is better for users new to website builders who want to set up quickly. WordPress is better for users who want more control over their website’s design and functionality
Migrate From Wix To WordPress: Your Step-by-step Process
To Migrate Wix to WordPress, there are some steps you have to follow. Let’s discuss the whole process in the following.
Step 1: Buy and Register a Domain Name
In this migration process, the first step is you have to buy a domain. Then try to register your domain name. You can sign up for a domain name with your hosting provider. To avoid any hassle with domain names, you can use custom domain names also.
Then, you have to find the available domain name to register your Domain name. But your present Domain name must be similar to your Wix domain name.
You can buy the Domain name by finding the Domain name.
Step 2: Choose a host with WordPress-specific Services
After that, you find a good company that provides the best hosting provider for your WordPress website.
Although Wix can host your website for a WordPress website, you need to hire a host. Nothing to worry about! Because there are tons of companies that provide hosting.
The most important thing, when you hire a hosting provider, you should check some features such as storage, uptime, bandwidth, and support of the host on your website. Yet, you have to choose an accurate hosting plan for your WordPress website.
Though I have recommended a great hosting site Managed Hosting for WordPress, you must try it for your website.
Step 3: Install WordPress
WordPress installation solely depends on what hosting provider you select. When you try to install WordPress, you can find the install options on your dashboard.
Click on the install option and continue with that process.
Step 4: Add a WordPress Theme To Your Website
After logging into your WordPress website, your website needs to include a visually appealing Theme. This is indeed an important part of your website, there are ample options for themes on WordPress. Some are free of cost and others are also at a premium.
Nevertheless, you should choose a Theme that suits your suit brand’s voice.
How To Choose a WordPress Theme
WordPress Theme choosing is a long and brainstorming process, as there are abundant options available. But you must be selected as your website and services demand, and your website visitors feel connected and intrigued with your website’s themes.
Also, you can get suggestions from the WordPress Theme Dictionary. You should select up-to-date premium WordPress themes and stay away from the old themes. If you choose outdated themes there are possibilities of security issues and cannot be compatible with your website.
Installing Your WordPress Theme
After completing the WordPress theme-choosing process, you can start the installation process. So, you can enter Themes > Add New.
After that, you can search for the theme you like, and click on the install part. And then after completing the installation process, you should click on activate. And for premium options, you need to pay more.
Step 5: Import Your Blog Content From Wix To WordPress
In this step, after completing the installation process, now you can migrate your blog from Wix. Then, You have to migrate the Wix RSS feed, as it will inhibit the manually copy and paste your blog posts.
After that, to generate the feed you have to include an RSS button on your Wix site. So, you can enter the RSS feed and open it. To do that, Press on the RSS button on your present WordPress website.
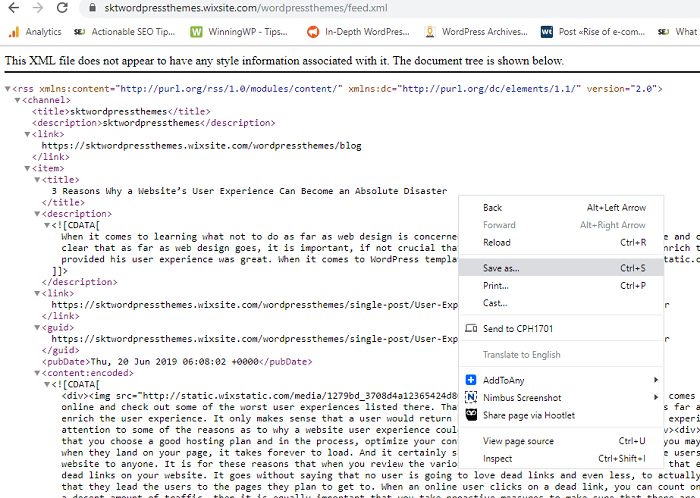
Then, it will open an XML page that displays all of the codes, you have to right-click on the page, and then click on Save As. And save the page anywhere on your Computer, you wanted to.
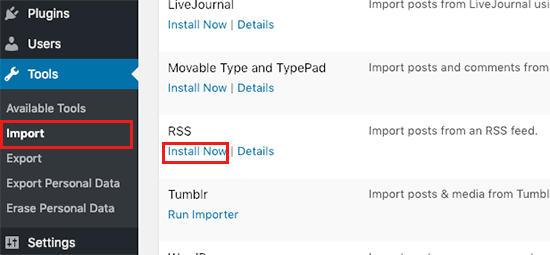
After completing the process of saving the file, you can log into your WordPress website, and enter to Tools > Import. And then you have to go to the RSS sections, and choose Run Importer.
Now, you can go to the next page and click on choose file and you have to open the saved RSS file. When the Importer has runned smoothly, you have to check your posts, whether they all are Imported.
Step 6: Transfer Your Wix Pages To WordPress
The RSS feed can’t import all of the pages of your previous posts, it is only done with your website posts. So, you have to recreate all of the pages again in WordPress.
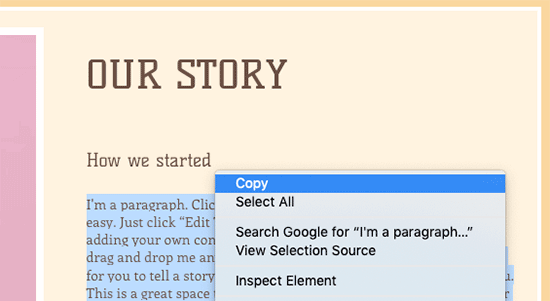
To begin the recreate process, you have to open the previous page which you wish to transfer from your Wix website. Then, copy all of the content and enter to WordPress go to Pages > Add New.
Now, you can paste the copied content into a new page, and then you can organise the content as per your wish. Like styling, adding titles to the content, adding extra images, internal links, and other media.
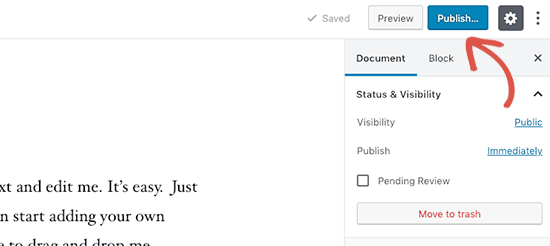
And then you can publish your page, and get into live, and you should check out all of your posts which look right for publishing.
Also, if you don’t want to manually recreate your pages, you can opt for third-party solutions. I recommend stunning tools like CMS2CMS, which allow you to migrate all of the Wix website to WordPress. But you have to pay for adding pages and images to your website.
Step 7: Navigation Menu & Plugins
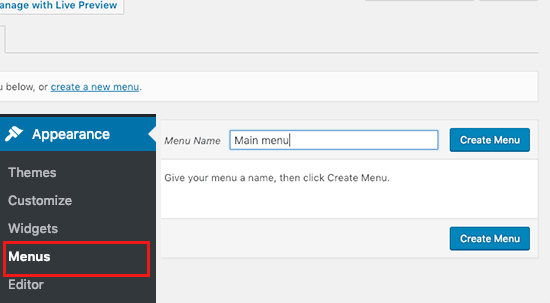
Navigation set up of your new website using the primary menu is a must. This can be done from the Appearance option in the Menu. All you have to do is type a name and click on the Create Menu button.
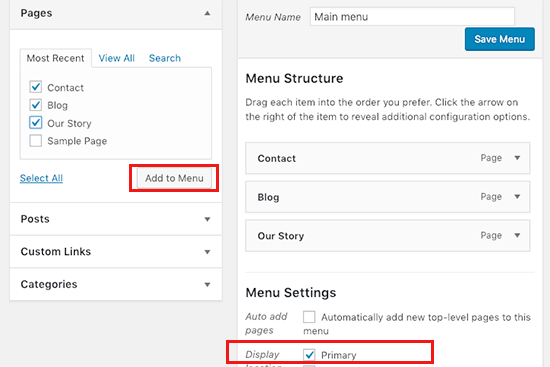
You can also select the pages that you want to add your main menu. Click on the Save Menu option to conclude the process. This will make it live on your website.
You can add more features to your site through WordPress plugins. There are hundreds of paid and free plugins available online.
You can use them according to the requirement of the functionality on your website. There are a few must-have plugins for any WordPress site which you can search and install for enhancing the site performance and security.
Step 8: Redirect Wix to Your New WordPress Site
Your Wix to WordPress website migration is already completed. But you need your old website traffic in a new website. So you have to redirect traffic from Wix to the WordPress website.
To do that you need to have a custom URL link on your Wix website, if your Wix account is free of cost, then it isn’t able to do the redirect process. But you can input a new link to your old website to inform your visitors about your new WordPress website.
Migrate From Wix To WordPress With SKT Themes
You have to migrate your Website Wix to WordPres, when your business is growing rapidly. Yet Wix is a great website builder but with certain boundaries of features and functions.
To improve your website visibility and ranking, you opt for WordPress. And then you need an up-to-date and authentic hosting provider, then SKT Themes comes into play.
We, at SKT Themes, offer you versatile, trendy, and optimised hosting plans, and a team of experts for your site migration. You can get solid services with expert advice here.
Conclusion
Migration from Wix to WordPress is indeed important for your website growth and potential traffic. Through this blog we have shared the details of the Migration process and limitations of the Wix website. So, don’t waste your time and make a grand website with the help of SKT themes Hosting provider.

