Are you looking for a free live chat plugin to add to your website? Would you like to communicate with customers via your website with voice and video for free…forever!?
Table of Contents
If the answer is yes, then look no further! We’re going to tell you all about 3CX StartUP, an all-in-one communications solution that offers live chat, voice, and video. It’s super easy to sign up for and get started. It’s a great way to convert your website visitors into fully-fledged customers.
3CX isn’t just about website communication. 3CX StartUP gives you a completely free live chat plus a whole team communication system.
In this article, we’re going to cover features and the sign-up process. And believe us when we tell you it takes just minutes – no coding needed!
3CX StartUP / Live Chat Plugin Review
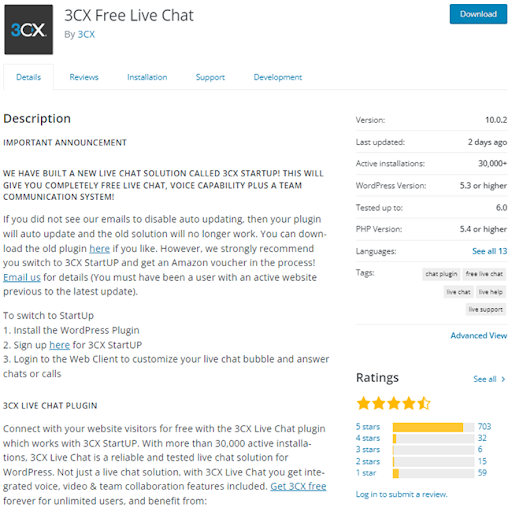
3CX Live Chat is a free WordPress plugin that can be integrated with 3CX’s StartUP system for a fully rounded solution that enables visitors to elevate chats to voice or video calls.
Both the plugin and the communication system are developed by 3CX, who have been leaders in the communication industry for a number of years.
If you’re looking to offer customers excellent service and support, no matter your organization’s size, then you’re definitely going to want to take a look at 3CX StartUP. As you can see above, the ratings speak for themselves.
Live Chat, Voice & Video – FREE!
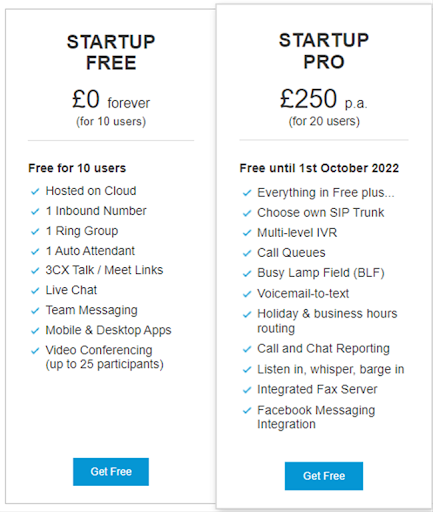
3CX StartUP allows you to connect with your team and customers effortlessly. It includes a phone system, free video conferencing, and of course, Live Chat. It is free forever for up to 10 users. If you need more than 10 users or agents, StartUP PRO is free for the first 3 months and then starts from as little as €$£250 per year for 20 agents.
Sign up for 3CX StartUP
1. Let’s get started! Firstly sign up for your free StartUP account and fill out the account details.
2. The next step is to add your users or agents that you will want to have access to the system to answer your chat messages and use the other features on offer. Use the roles drop-down selection to make other users managers, receptionists, or standard users.
3. Now choose if you want to connect a SIP Trunk. This would be used for making inbound and outbound calls. If you are just using the system for internal communication and Live Chat, simply click ‘Next’
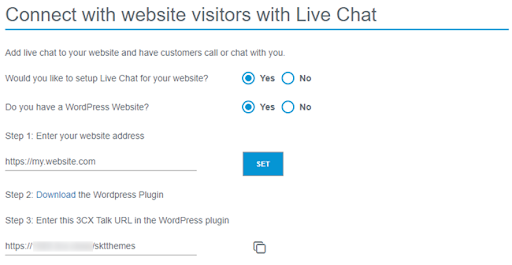
4. Now you can start setting up your Live Chat by choosing the option ‘Yes’ and selecting if you have a WordPress website or not. Enter your website URL and click ‘Set’
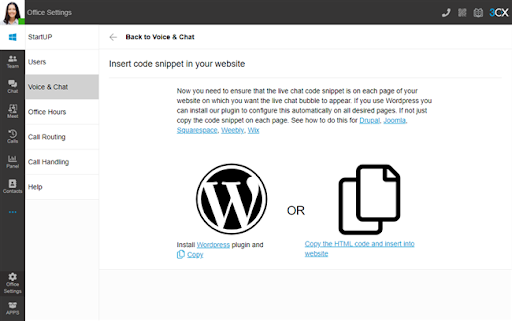
5. Download the WordPress plugin and then copy the 3CX Talk URL and save it for a later stage. Click ‘Next’
6. That’s it! You’re signed up. Use the ‘Login’ button to log into your dedicated 3CX Web Client which is where all your customization and chat messages will be located.
Customize your Live Chat
Now you can configure the settings of the plugin to determine how it will behave on your website.
Your Live Chat bubble and functionality can be edited and customized directly from the Web Client. Changes made take effect immediately so updating your preferences at a later date is quick and easy.
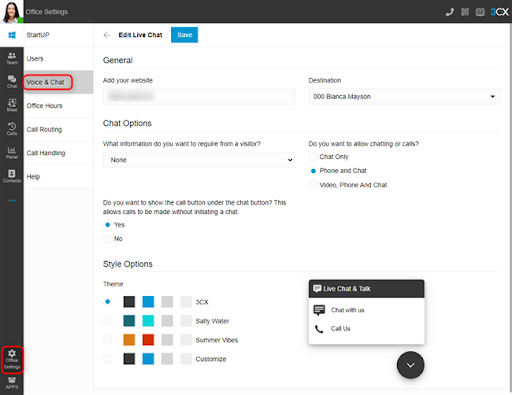
1. In order to set up Live Chat so that calls and messages can be answered from the Web Client, go to “Office Settings > Voice & Chat” and click on the pencil icon.
2. Your website address will already be populated from the wizard process but you can amend this if required.
3. The “Destination” field shows where live chat messages or calls will be sent. To amend the “Destination”, navigate to “Office Settings > Call Routing” and choose your destination. By default, the Live Chat will route to a ring group. 4. For more information on ring groups check out the getting started guide.
5. Under the “Chat Options” section, use the drop-down selection to choose what information visitors need to provide you with.
6. Use the radio buttons to choose if you want to allow “Chat Only”, “Phone and Chat”, or “Video, Phone, and Chat”.
7. If you want the option for “Call Us” to be displayed immediately on the chat bubble, use the radio button to show or hide the option.
8. Under “Style Options” choose from one of the 3 predefined themes or select “Customize”. For the last option, click on each of the color tiles and use the pop-up color picker or enter your RGB numbers
9. Use the preview of the chat bubble to interact and test the functionality. If you are happy, click “Save” at the top of the page
Enable Live Chat on your website
1. Log in to the admin panel of your WordPress website
2. Navigate to “Plugins” and click “Add New” at the top of the page
3. Click on “Upload Plugin” at the top and choose the file you downloaded during the signup process. You can also obtain this from the Web Client in “Office Settings > Voice & Chat” and click the ‘i’ icon next to the pencil icon. Then click “Install Now”
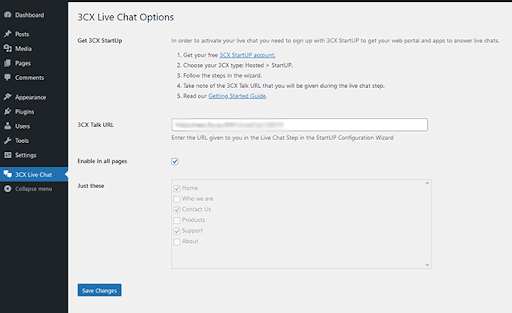
4. Once installed, click on “3CX Live Chat NextGen” in the sidebar
5. Paste the URL you copied earlier. It can be found again in the Web Client in “Office Settings > Voice & Chat” under the “Information” field or within the email sent during the setup process.
6. Either tick the box to show the chat on all pages or use the tick boxes below to select individual pages. Finally, click “Save Changes”.
Note: Currently the WordPress plugin will support only one Live Chat URL per website. Multi-chat bubble support will be released in the near future. In the meantime, if multiple Live Chat options are required, simply paste the different code snippets into the pages you require.
Sending and Receiving Chats
There’s no need for agents to log in to WordPress to access visitor chats. Instead, all incoming queries are delivered, to the extension or queue, you selected in the 3CX Web Client.
This means agents are able to enjoy all forms of communication from one central hub. There’s no messing around on multiple apps or interfaces.
As well as the web client, you also have access to free smartphone apps for iOS and Android. That means agents can answer website live chats from anywhere. Set up of the apps is easy with a simple QR code to scan and the rest is all automated for you.
With StartUP PRO, you can even integrate Facebook Messenger to have business page messages delivered there too.
The agent is easily able to take ownership of the conversation in the 3CX Web Client. If the conversation becomes more complex, visitors can opt to elevate the chat conversation to a call with a single click of a button. The call will be connected to the same agent so that the visitor doesn’t need to explain the conversation to a new agent.
Other benefits of integrating live chat with 3CX
- Easy 2-step Facebook integration
- If you’re using a CRM or accounting software, you can also integrate this for even better customer service.
- 3CX can scale with your organization as there are simple license upgrade options to elevate your StartUP account to a fully-fledged business communication system.

