Are you thinking of accepting the recurring payments on your WordPress website? Then opting for the best quality gateways is going to help you in many ways. Recurring billing enables your customers to set the time intervals or the custom intervals for making payments.
Table of Contents
If you are thinking about how to do it on your WordPress site, then you are at the right place. In this article, we are going to talk about the various methods that you can use to accept recurring payments in WordPress. But before that, you need to ask yourself a few questions.
The advantages of recurring billing:
Following are the advantages of recurring billing. Let’s have a look.
Fewer late or missing payments: Besides dealing with the potential losses of funds, the costs of administration that are associated with payment chasing becomes less. It is a double win for the business.
Lessens the administrative costs: The cost of invoicing and the other associated costs get reduced. It becomes easier to account for. It is especially helpful for businesses that process everything in a digitized way.
No more need for payment conversations: By setting-up the recurring bill, you can focus on having positive interactive sessions with your customers or clients regarding your services or products instead of chasing payment.
Give subscription altering offers to your clients: It makes the subscription sign-up process easier. Most of the software enables you to offer promotions for your page. You can give free-trials to the new users. Or you can give a better plan to your existing customers, based on their situation.
Security: You can be sure that your client data is safe and secured. This is because of the safe payment gateways through which one accept recurring payments in WordPress.
Your clients get a better experience: If a recurring bill is set up properly and is integrated with an easy to use and understandable interface, it gives your customers a better impression.
It can promote conversions actively, and there also lies a chance of organic promotion because most people love to share great experiences.
Reduces significant costs: with the help of few materials like paper, stamps, and inks, you can easily invoice your customers. Thus, there is no need to visit the post office. You no longer need to pay your employees for processing every statement.
Higher retention: Just like the cable TV channel subscription and gym membership continues to generate higher revenues just because the payments mostly remain out of sight and mind. Unless a user does not opt-out of the recurring bill himself or herself, the payments keep on coming.
Better image of the corporation: You can easily reduce your firm’s carbon footprints by recurring billing. Those environmental savings can be promoted to your customers, thus improving the overall image of the corporation.
How can you set up the Recurring Payments through WordPress?
Well, there are several methods in which you can set up your WordPress site to accept recurring payments. Here, in the below section, we’re going to discuss 6 methods to set up the recurring payments through WordPress.
Method 1: Use WP Simple Pay for Recurring Payments
To enable your WordPress to accept recurring payments via Stripe Addon, you need to follow a few steps. Below is given how you can do it step by step.
Step 1: Open a Stripe Account first
To accept recurring payments in WordPress, you need to use a payment processor. It is better to start with Stripe. The first step you need to opt for is to open a Stripe Account.
- Click on the “Create Account” button on Stripe’s website and enter your name, email, and password.
- After reaching the dashboard, click on the ” Activate your account” link on the left.
- Follow the next steps to confirm the email address and then give Stripe some of the basic information about your business type.
- Browse through the links present on the left to see if anything goes applicable for you.
Stripe comes with many helpful features to help you with your business. It takes a week for Stripe to verify the bank account.
Step 2: Download the WP Simple Pay
To allow the Stripe to work through your WordPress site, you need to activate the WP Simple Pay. After opting for the purchase of the plugin, download it from the purchase email that they have sent to you. Or you can download it from your WP Simple Pay Account.
To install it, go to the WordPress backend and click on the “Add New” under the “Plugins.”
Click on the “Upload Plugin” to complete it. Click on the “Choose File” and find the WP Simple Pay.zip file on your desktop.
Click on the ” Install Now” button. Then, when you are done with uploading, press on the “Activate Plugin” button.
Step 3: Integrate the Stripe and WP Simple Pay
Before accepting the recurring payments, you need to link your Stripe account and the WP Simple Pay. Here is how to do it:
Step 1: Click on the WP settings on the left side of the WordPress Dashboard. Here you need to enter the API keys to integrate the two tools.
You can easily find your API keys on the API Keys page provided on the Stripe Dashboard.
Step 2: Then, you need to enter the Test Publishable Keys along with the Live Publishable and Live Secret Keys. This is to test your forms before going Live with them.
Step 3: Visit the “General” and “Payment Confirmation” tabs to review more settings. You can make any necessary changes from here.
Step 4: Create a subscription plan in Stripe to make the option displaying easy for the WP Simple Pay.
Step 5: Set up for New Form
Once you are done with linking your account, you need to create a form for the recurring payments. Here is how to do it step-by-step:
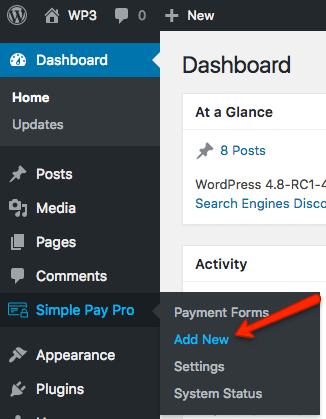
Step i: Get logged in to the WordPress admin. Go to the simple Pay Pro and click on the “Add New.”
Step ii: On the ” Add New Payment Form” page, you are going to see some vertical tabs with several groups of settings. From the On-Page Form Display tab, you can add the custom fields to the recurring form. From his place, you can customize the on-page form’s layout and fields.
Step iii: From the Checkout Display tab, go for configuring the basic settings related to the Stripe popup.
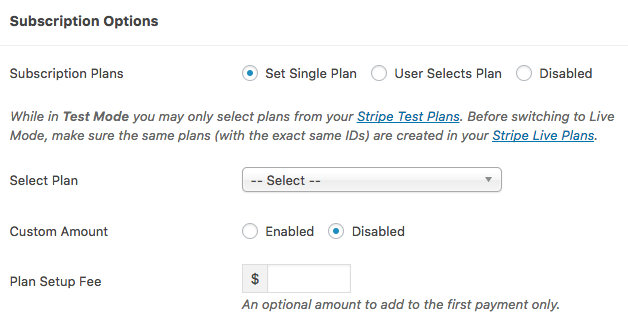
Step iv: Click on the ” Subscription Options” tab.
Step v: There are two types of subscription plans that you can opt for creating:
1. “Set Single Plan” Payment Form.
2. ” User Selects Plan” Payment Form.
The Set Single Plan Payment form allows your customer to sign up for one plan with no other opinions. Select the “Set single Plan” radio button to create one.
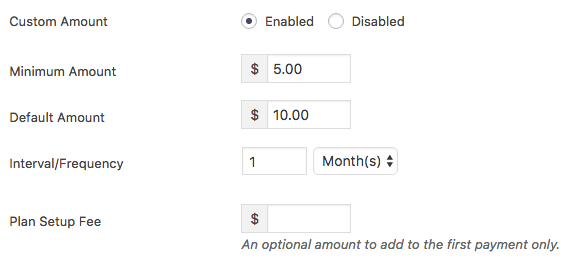
Step vi: From the ” Select Plan” drop-down, choose one of the existing Stripe plans that you created some time ago. You can also charge a setup fee. You can also enable recurring custom payment forms. All you need to do is enable the ” Custom Amount.” Enter a minimum amount along with the interval/frequency for charging the customer.
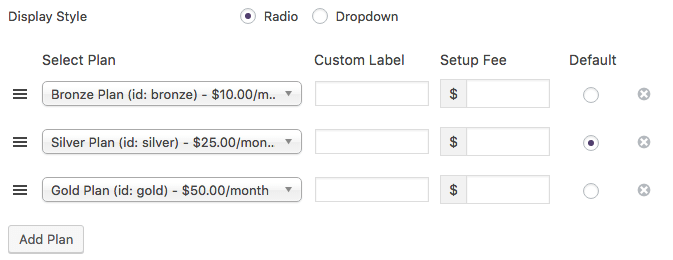
Step vii: To create a User Selects Plan payment form lets the customer sign up for one of the several payment options. To create one op or the ” User Sets Plan” radio button. Here is how to do it:
- Choose the display style between the radio or drop-down, as in this way; the options are going to be presented to the user on the form.
- From the “Select Plans” column, add the plans that you are going to present to your customer. You can also add custom labels.
- Add any setup fees if you are willing to charge for each of the plans.
- Choose which plans you are going to select by default.
Step 5: Add the payment form to a page
After you are done with creating the form, you need to put it on a page. Here is how you should do:
Step 1: Navigate to the existing WordPress page/ post, or you can create a new one.
Step 2: Click on the ‘Insert Payment From” button placed above the text editor. It is going to bring up a window or selecting one of the WP Simple Pay Payment forms.
Step 3: After you have finished selecting a form, a shortcode is going to appear in the text editor.
Step 4: Move that code anywhere you want the form to appear. You can also see the preview or the publishing of the page.
Method 2. Use the MemberPress to accept recurring payments in WordPress
If you are creating a membership website and also want to set up the recurring payments for the subscribers, then the MemberPress becomes helpful. It is one of the best WordPress Membership Plugins in the market.
It allows you to sell subscriptions, paid content, online courses, or digital downloads through the plugin. It lets you create membership levels, restrict the membership level-based access, collect payments, etc.
You have to create a membership website. Here is how you can do it step-by-step. To get started.
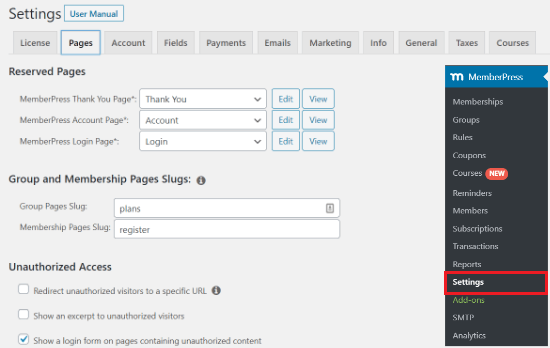
Step 1: Once you are done activating the plugin, you need to go to the MemberPress setting to configure the settings.
Step 2: Set up a payment option.
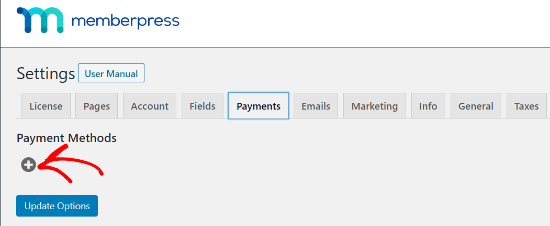
Step 3: Navigate to the Payments tab and click on the plus button for adding a new payment option.
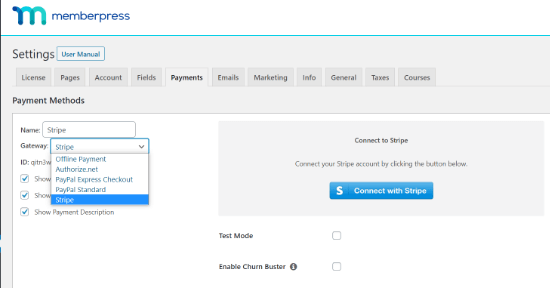
Step 4: Select Stripe as your payment gateway from the drop-down menu. Give your payment option a name.
Step 5: Click on the “Connect with Stripe” button.
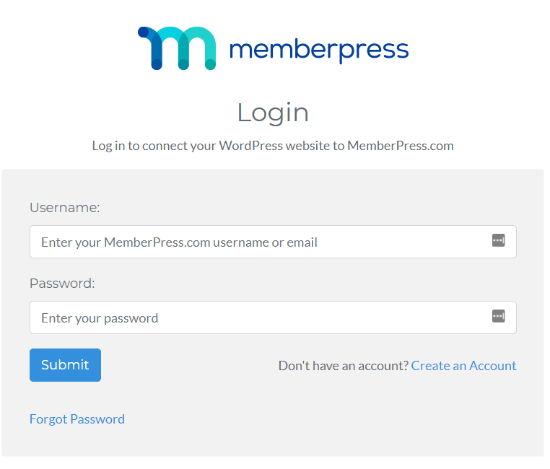
Step 6: On the next screen, log in to your MemberPress account. Put in your username and password and tap on the “Submit” button.
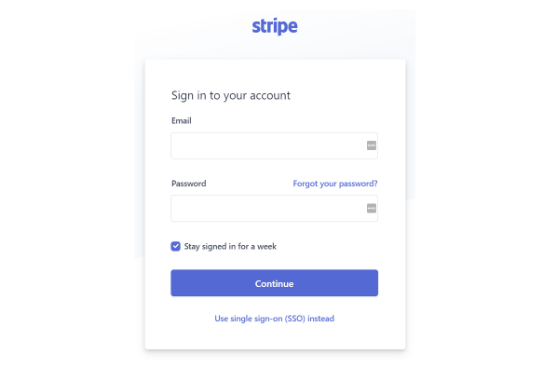
Step 7: Once you have logged in, sign in to the Stripe account. Stripe is quite popular as a payment processor, which allows you to easily accept credit card payments online, without any separate merchant account.
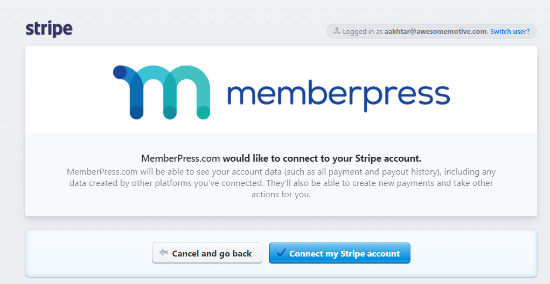
Step 8: After signing in, click the ” Connect my Stripe account” button to allow access.
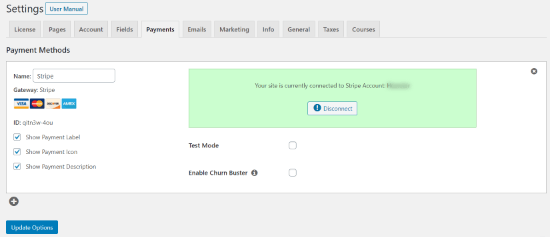
Step 9: You are going to redirect to the MemberPress Payments Page in the WordPress admin area. On this page, you are going to show you that the site has successfully connected to the Stripe Account.
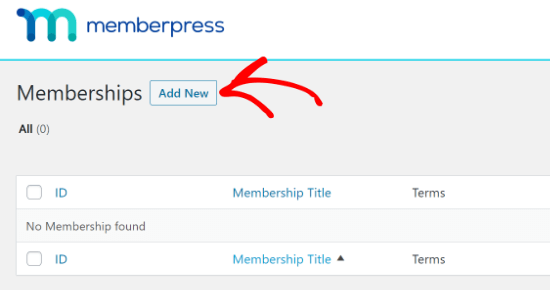
Step 10: Go to the WordPress Admin area and navigate to the MemberPress > Memberships, and click on the “Add New” button.
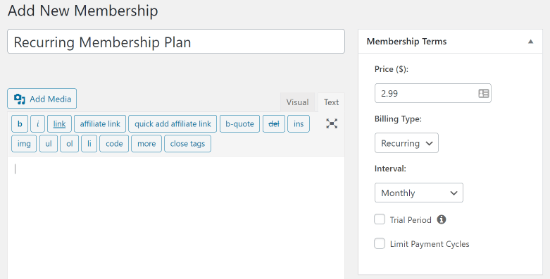
Go through the Membership terms. You can input the payment details for your membership subscription here. Enter a value under the price and then select ” Recurring” from the drop-down menu located under the Billing type.
Step 11: Set the interval for the recurring payment. Choose from the monthly, yearly, weekly, every 3 months, every 6 months option. Or you can set up a custom interval.
For a trial period offer, you can configure the settings by selecting the checkbox in front of the Trial Period option. You can also limit the payment cycles.
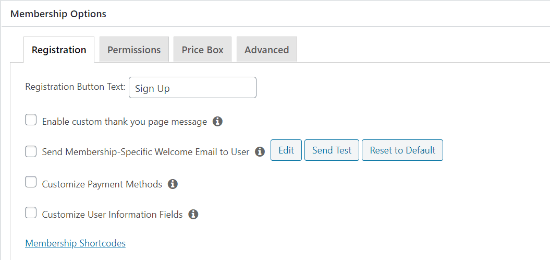
Step 12: Scroll down and enter the membership options in the meta box, located below the post editor. Choose the registration details, customize the permission settings for changing the details of the price in the box.
Step 13: After entering the details with your settings, click on the ” Publish” button. For creating more memberships, repeat the process.
Method 3. Opt for Using the Buy Now Plus for Recurring Payments
You can also use the method of using Buy Now Plus on your WordPress site to accept recurring payments. This is a free WordPress Plugin that lets you securely accept the payments without any need to purchase and install the SSL certificates.
It works with the Stripe Account and allows you to create the payment button for displaying anywhere on your website.
Step 1: Go to the Buy Now Plus website and click on the “Start Selling” button.
Step 2: Buy Now Plus is going to ask you to connect with the Stripe account. Get signed in with an existing account, or you can enter the details for creating a new one.
Step 3: Create a new payment button by clicking on the ” Add New” option.
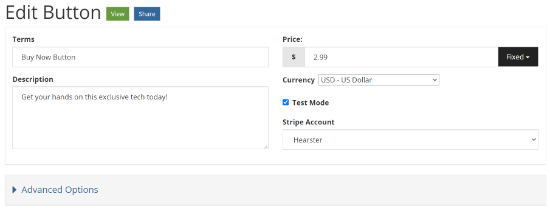
Step 4: Enter the product name in the Terms Field. Add a product description, price, and select the currency. Buy Now Plus is going to enable you for the Test Mode. You can remove the checkmark for publishing the payment button.
Step 5: Select the stripe account from the drop-down menu.
Step 6: Click on the Advanced Options for more settings.
Step 7: Specify the information that you need from your customers during the checkout. You can ask for the name, billing address, and shipping address to accept recurring payments in WordPress.
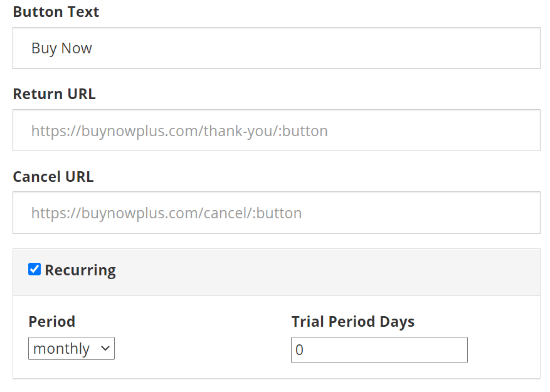
Step 8: Enter the button text that you want to display.
Step 9: For setting up the recurring payment, scroll down, and select the checkbox for recurring. Select the time interval and enter the trial period days.
Step 10: Once you are done, click on the “Create” button.
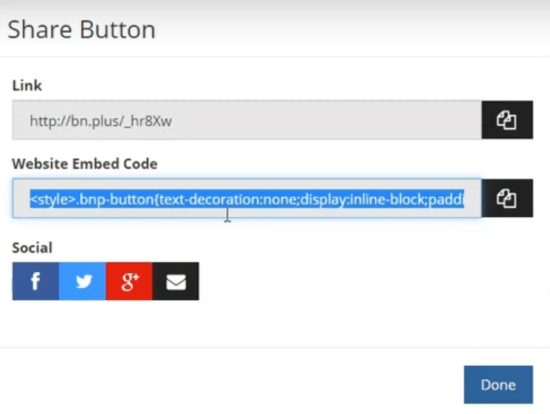
Step 11: You are going to redirect to the Buy Now Plus dashboard. Click the blue arrow button to share the newly created payment button. A popup window is going to appear, showing the 2 options to share the button.
In the first option, you can get the link of the button copied and share it as per your need. For the next option, you can copy the embed code and paste it to your website.
To use the Buy Now Plus button on WordPress, use the second alternative, and insert the code where you wish to display the buy now button.
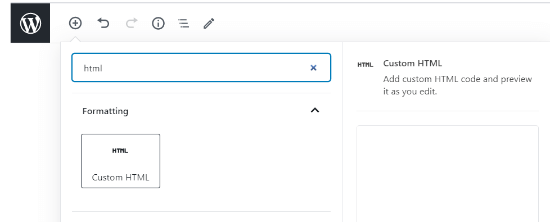
Step 12: Go to the WordPress admin area and navigate to the Posts> Add New and click on the “+” icon.
Step 13: Search the HTML and select the Custom HTML option.
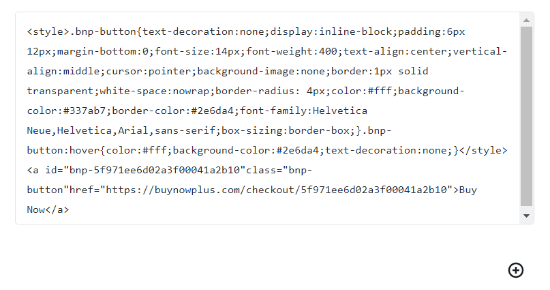
Step 14: Now, you can paste the embed code in the HTML field.
Step 15: Once you are done with your required settings, click on the “Publish” button. Your payment button is going to appear on the website.
Method 4. Accepting the Recurring Payments in WooCommerce
WooCommerce is one of the World’s largest eCommerce platforms. In case you have a WordPress website, then you can easily install and activate the WooCommerce plugin. Here is how you can accept recurring payments in WordPress.
Step 1: Go to the Bluehost Website and click on the ” Choose a plan” button.
Step 2: Pick a plan of your choice. You can go to the Starter plan or the plus plan. Insert the domain name for your WooCommerce store.
Step 3: Bluehost is going to ask you for the account information, package information, and it is going to offer the package extras that you can add.
If you want, you can leave the optional extras for now, as you can add them at a later stage.
Enter the payment information and agree to the terms of service, and click on the ” Submit” button at the bottom.
Step 4: After signing up to the Bluehost, you are going to receive an email that contains the details about how to login to the web hosting control panel.
Step 5: Log in to the cPanel, and you are going to see a popup message. Click on the ” log in to your site” button. It is going to take you to your WordPress admin area.
Step 6: Set up the recurring payments in WooCommerce to have a payment gateway. Stripe is the best solution for recurring payments.
Step 7: Download and install the free plugin of the WooCommerce Stripe Payment Gateway.
Step 8: Once you have activated the plugin, go to WooCommerce > Settings and click on the Payments tab.
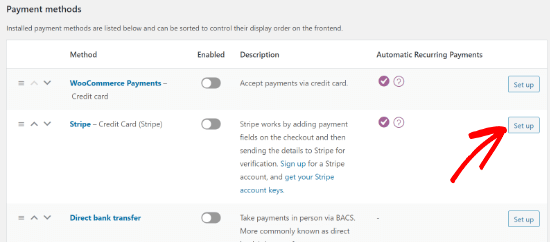
Step 9: Navigate to the Stripe credit Card option and click the “set up” button.
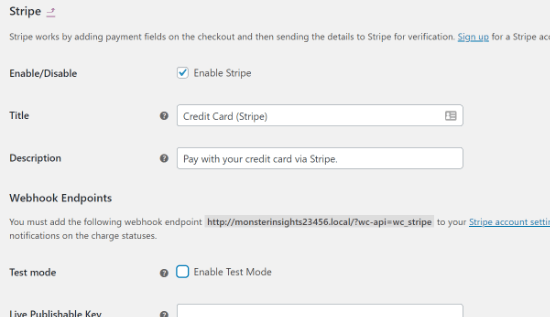
Step 10: Click on the checkbox ” Enable Stripe.” Ensure that you have unchecked the box for “Enable Test Mode” if you want to publish the payment gateway. Click on the ‘save changes’ button.
Step 11: You need to install and activate the extension of the WooCommerce subscription.
Step 12: After downloading and activating the extension, add the recurring payments to the new or existing products.
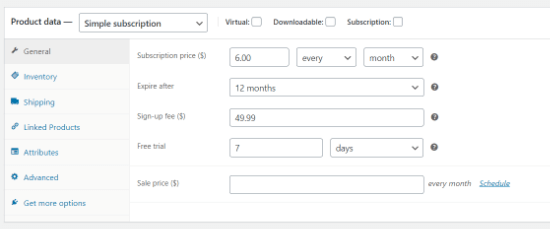
Step 13: Go to Products > Add New and navigate to the Product Data meta box. Select the: simple Subscription” from the drop-down menu.
Step 14: Enter the subscription price and the billing interval under the General tab. You can also select the sign-up fee, expiration period, and price options.
Step 15: Once you are done with the required settings, click on the ” Publish” button.
Method 5. WordPress PayPal – Easy Recurring PayPal Payments
PayPal is a good option if you intend to add a simple way of accepting the basic recurring payments. WordPress PayPal is thus another simple way to accept recurring payments on WordPress. Here is how you can do it:
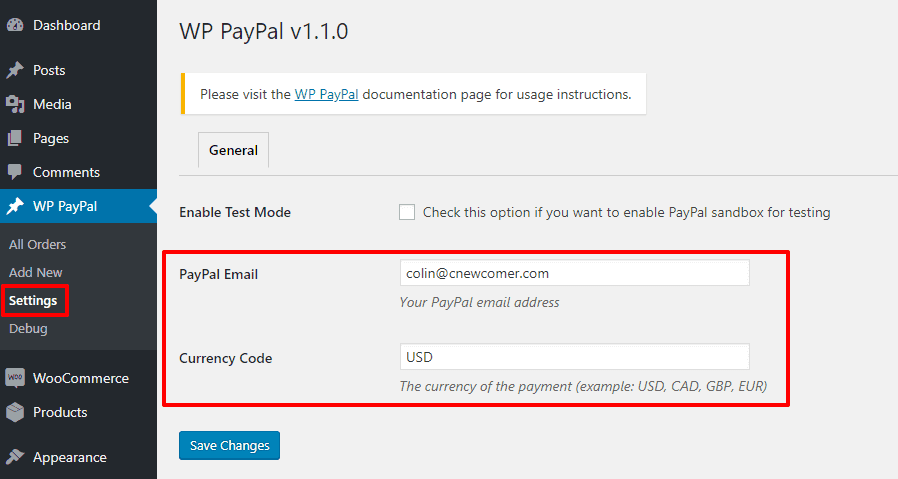
Step 1: Add your email address and the currency to the plugin settings place.
Step 2: Use the shortcodes to create a subscription button to activate the accept recurring payments in WordPress. Here’s an example of how the shortcode for a basic subscription payment looks like:
[wp_paypal button = “subscribe” name = “My product” amount = “1.00” recurrence = “1” period= “M” src= “1”]
Step 3: All the shortcodes come documented on the plugin page. Add the shortcode to the post or the page. And after that, the subscription button is going to appear.
Method 6. Easy Digital Downloads – Recurring Payments for WordPress Add-on
For having more control over your subscription payments in terms of the payment gateways or on the functionality, Easy Digital Downloads is a good option. With this recurring payment add on you can create digital products using the automatic recurring payments. Here is how to do:
Step 1: Choose from the various popular payment gateways, including PayPal, 2Checkout, Stripe, Auhorize.net.
Step 2: Integrate along with the several other Easy digital downloads, add ons for creating more subscription products in a customized way.
Step 3: Connect to the other types of plugins for creating the recurring payments, which includes the most popular membership plugins on the LMS plugin.
Which is the Best WordPress Recurring Payment plugin?
The best WordPress WordPress recurring payment plugin depends on the type of business needs that you want to fulfill. In case you want to accept recurring payments in WordPress in the simplest way with a full shopping cart plugin, then WPFroms can be a good option for you.
If you intend to sell subscription-based digital products, MemberPress is the apt solution. It allows you to accept recurring payments and comes with an online course realtor solution and many other membership features.
FAQs:
1. Does the recurring payment plugin go suitable with my WordPress site?
To know what kind of recurring payment plugin is suitable for your site, you need to consider the type of business that you are dealing with. Choose one that fulfills your business needs.
2. Does the recurring payment plugin for WordPress come for free?
Not all the plugins come for free. The majority of them come with a subscription plan that you need to opt for to access the features.
Conclusion:
Choosing the right kind of recurring payment plugin to your business adds more leverage and mobility to your business. It allows your users to have smooth times while opting for a payment using your site.
We hope this content was well-informative for you and going to help you to accept recurring payments in WordPress.

