Are you the one to have a WordPress site but do not know what is a Meta keyword or Meta descriptions?
Table of Contents
Well, in that case, this article will guide you in improving your SEO knowledge. Also, it will teach you how to add Meta keywords and descriptions for your website.
The main aim of adding keywords or Meta descriptions is to develop your optimized website for search engines.
What are keywords and Meta descriptions?
Meta keywords are HTML tags that developers traditionally used for Google to search your website. This process made the websites visible on Google’s search results. This takes place when its keywords matched the search words of the users.
The Meta keywords or Meta elements are visible to the search engines but not to the users. When you add Meta keywords, it suggests whether your website is relevant as per the user’s search. If it finds maximum visibility on the users’ searches, then it induces higher SEO ranks.
Meta descriptions are a 155 characters length snippet included within an HTML tag. It sums up the entire web content. To add Meta descriptions, you have to add the description within the phrase called ‘searched-for’. Then search engines show the Meta descriptions in search results.
Ways to add keywords and Meta descriptions
There are different ways to add keywords and descriptions to your websites. But before you know the ways to add them, you need to enable the functionality. You can do this through WordPress SEO plugins like Yoast or do it manually.
Manual method
Adding Meta keywords or Meta descriptions are important for your WordPress site. You can do it manually following these steps:
Step 1: Edit header.php file
i. This step does not require you to make changes to the core coding of WordPress. Head to the “Administrations”, then to “Settings” and finally reach “General”.
ii. You have to make changes in General.
iii. In case you want to include these attributes to the header file, access the header.php file in Wordpress using FTP.
iv. Alternatively, go to the “Appearances” tab, then to “Editor” and finally to “header.php”.
v. The header.php file open with the following code:
vi. You can edit this with a simple title within the title tags.
vii. In the next line, add Meta tags to add Meta Keywords and Meta descriptions.
viii. Add the following code for your search engine snippet:
In case, you want to add keywords,
Remember to keep the snippet within a length of 130 to 150 characters, the applicable range for Google. At any cost, avoid keyword stuffing and use keywords that are relevant to your content.
A reminder: Before you go to the next stage, keep backups of your core WordPress files with child theme.
Step 2: Add query for conditional tags
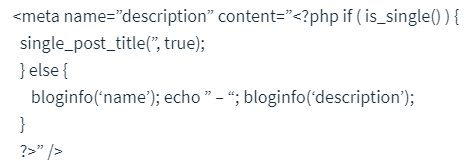
For changing keywords and Meta descriptions, the plugins are your best options. Nevertheless, this is possible with a conditional tag query:
This snippet is possible to show changes if your Wordpress settings work for viewing a single post. Otherwise, it will further roll back to the default settings.
A manual method is always possible and more specifically feasible for people who have technical knowhow. As these simple changes need a primary knowledge of coding, you can avoid this instead and look for plugins too.
Using Plugins
This is the easiest way to add Meta keywords or descriptions to your WordPress site. The WordPress SEO plugins called Yoast SEO to help you to easily add or edit keywords and descriptions for better search rankings.
Using the Yoast plugin, follow these steps:
Step 1: Installation and activation of plugins
i. Go to WordPress repository, go to Plugins and then to” Add New”.
ii. Here you have to search for “Yoast SEO”.
iii. Install and activate Yoast.
iv. Start configuring using the configuration wizard of Yoast SEO.
Step 2: Include your keywords
i. Click on Posts, then go to Posts, and select one of them.
ii. A box appears below the content on the bottom of your page.
iii. In the “Keyword” tab, place your focus keywords. Here Yoast makes suggestions even for H2 heading keywords.
iv. Use them to improve your site ranking.
Step 3: Include Meta descriptions
i. In the “Keyword” tab, preview the articles’ appearance.
ii. Edit the Meta descriptions for your page, here.
You can fetch useful features to explore your blogs with Yoast.
How will you benefit from having Meta keywords and Meta descriptions?
If your websites have focused on a particular keyword, Google finds synonyms of those words and make your site visible in the search results. This is where the real benefits of adding keywords lie.
Added to this, if you add Meta keywords such that some of its phrases match Meta descriptions, it increases chances of making your website visible on Google search results as well.
Even though search engines officially claim that, your met description has no direct benefits, as the ranking algorithms do not consider it. But indirectly, the CTRs of the Google users help increase the visibility of the websites.
If Google finds that people are viewing a particular website more often, then it considers your website having a good score. Then it eventually ranks your website up. As a result, when you add Meta keywords and Meta descriptions they stand so important for your websites.
The main objective of adding Meta descriptions is to let users click on your link when they are searching for something on Google. Thus, you can understand that these Meta descriptions render more click-through-rates or CTRs.
Wrap Up!
Defining your WordPress site with the right keywords and Meta descriptions is the key. It focuses on making your website more relevant and boosts your SEO performance.
So as you have seen above, you can simply add Meta keywords and Meta descriptions using WordPress plugins like Yoast or manually. This even goes for the home pages, which may be static, or the blog pages.


