Currently, WordPress is the most popular open-source Content Management System(CMS). About one-third of the world’s websites run on WordPress. You can do anything using WordPress, provided you have the proper knowledge.
Table of Contents
Social networking sites are extremely popular among netizens. It allows them to create their profiles, post pictures, message their friends, all from a single place. You can use the plugin BuddyPress to Create Social Network platform in WordPress.
Using the social networking platform, you can communicate with other users. You can also customize the network according to your needs.

Why Use BuddyPress
These are the reasons why you should set up a social network platform on your WordPress site:
- Social media helps you to capture more of your target audience.
- It gives the business a chance to be more productive.
- You can establish direct contact with the users, alerting them about new posts and events.
- The end-user can directly access your site and make it available offline.
- Social media helps you communicate with your audiences and learn about what they want. You can profit from this learning.
- Users will get notifications about your site, reminding them to check it out on a regular basis.
- Your users can now chat with each other, and add each other as friends. They can also create groups and subgroups to discuss their interests.
- You can now share custom feeds to users, based on what they like.
- Users can now create profiles for themselves.
Installing WordPress Theme
First, select a basic theme for your website. Got to Appearance->Themes and search for a theme, e.g. “Quest”. Click on Install. Once installed, click on Activate to activate the theme.
Installing the BuddyPress Plugin
Next, install BuddyPress to Create Social Network. Navigate to the WordPress Admin Panel. Go to Plugins->Add New. Search for BuddyPress and click on Install Now. After installation is complete, activate the plugin.
Configuring BuddyPress
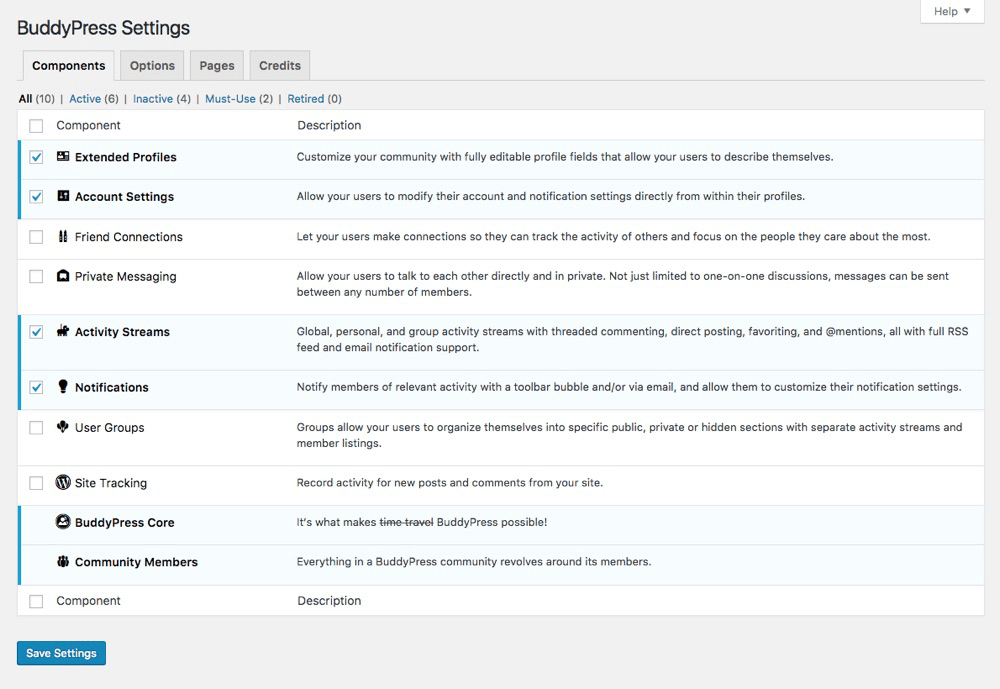
The settings for your BuddyPress plugin can be found under Settings->BuddyPress. There are one Credits tab and three other tabs through which you can configure BuddyPress to Create Social Network. These are:
1. Components:
This is where you decide what features to make available. These are:
- Extended Profiles: Enabling this allows you to customize your community with fully editable profile fields.
- Account Settings: Allows your users to modify the account and notification settings directly from their profile.
- Friend connections: When this is enabled, users can establish connections with other site users. They can also monitor each other’s activity.
- Private messaging: Allows users to talk to each other in private.
- Activity streams: Allows users to see the global, personal and group activities of their connections on social websites. These include threads, comments, mentions, and favoriting. Email notification support is also available.
- Notifications: Notify members of relevant activity via a toolbar bubble or email.
- User Groups: Allows users to organize groups into public, private and hidden.
- Site Tracking: By enabling this, you can record activities related to new posts and comments.
New menus may sometimes appear upon activating these components. These include:
- Activity: Here you can see what the author has been doing on the site.
- Groups: This allows users to create new subgroups and configuring each of them separately. You may also add a new logo or new users, and check the status of each group.
- Emails: Lets you create customized messages based on your social network activity.
New settings can be found under the User menu. These are:
- Manage Signups: Lets you register and approve new users. You need to enable “Anyone can register” in the Settings->General menu, to activate this.
- Profile Fields: This lets you decide which fields are available to the users when they create or update their profile.
- Site notices: Lets you set up a welcome message for users visiting your site.
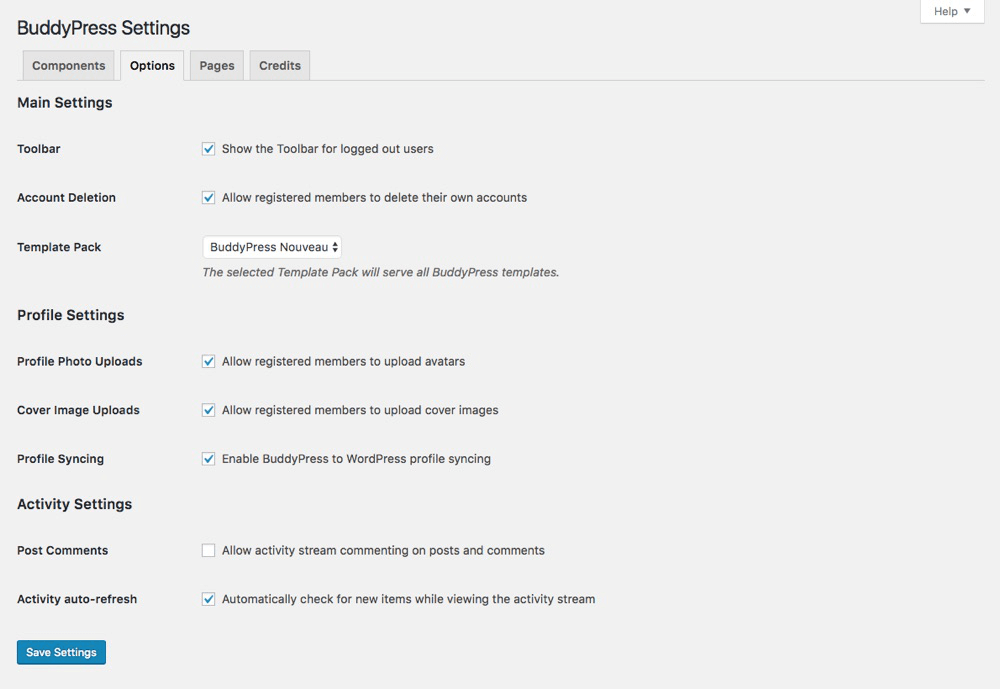
2. Options:
Using this tab, you can determine how much control users have on their profiles. It has four categories:
– Main Settings: Contains interface options. It also contains a checkbox that allows registered members to delete their own accounts.
– Profile settings: Allows users to upload cover pictures and avatars.
– Groups Settings: Allows users to create groups and upload photos to them.
– Activity Settings: Checking this allows for user disengagement within activity streams
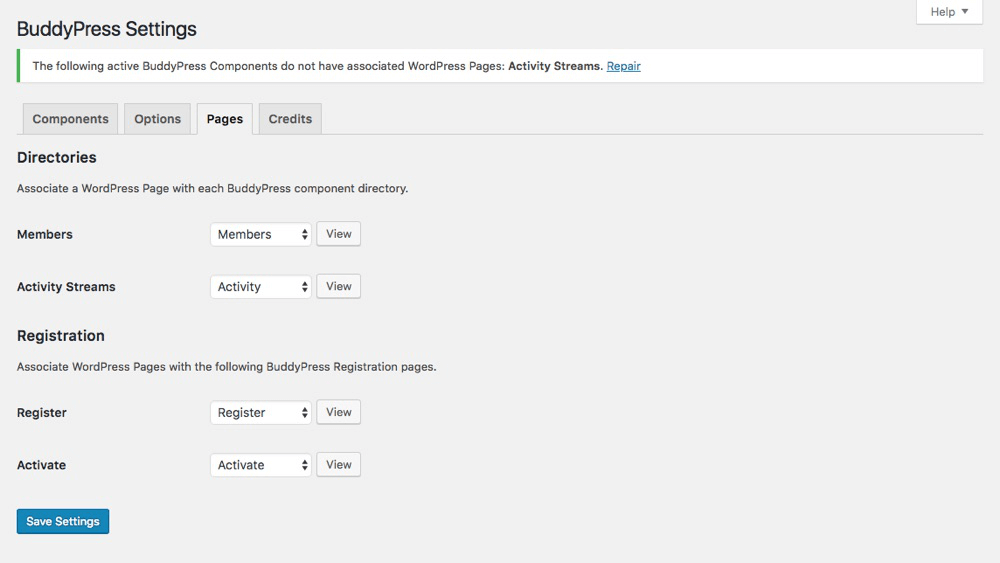
3. Pages:
Using this tab, you can assign pages for your social network. WordPress creates some pages for you by itself, which are Members, Activity Streams, User Groups, Registration, and Activation.
In order to create a custom page, go to Appearance->Menus. Search for the social network page you wish to add, click on the checkbox next to it, and then select Add to Menu. Click on Save Menu.
Using BuddyPress With the Theme
To ensure you are using BuddyPress to Create Social Network with the theme, navigate to Apperance->Menus. At the top right corner, click on Screen Options. Check whether BuddyPress is marked or not. If not, mark BuddyPress.
Creating a Menu for Nav Bar
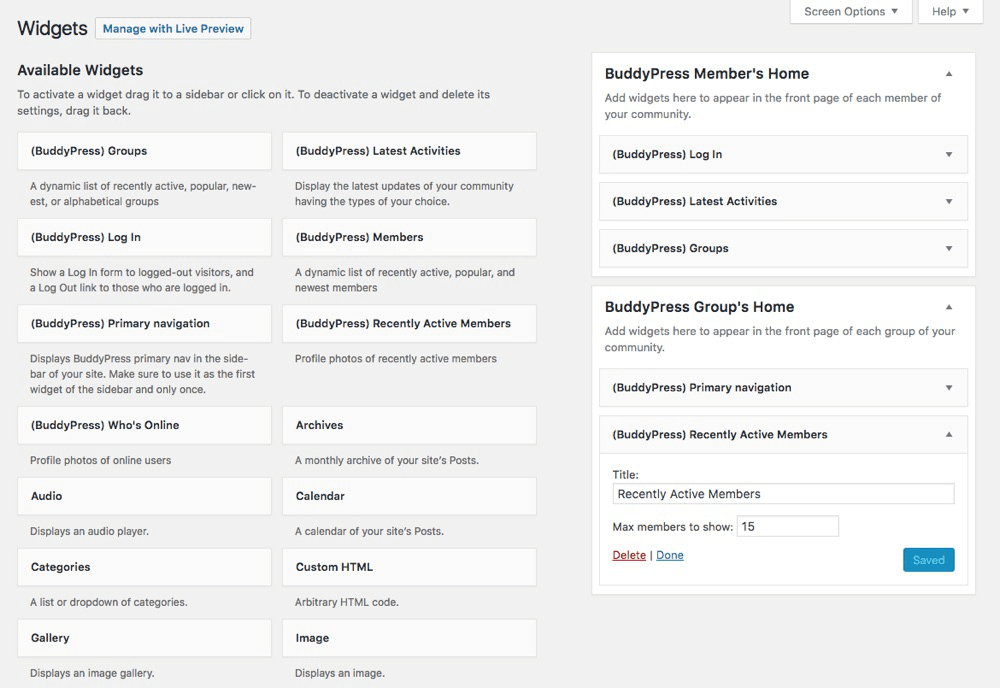
If a Menu Bar already exists, you need to delete it. To add a new menu bar, remove the default theme widgets and configure them. Add the Buddypress Widgets. The different BuddyPress widgets are:
- Login: This widget presents the BuddyPress login form in the sidebar.
- Latest Activities: This widget displays the latest trending activities.
- Members: This widget lists all the popular members.
- Recently Active Members: This widget displays the users who have been active recently.
- Who’s Online: This widget allows other users to view online members.
- Primary Navigation: This widget is situated at the top. It shows activities and mentions.
Enable Social Network User Registration
By default, WordPress disables website registration. You need to enable this manually. Go to Admin Dashboard->Settings->General. Then, enable the ‘Anyone can register’ option. Save your changes.
Setting Up the Front Page
When a user visits your website, the front page is the first page they see. Navigate to Settings->Reading. Select a Front Page from the dropdown. Save your changes.
This is how you can use BuddyPress to Create Social Network in WordPress.


