Jetpack is recognized as an all in one plugin which offers plenty of use cases along with this it consists of performance optimization feature, WordPress security, analytics, marketing tools and more.
Table of Contents
By Automattic, this plugin is maintained. Automattic has huge team which is responsible for handling some most well-known WordPress services and products such as WooCommerce and wordpress.com.
In the past few years, the jetpack plugin is considered a non-essential plugin as most of the sites do not require its features, especially the websites which are managed by Kinsta like WordPress hosts.
In this blog, we will learn about jetpack’s pros and cons and its extensive features to know whether those particular features are necessary for your WordPress website or not.
Steps to Install Jetpack
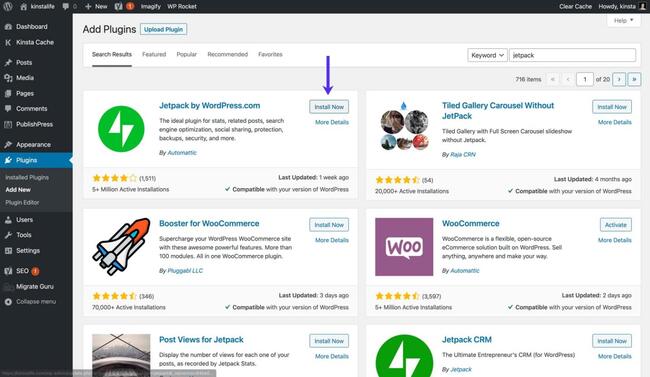
From the WordPress plugin repository, the Jetpack plugin can be installed directly. At present, this plugin has almost 5 million active installations and rated with 4 stars.
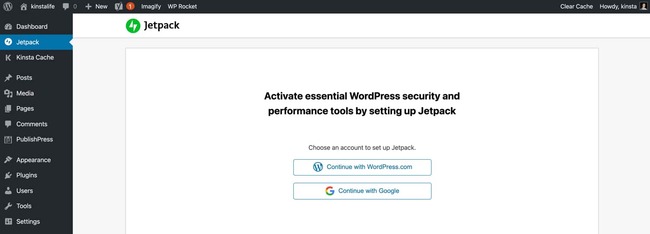
You can easily install and activate the jetpack plugin. After this, you will be asked to log in with a Google account or wordpress.com.
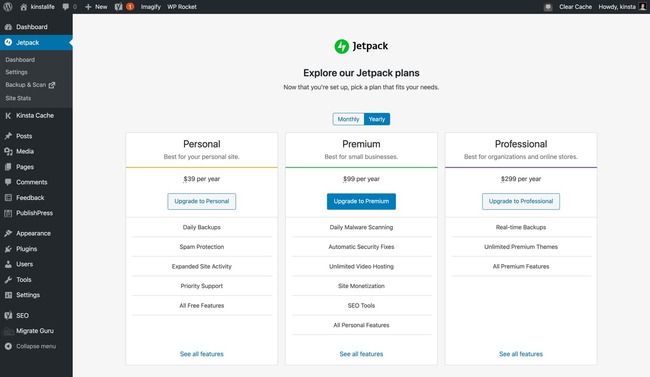
Once you have log in you will be asked to choose a plan from Jetpacks’ various plan tiers. The plans for Jetpacks will vary from $39 to $299 per year. Also, the option will be provided as a monthly subscription.
If you are willing to purchase a paid plan then do not think more and go with it. Else scroll the page down to the bottom and select the free plan.
Steps to Configure Jetpack settings
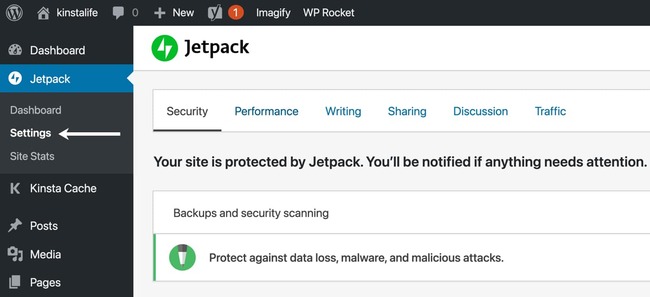
The three sidebar tabs are included in jetpack i.e. Settings, dashboard, and site stats.
Let see how Jetpack can be configured for your website. After this, we will learn about the dashboard and pages of site stats.
Performance – Speed optimization, search functionality, and media offloading
Sharing – Social sharing buttons and more
Security – Auto-updates, downtime monitoring, brute force protection, and more
Writing – Markdown, full-screen slideshows, LaTeX support and more.
Traffic – ShortLink generation, ads, related posts, sitemaps, and more
Discussion – Subscriptions, additional commenting functionality, and more.
Jetpack Security Settings
On your website, you will be able to add downtime monitoring, backups, security, and more with the help of Jetpack. Let’s check out the Jetpack setting for security and its features.
Security scanning and Backups (this is a paid feature)
This feature is only available for Jetpack’s paid users. It is essential to have a security strategy and backup for your WordPress website.
If you have chosen a host that does not offer security scanning and backups then you should choose the paid plan of Jetpacks as it provides the best solution.
But if you are a user of Kinsta and your website is hosted on it then we do not suggest you use this feature.
In the MyKinsta dashboard, the automatic daily backups can be restored at any time this is another feature provided.
To download the ZIP file we allow you to use the option i.e. downloadable backup which will contain all your database and WordPress files.
If you are an advanced user then you will get an option known as an external backup add-on which will help you to back up your website to Google cloud storage or an Amazon S3.
Our infrastructure and stopping attacks are constantly tracked on the security front by sysadmins before they occur.
While having your website on Kinsta if your website does not get hacked then our team will make it clean without letting you pay any amount.
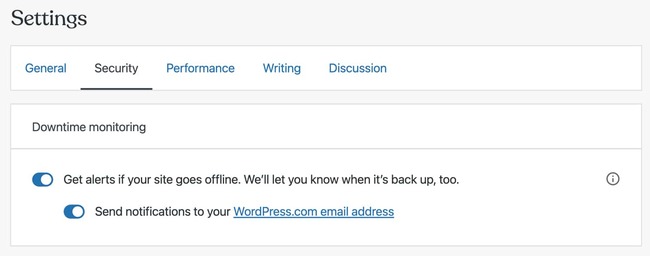
Downtime Monitoring
If you have a website with mission-critical then it is very important to have a strategy that is known as downtime monitoring.
In terms of notification configuration and monitoring the downtime monitoring feature of the Jetpack is not very customizable. At such time, Jetpack will only help you by sending notifications to the email address of wordpress.com.
No phone call support, no slack, and no SMS support.
For your WordPress website if you are looking for a downtime monitoring solution then we suggest you check for the more particular built service such as Pingdom and Uptime Robot.
Auto Update plugins
At very first this feature will seem like a big timesaver, but we actually do not suggest you get automatic updates for plugins. For some years we have found that the automatic plugin update actually creates PHP code conflicts and 500 errors.
We always suggest you test the plugin first by utilizing the staging environment feature. Does not matter if you are a multinational brand or a personal blogger you should always check for the plugins.
This will help you to get more productive results and ensure that you have chosen the right path or a plugin to go with.
Before getting into any plugin update some of the plugin developers do some extensive testing. For every single WordPress configuration, it is impossible to account.
However, it is up to you whether you want to check the update double to ensure whether it is completely compatible or not. This is the reason we do not suggest you go with automatic plugin updates features for your website which is provided by Kinsta.
Protection against Brute force attack
In the world, WordPress is the most well-known CMS and for hackers and some malicious actors, this becomes the prime target. For WordPress endpoint’s such as xmlrpc.php and /wp-login.php, this becomes more common to get attacked by such designed bots to brute force. This attacks login credentials.
To enhance the security on your WordPress website it is very important to add brute force protection, establishing it on webserver level or DNS is preferable at the application level to brute force protection.
To protect your website from some common WordPress endpoints at Kinsta, some specially designed Nginx configurations are provided to save from brute force attacks. From brute-forcing, we also protect SFTP and SSH.
If brute force protection is not provided by your host then we suggest you improve or enhance your website security with Cloudflare and for your login URL, adding rate limits.
WordPress.com Login
To login to your WordPress website with wordpress.com login detail, this provides you an option. But we do not suggest you choose or enable this feature because it does not add any other attack vector or convenience to your website.
If you are trying to configure the Jetpack plugin that means you have a login already. Considering this point it seems like it does not need any plugin to be get added for doing the same thing. Rather than this, we would recommend you to add wordpess.com as a login option.
With the default method i.e. integrating two-factor authentication and changing your WordPress login URL we did recommend you to stick to the default method this will enhance the security.
Performance settings of jetpack
In 2022, to enhance the user experience and SEO, you need to make sure that your WordPress website is loading faster. New features like image optimization, search optimization, video hosting, CDN, and other performance-oriented options are provided by CDN.
Let’s check out the Jetpack settings for performance.
Speed and performance
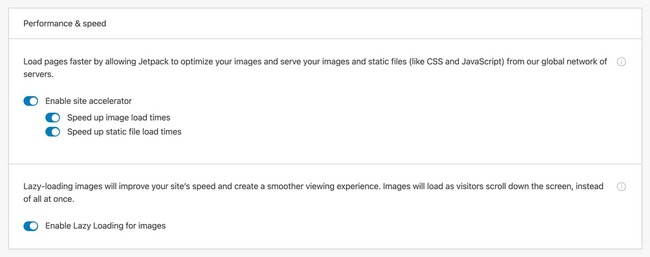
The static file and speeds-up images of Jetpack’s “site accelerator” load times. Based on the IMG tag’s width and the attributes of height the image optimization feature image resizes. It also converts and compresses images to WEBP format for browsers supported.
On Jetpack’s CDN, a specific JavaScript and CSS files are cached by the static file optimization feature. At such time, in WordPress core, WooCommerce and Jetpack, the jetpack will only cache the static files.
It does not provide CSS files and JavaScript from other WordPress themes and plugins.
Actually the main reason that why we do not suggest you to use jetpack’s site accelerator feature because this is not the good option for enhancing the speed of your WordPress website. The image optimization feature will not permit you to perform customization. As well as also support the cache invalidation.
From the cache, if you are looking to clear the image, then you will need to manually reach jetpack support. Some other solution for CDN such as Kinsta CDN permits you to get your CDN cache in their related dashboard.
We suggest you use the Autoptimize plugin instead of using static file optimization in jetpack for minifying assets before getting them served over Kinsta CDN or other full-featured CDN.
For images, lazy loading is supported by Jetpack. To increase the speed of your pages and get all visual content to load quickly then it is better to use Jetpack.
Video Hosting (for paid users)
A paid video hosting service are provided by Jetpack. This feature will allow you to host video files on the server of jetpack for embedding on your website. There are some advantages of this type of service because it helps you to serve video files to your users directly from your host.
The very first thing is that, a huge bandwidth is consumed by the videos, and most of the host has similar sort of bandwidth limit.
And the second thing is that, all across the world, dedicated video services will stream with distributed data centers more reliably. You should check out the Jetpacks solution if you are looking to self-host a lot of visual content on your WordPress website.
Writing settings of Jetpack
Another JetPack settings is provided for mainly content creators and bloggers. It offers some most useful tools such as Full-screen image carousels, markdown support, LaTeX support, and so on. Let check out them one by one.
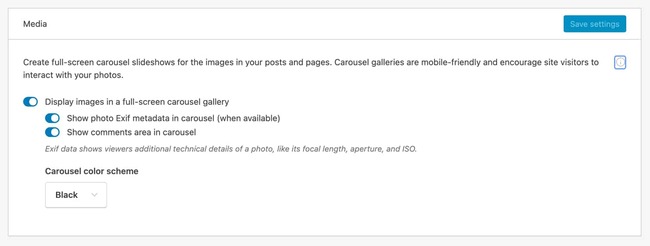
Full-Screen Carousel Slideshows
On your WordPress website sometimes you need to embed so many images especially if you are a travel blogger or a photographer. You can enhance the user experience for the visitors of your website by adding the full-screen carousel.
This will support image galleries. Using Jetpack you can also add another functionality known as full screen carousel slideshow to your WordPress galleries standard without touching any line of code.
You just need to enable “display images in full-screen carousel gallery’ to make use of full-screen carousel slideshows of Jetpacks.
To showcase EXIF metadata you will also find the option. As well as you find an option for comments for the carousel slideshow.
After this you will also have option to select whether you want a dark or a light theme for your carousel.
By clicking on standard gallery with the full screen carousel, it will launch a beautiful slideshow view.
The carousel will look best on mobile devices and tables because it is fully responsive in nature.
Composing
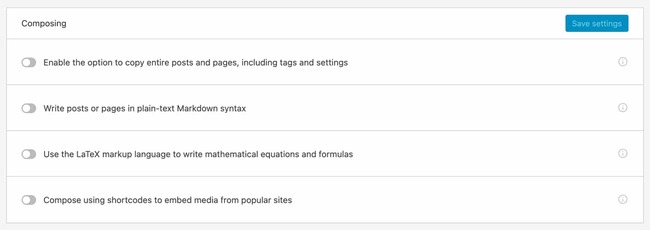
A few features are included in Jetpack settings to improve the content and writing management in WordPress.
- Copy pages and posts –
- Markdown support –
- LaTeX support –
If your main task is to create new pages and posts base on a single template then this feature is worthy for you.
For writing content destined on web, this syntax format is designed. From all around the world, millions of people use this syntax. But unfortunately, the WordPress does not give first-class support for it. But fortunately, the new release of WordPress i.e. Gutenberg editor provides a support for it.
So if you are using the Gutenberg editor then you do need to activate this feature. And it is recommended to enable this option if you are still user of classic editor to write markdown.
For writing mathematical text and equations this markup language is used. People who write in LaTeX will find this feature most helpful.
Using Shortcodes compose
You will be able to use shortcodes if you enable this feature.
This will help you to embed content from different services such as Hulu, Flickr, Scribd, Instagram, and so on but if you are utilizing the features of Gutenberg editor then you do not need to enable this feature because Gutenberg editor offers this feature by default.
Custom Content Types
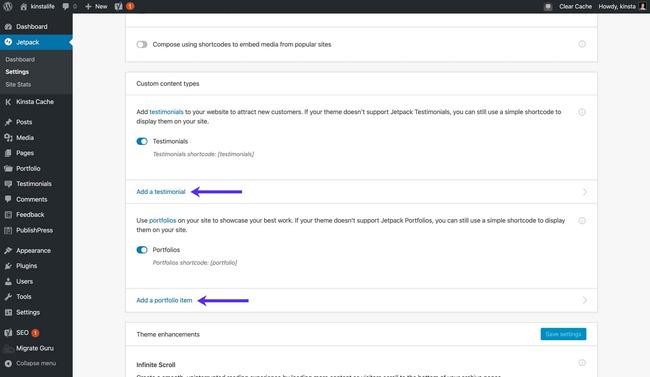
To your WordPress website, you can easily add two custom content types because of Jetpack. Custom content types like tutorials and testimonials. Considering your specific business needs and the theme you choose this feature can be worthy.
In Jetpack settings or testimonials and portfolio tabs in sidebar, you can add portfolio and testimonial items with this feature enabled.
If custom content types are not support by your theme, then you can make a use of shortcodes such as [testimonials] and [portfolio] to showcase the content.
Theme improvement
To your website, you can add two theme enhancements if you use Jetpack. An enhancement like CSS customization panel and infinite scroll.
Your WordPress site’s pagination will be replaced by an infinite scroll with an AJAX-based loader. This will fetch new posts automatically without getting the load to the next page.
Three options are provided by Jetpack for its unlimited scroll feature
- The use of default theme behavior, load more posts.
- As the reader scrolls down, load more posts.
- With a button, load more posts on pages.
Using jetpack settings can be an easy option to add unlimited scrolling to your website.
But member the point that if you have selected the third options then for visitors it might get difficult to click on content or a link in your website’s footer area. On WordPress websites, this is the most common problem that uses infinite scrolling.
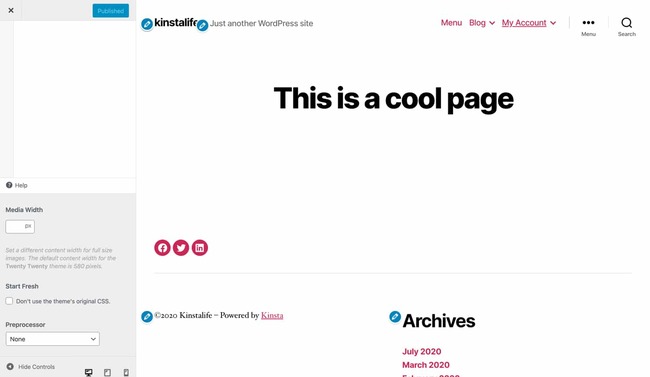
A new feature will be added additionally to your WordPress CSS editor if you enable the “enhance CSS customization panel”. You can use those features by going to appearance then click on customize and then on additional CSS.
- Start Fresh –
- Preprocessor-
By using this option your default theme’s CSS styles will be stripes completely. If you are looking to recreate CSS from scratch then this feature is more useful as it will help to recreate without overriding existing styles. To minimize the CSS bloat, this feature will seem to be helpful as well.
The Sass and LESS (SCSS syntax) are supported by the enhanced CSS editor. For people who choose to write styles in Sass or LESS, this option is useful. Plus it will seem to be helpful for offloading CSS conversion to the preprocessor.
Widgets
To customize the widgets on your website, you will find “widgets” in Jetpack settings you will find a lot of options.
For some extra widgets, it adds support including top posts, social icons, pages, top posts, Twitter timeline, and more.
On a per post or page basis, edit the widget visibility.
The above two features will be used for widget customization, by considering the configuration Jetpack settings of your WordPress website.
Consider an example if your blog is covering both photography and technology, then to get visible on your photography related posts you can set Flickr widgets on it.
Related Post: How to Add Social Media Icons Widget With Jetpack?
Post by Email
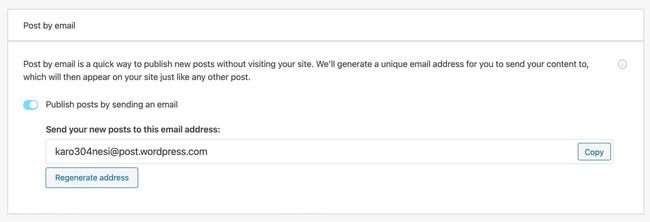
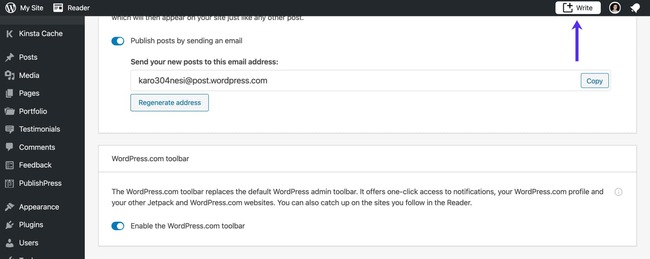
You can publish new posts via email if you use this jetpack feature. After enabling it, this feature will also give you an email address that is unique to send posts to.
So many shortcodes are available there such as [slug some-url-name] and [category x,y,z] for indicating the post metadata.
For some bloggers, email publishing can be useful. But over we don’t thing that it will give you the best experience. For instance, if you want to use email publishing, you need to ensure that formatting is just put in right.
Along with this you also need to make sure that format shortcodes have been made accurately. You might be able to use web browser to publish content in dashboard of the WordPress if you are face a scenario where your clients have given their email access to you.
Instead of email publishing, you can use the WordPress app if you want to publish on mobile devices for your WordPress users.
WordPress.com Toolbar
With your WordPress.com styled you can swap your WordPress toolbar. This is another feature provided by Jetpack. The toolbar of wordpess.com is included with links to which are actually LinkedIn with notifications, account, and wordpress.com profile of jetpack.
To begin with a new post you need to click on “write” in wordpress.com toolbar. Instead of the default editor, it will launch official wordpress.com.
This editor is actually an updated version of Gutenberg editor. It gives so many outstanding features including prebuild blocks for easy customization of pages and posts.
Sharing
With so many social related features the Jetpack is packed. This feature will help you to connect with your visitors easily. Let us learn more about its features
Publicize connections
You will be able to link your WordPress website with linked In, Facebook, Twitter, and other social media with the help of Jetpack’s “publicize connections’ feature.
As soon as you enable this feature, a newly published post will be shared on social platforms that you have connected on your WordPress website.
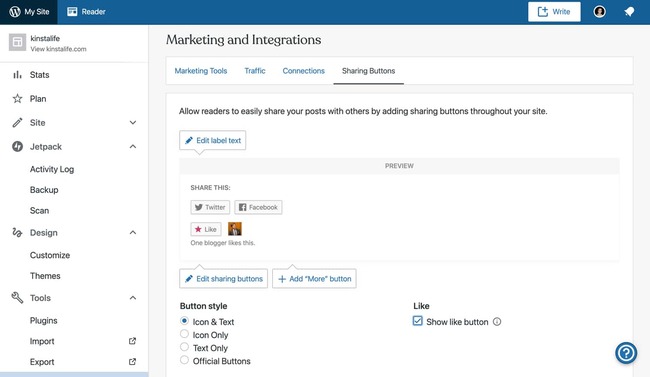
Like buttons & sharing buttons
You will be able to modify the social sharing button to pages and posts of your website. Moreover you will be able to customize its look. Also, you will be able to indicate the content types that you are looking to showcase.
Similar to the sharing button explained above, the like button will help you to add “like” button on your WordPress posts at the end.
Discussion
You can enhance the WordPress’s premade commenting system’s feature by enabling the jetpack’s discussion.
Let learn more about it
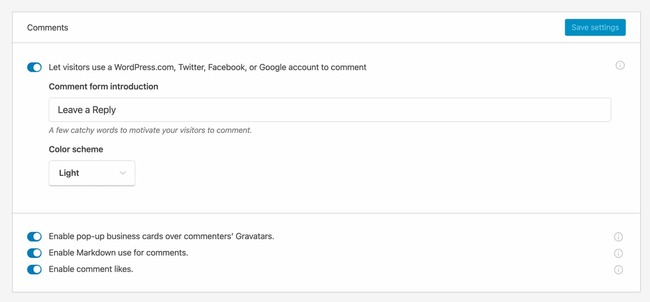
Comments
You can easily add authentication methods in comments section for commenting. Also, you can easily modify the color scheme and “comment form introduction” of the form.
Some other Jetpack settings in this session are markdown support, popup business cards, and comment likes.
In terms of engagement and login method features, the default commenting system of WordPress has limited. On your blog if you are getting plenty of comments, then to enhance the user experience you need to enable jetpack’s comments related feature.
Subscription
Simplest way will be provided to add comments and site subscription by this feature provide by Jetpacks for your WordPress website.
The two extra checkboxes will be visible, along with the comment subscriptions enabled just below the comment form. This will permit your visitors to subscribe to new comments via emails or on your website.
Traffic
You can configure plenty of Jetpack settings for Traffic if you have enabled the jetpacks traffic tab. Settings like ads, Shortlinks, sitemaps, related posts, and more will be included.
Ads (for paid user only)
You can activate the display ads on your website if you are on the JetPack premium plan.
This feature is introduced by WordAds which is a WordPress-specific ad program. This pro-am is responsible of connecting your website with other advertisers including Amazon, Google AdSense, AppNexus, and more.
As per the WordAds, for placement, the advertisers bid aggressively because on WordAds it showcase the ads which reaches more than 1 billion people each month.
If you are a subscriber of jetpack premium plan and looking to incorporate display ads on your WordPress website then it is good option to enable the WordAds in Jetpack.
With some other ad network such as Mediavine, Google AdSense and AdThrive you can test your website and comparing the RPM.
Related posts
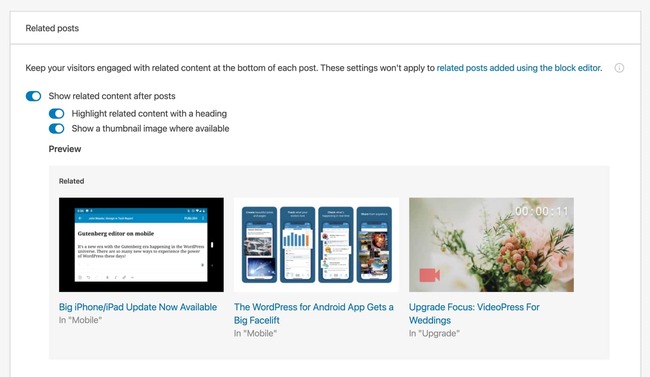
Jetpack’s “related posts” feature can be used to add related posts widgets to each post’s bottom. You will be able to add related content header with few customization options.
Also, you will be able to add thumbnail images for single posts.
In customize > related posts, you will be able to find some of the options. You will be able to modify the switch between grid layouts and list in the menu. Now select whether to display the tag, date, or category of the posts.
If you want a simple way to display the related content, then the feature of jetpack can make this task easier. In terms of customizability, this is not actually a complete feature as YARPP. But it can benefit some of use cases.
Search Engine Optimization (for paid users only)
For the paid users, the jetpack has premade SEO support. You can start editing the SEO title, descriptions and much more by enabling it. And this can be done easily in WordPress editor.
We suggest you to install the third party plugin for SEO, if you have Paid Jetpack plan. To enhance the WordPress SEO, some of the best plugins are Yoast SEO and RankMath.
Google Analytics (for paid users only)
To add a Google Analytics tracking code you can use Jetpack to your WordPress website but only if you are the jetpack’s paid users. The task of adding GA tracking code is simple and convenient in jetpack but we still suggest you use Site Kit by Google.
This will help you to add Google analytics on your website. Along with this, you can add Google AdSense and Google search console in a single plugin.
Some features included in Jetpack are WP.me Shortlinks, Sitemaps, Site verification, and much more
Conclusion:
Jetpack is considered as all in one plugin that comes with a variety of features. In comparison to the purpose build plugin, the jetpack plugin falls short even if it is capable of doing plenty of things.
But as per your site’s requirement, you can enable Jetpack. And while enabling the Jetpack we would recommend you to only enable the features which are highlighted in this blog for your convenience.

