WordPress Yoast SEO Plugin
In this article, our main focus will be on WordPress Yoast SEO plugin and all the advantages it has to offer you.
Table of Contents
We’ll also highlight the steps you need to undertake in order to install, activate and configure it properly and without hiring developers to do it.
The role of search engine optimization of any website or blog can never be underrated.
From a calculation viewpoint, the basic aim of any website is to become visible for the target market.
Well, in this relation, search engine optimization is the key to boosting your inline presence and visitor engagement.
Hence, with this productive relationship between SEO and your digital presence, many WordPress themes and templates are well optimized for search engine rankings to get quantifiable results.
However, it’s not always satisfactory for your profile to get the maximum exposure in the digital platform you want.
This is where practical SEO plugins come into play. If you want your website to obtain higher rankings, be Google friendly and receive more web traffic, the WordPress Yoast SEO plugin is what you are looking for. This plugin is the daddy of all WP SEO plugins for now.
With millions of downloads and thousands of users, it is by far one of the top-rated SEO plugins you can add to your website and highly benefit from it.
Although there is a slice of a learning curve with this powerful plugin and you will need to familiarize with nuts and buts of it, we have done our best to make things as simple as possible in this article.
WordPress SEO plugin Yoast is available both in free and premium versions. There are also extensions to this plugin, like Yoast Local SEO, Yoast News SEO, and Yoast Video SEO.
Now, let’s see where to start from in order to have WordPress Yoast SEO plugin properly installed and running on your site.
What is the WordPress Yoast SEO Plugin?
The Yoast SEO plugin is one of the most popular tools for optimizing websites on WordPress. It provides features like meta title and description editing, readability analysis, focus keyphrase optimization, XML sitemaps, and social media integration. Whether you’re a blogger or a business owner, this plugin helps you create content that both users and search engines love.
Steps to Install, Activate, and Configure the WordPress Yoast SEO Plugin
-
Installing and Activating the Plugin
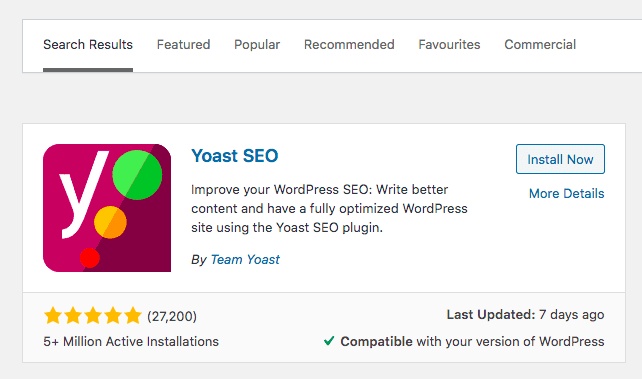
- Go to your WordPress Dashboard and navigate to Plugins > Add New.
- Search for “Yoast SEO” in the search bar, click Install Now, and then activate the plugin.
- Once activated, the SEO menu item will appear in the dashboard.
-
General Configuration Overview
- The plugin offers a range of features and configuration options. Below, we’ll guide you through the essential settings to help you get started.
-
Accessing General Settings
- Click the SEO tab in the menu to access the general settings page.
- In the General tab, you’ll find a configuration wizard. You can skip this as we’ll cover the key options in detail.
-
Features Tab
- Enable advanced settings in the Features tab. Activating these will add new menu options under the SEO tab, such as Titles & Metas, Social, and Advanced.
-
Your Info Tab
- In the Your Info tab, enter your website name and an alternative name for indexing purposes.
-
Webmaster Tools
- Use the Webmaster Tools section to link your site with search engines and view essential insights.
-
Security Tab
- The Security tab includes advanced settings for the Yoast SEO meta box. It’s recommended to leave this as is.
-
Titles & Metas
- In the General section, choose a title separator (e.g., a dash or pipe). Enable Readability Analysis and Keyword Analysis for better SEO suggestions.
- Fill in templates for your Title (e.g., “Hotel Name, London, UK”) and Meta Description (ensure it’s concise and under 156 characters).
- In the Post Types section, set individual titles and meta descriptions for posts, pages, and custom post types for better SEO results.
-
Taxonomies and Archives
- Minimal configuration is needed for Taxonomies.
- In Archives, disable Author Archives if you are the sole author of your site.
-
Social Settings
- Use the Social section to integrate your site with platforms like Facebook, Twitter, Pinterest, and Google+.
- Add your social profiles under Accounts and enable Open Graph Meta Data in the Facebook tab.
- In the Twitter tab, enable Twitter Cards and set a default card type.
-
XML Sitemaps
- Ensure XML Sitemap functionality is enabled in the General section.
- Use the User Sitemap to disable unnecessary user sitemaps.
- Adjust Post Types and Taxonomies to exclude specific content from sitemaps.
- Under Excluded Posts, select posts or pages you want to omit from the sitemap.
-
Advanced Settings
- In the Advanced section, enable Breadcrumbs for improved site navigation.
- In Permalinks, clean up URLs by removing the category base or stripping stop words. Redirect attachment URLs to their parent post for better SEO.
- Use the RSS section to include links back to your content when it’s shared on other sites.
Conclusion
The WordPress Yoast SEO Plugin is an invaluable tool for anyone looking to improve their website’s visibility. By following best practices and leveraging its features effectively, you can create content that ranks higher in search results while providing value to your audience. Start optimizing today and watch your traffic grow!
![]() Sonl Sinha is a passionate writer as well as WordPress and WooCommerce rockstar who loves to share insights on various topics through his engaging blog posts. He runs a successful website design and digital marketing company. With 15+ years of experience in WordPress theme development, he strives to inform and inspire readers with his thought-provoking content. He helps thousands of small and medium businesses and startups create a unique online presence. Follow Sonl Sinha for your regular dose of knowledge and inspiration.
Sonl Sinha is a passionate writer as well as WordPress and WooCommerce rockstar who loves to share insights on various topics through his engaging blog posts. He runs a successful website design and digital marketing company. With 15+ years of experience in WordPress theme development, he strives to inform and inspire readers with his thought-provoking content. He helps thousands of small and medium businesses and startups create a unique online presence. Follow Sonl Sinha for your regular dose of knowledge and inspiration.
Do check out our free WP themes and WordPress themes bundle