Create a Dropbox Upload Form
Are you interested to create a dropbox upload form in WordPress? Have you listen about this term from one of your friends and want to use this for your blog too? If yes, then it’s time to roll on this blog. We will show you here how you can use and take the benefit of the dropbox form.
Table of Contents
So, are you ready?
Let us start with first what Dropbox upload form is.
As compared to the previous time, it’s extremely hard to manage too many attachments files in the cloud. If your site is getting this or your site is all about forms then the Dropbox form can be the best option. This is a simple yet easy method to manage whole files in the cloud.
Maybe you are wondering now, why you get too many attachments. This has been introduced for the websites who collect the online form, submissions, entries, CVS, and many more.
For example, if your site is just like Indeed.com, the purpose is collecting CVs and other credentials or sometimes work samples.
Moreover, the customer review page requires to send their images whereas the photo contest site or voting sites require documents and pictures both.
So, when your site receives maximum numbers it becomes difficult for you to manage, but with dropbox your files get safe under the wp-content folder via the cloud.
If you are creating such kind or website or expecting your customers going to increase the near future then it is a must to add.
In case if you are receiving those entries which are not connected with your site, it is better to save all those files in separate storage.
Advantages of Dropbox Upload Form
When your files uploaded on Dropbox you may receive the following advantages:
- This will keep your documents separate and safe in WordPress files.
- With this, your work will be easier so you can access your website comfortably.
- You can browse, navigate, and manage the content, files, etc. in the dropbox dashboard.
- You can easily manage the content as in downloaded files, archive, and delete them.
As you can see, your work is going to easy. So now your job is to how to create and upload files on dropbox.
How to create Dropbox Upload form in WordPress
If you are ready to create a dropbox form then first you will need to activate the smart plugin named WPForms plugin. To install the plugin, go to settings then install and activate.
WPForms is the best plugin made by the WPBeginner and you have to activate the pro feature if you need its great features like Zapier addon. So here we are going to share its tutorial with you.
After the activation of WPForms, click on add new page from the admin area. The next you will reach to WPForms builder page that simply provides you the name and select a simple contact form for your start-up.
With this, WPForms load the templates which commonly used in fields. Now, you have to do is select any field from the file that you would like to edit. Or also you can drag the fields into the form. Then click on the File Upload button, which is located near the Fancy field’s option from the left side.
After done with this, it will create a file upload section in your form that will make it easier for users to add the files. So, after done with all steps click on the save button to save all the settings.
How to integrate Zapier with WPForms
As I said, Zapier is an advanced feature of WPForms. To integrate Zapier we are going to share some steps with you.
This app will help you to connect with form without nay playing with codes. This plugin can ease your load and build a strong connection with WPForms and Dropbox.
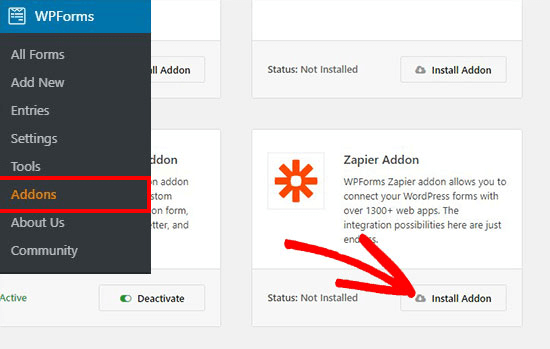
Well, WPForms comes with Zapier Addon which can easily integrate 1500 popular apps. To add this addon in your WordPress follow the given steps:
1. Go to WPForms then Addons page.
2. Select the Zapier addon and install it. When you start its installation, it will take only a few minutes to activate.
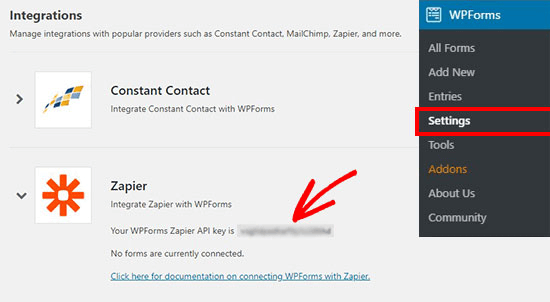
3. Once the installation completes, you will get the Zapier API key which you need to copy and use it further to connect with Zapier for a long time or it pro version.
4. After copying the key, you should visit the Zapier website and login to the Zapier account. Here you will need to click on Make a Zap button.
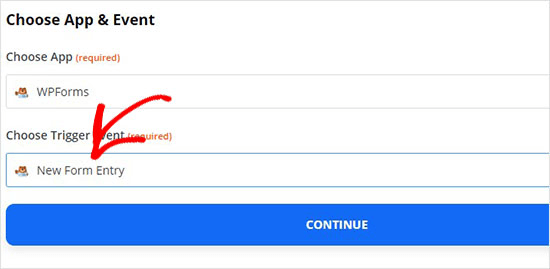
5. In this, you will find many apps so search for WPForms and click on this app for launch.
6. Now, select the NEW FORM ENTRY Option to trigger the WPFORMS app. This will help to trigger form submission.
7. The next step to sign in to WPFORMS and connect the Zapier with WordPress Form plugin in your WordPress site.
8. Make sure you have copied the API key of Zapier and URL to connect it with a WordPress site.
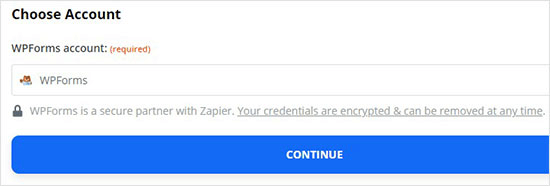
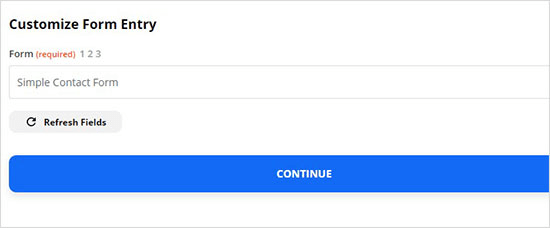
9. After this, it will show you the WPForms account and then continue.
10. And next from the dropdown box, choose the upload file option to sad form.
11. Click on the continue button.
Test Zapier file
When you are done with the previous test, it will ask you to test the file upload in Zapier to analyze the settings are working correctly.
Next, you will need to visit WPFORMS then choose all form options here to see the preview of the form. You can use the Zapier account and click on the test button. Once the test will be successful, move to the next stage.
Connect WPForms with Dropbox
Visit the Dropbox account and create a new upload folder. Give it any name and your files will attach with this folder automatically. Go back to Zapier account and from the Do this section chooses Dropbox.
This will ask you to create action, so select the upload file option and click on continue. Now sign in to dropbox and connect it with Zapier. After this, it will ask you two questions choose the file uploaded and continue.
Connect WPForms with WordPress
Go to any page that you want to edit then add WPForms with content and choose the form which you have created. This will give you a preview of the content. Now do the test to see the action of WPForms by entering the information.
Congratulations! You have successfully completed Dropbox Upload Form task.

