If you are looking forward to embedding Google maps with your WordPress site, then you are in the right place.
Table of Contents
As known about WordPress, sites developed using this software provides loads of opportunities to embed Google Maps. Likewise, with flexibility being the chief characteristics of WordPress, you can simply add the maps using plugins or manually.
Adding Google Maps to your site can be of great help to your users and facilitate a better business opportunity for you. A prospective customer can probably locate your business; provide them with loads of information and easily communicate with you.
Such essential factors make adding Google Maps to your site a necessity. However, some things can keep you worried. This means, you will be successful with inserting Google Maps to your WordPress site, if only you know the correct way.
Using plugins is the easiest and quickest way to lodge the maps. In case, you are a pro at technical know how, nothing can stop you from trying out the manual way. So, have a look at the detailed steps to embed Google Maps in WordPress.
Some noteworthy plugins for embedding Google Maps with WordPress sites
By far, many plugins allow embedding Google Maps using popular plugins. Most of the free versions of these plugins provide useful functionalities. Whereas the pro versions also come with attractive features and you can choose from some of them as:
MapSVG
MapSVG is a WordPress map plugin and content manager. With it, you can create custom content and show it on a vector, image or Google maps.
Use it to extend the Google Maps functionality with its powerful features. You can also combine vector maps with Google Maps and change the default Google Maps look by importing thousands of map styles from SnazzyMaps into this WordPress map plugin to create amazing maps for your visitors.
Take advantage of the extensive SnazzyMaps repository. Pick one of the several thousands of map styles and improve Google Maps to look better on your website.
WP Google Map
The free version of this plugin will allow you to set icons to mark places. Furthermore, the pro version displays custom posts using custom fields.
Google Maps Widget
This minimalistic solution serves the purpose of adding maps to your posts.
The above-mentioned plugins function similarly and substantially add the features to embed Google Maps. You just have to understand the ways to create the API key and operate the interface. Once you encode these, picking up a new plugin at any point of time, won’t be an issue.
How will you embed the WordPress sites with Google maps with plugins?
In case, you wish to turn more creative and build maps with unique features then looking for a plugin can be the best way out. Given the chance to create custom maps, the Google maps plugins add certain features specific to WordPress.
These include filterable store finder and use of custom fields to display any type of posts. Moreover, plugins allow using shortcodes and not IFRAMES that comparatively make them more user-friendly.
To start the process to embed Google Maps, install and then activate the WP Google Maps. The WP Google Maps will allow you to create a single Google map with multiple markers as per your requirement. You can avail of all the added facilities from its paid version. The markers are of high quality, with appropriate descriptions, links, maps, and images to support it.
The steps are as follows:
Step 1: Building the API Key for Google Maps
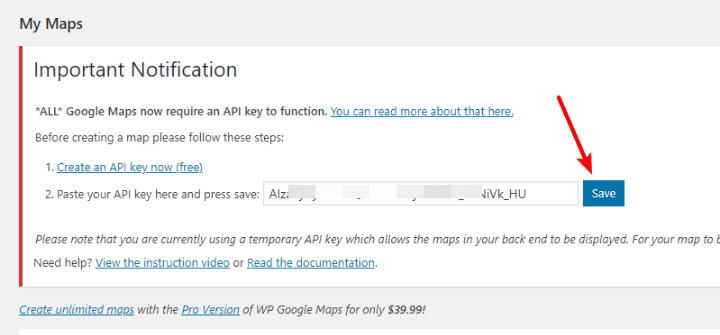
For every plugin that you use, you need to go through this step to create an API key. Similarly, in this case, Google also allows creating an API key to access Google Maps to work on it.
In the context of embedding Google Maps to the WordPress site, creating the API key and entering it will help to connect the Google Maps with your site. Follow a detailed process to create the API key.
Once you are done with creating the API key, head on to the next stop. Enter it into the box and hit on the save button.
Step 2: Make changes to My First Map
The free version of this plugin will let you create a single custom map. To make changes to your first map, you need to select Edit and then under it, ‘My first map’. This will direct you to the editing interface of the plugin.
Step 3: Configuration of Basic Settings
Several different types of tabs appear at the top band of the map interface to embed Google Maps. These tabs are provided with different functionalities that you need to configure. These are as follows:
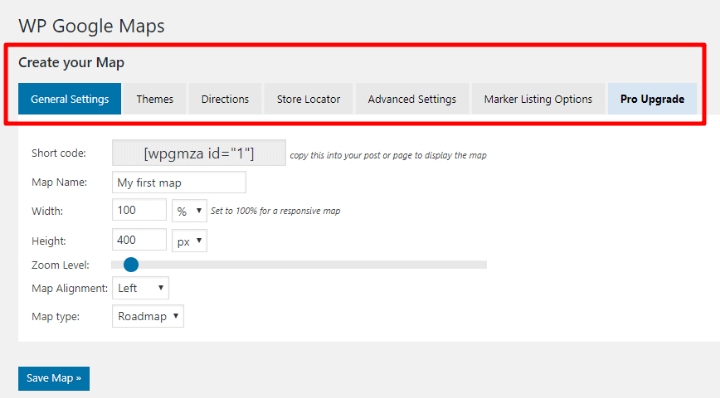
2. Directions: This plugin only allows using the direction for the map from its Pro version.
3. Advanced Settings: These include enabling the traffic data along with features that are only available on the Pro version.
4. Themes: You can choose from 9 themes for your maps. This will help to change the overall appearances of the maps.
5. Store Locator: This amazing feature permits users to locate all the stores located nearest to them. Store Locator can be helpful for people running businesses facilitated by physical address.
Configuring these settings is important and makes you ready for creating the maps on your own.
Step 4: Including Map elements
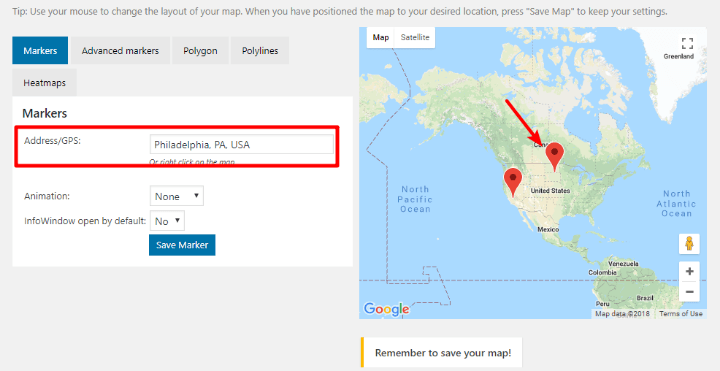
Apart from the basic settings, insert map elements to your map with different tabs. Add markers using the following:
Find the location
1. Drop the marker at the specific location by a right-click on any area of the map.
2. Save the marker as it appears on its map and, keep adding the others as well.
3. From the Your Marker panel, see the markers lists and edit your present markers.
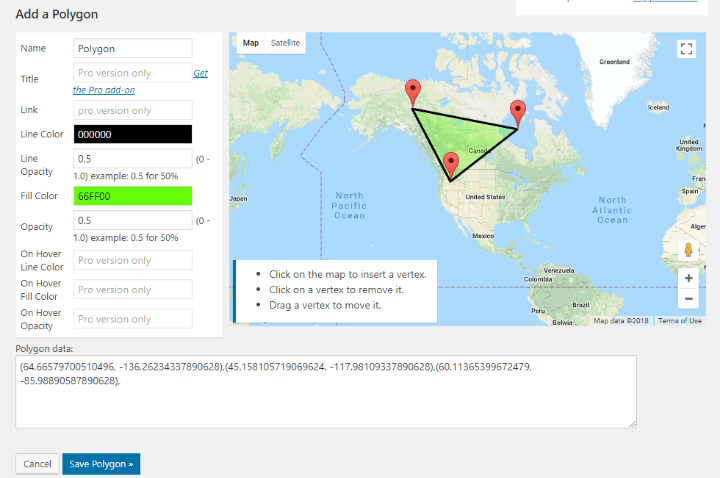
4. From the tabs of Polylines and Polygon, launch the interface that will let you build complicated sets of shapes.
5. After you are over with the map and building shapes, click on Save Map.
Step 5: Using shortcode to insert Embeds
1. After saving the map, click Maps from the sidebar of the WordPress dashboard.
2. Copy the map shortcodes
3. Paste the shortcode in the location where you want your map to appear.
Ways to Embed Google Maps to WordPress site without plugins
Here is a quick way to insert Google Maps to WordPress sites. The steps are as follows:
Step 1: Create the map for inserting into your WordPress site

For adding a presentable Map similar to the ones that appear on Google’s website, you need to:
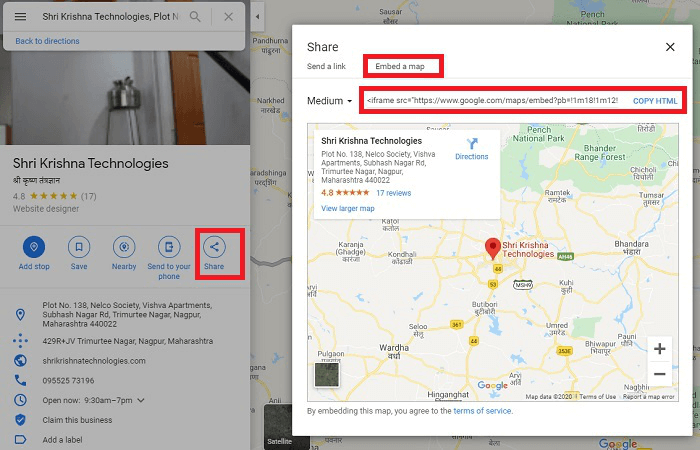
1. Open the map of the business from the interface of Google Maps.
2. Hit on the Share option.
3. Click on the Embed map.
4. Copy embeds code as shown below:
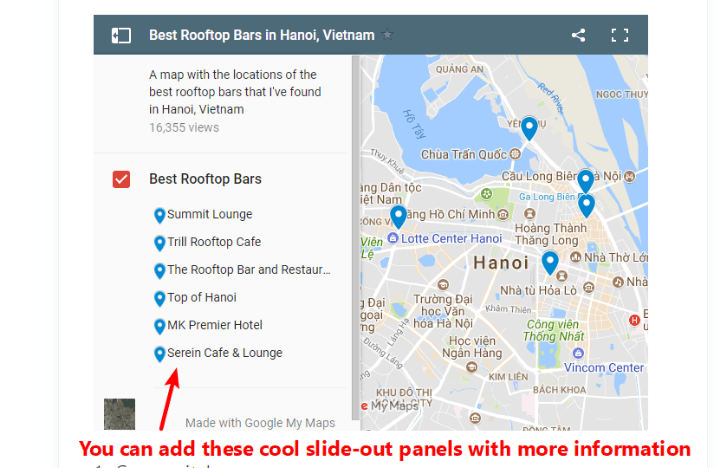
5. Create an advanced version of your map with appropriate colors, custom notes and location markers.
6. Use the Google My Maps as the interface is user-friendly. Click on the button, ‘Create a New Map’ after you have signed in.
7. Build the map and after you finish click on Share.
8. Next, head on to Private and then click on the Change button.
9. After that, select On-Public on the web and Save.
10. Click the three dots and select ‘Embed on my site’.
11. After this, copy your embed code which will be needed in the following steps.
Step 2: Inserting embed code to the WordPress site
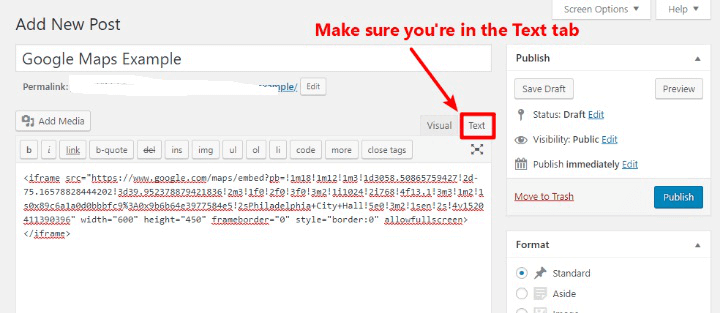
1. Edit the post or the pages from Google maps or Google My Maps interface.
2. Choose the tab marked as Text from the WordPress editor and finally paste the embed code.
3. On publishing, you can observe all the embedded of Google Maps, live on your site.
This method is appropriate in case you want to inserts maps marking a single location or just to set the directions rightly for users. Alternatively, create custom maps with Google My Map, which has added functionalities to offer.
A quick wrap
Thus, you can always look out for WordPress themes and plugins. Some themes come handy with useful features that allow embedding Google Maps.
The built-in functionality of adding maps help to serve the purpose of manually doing it or with plugins. Certain builder interfaces of WordPress also come with dedicated modules for maps. Considering your convenience, choose the best way to embed Google Maps within your site.
Plugins are easier to implement but in the event of adding maps only to certain functionality rather than the entire site, you may have to use the manual method. This applies to store locators, embedded in a certain post.

