In this article, we will tell you how to create a WordPress plugin in simple steps.
The most important reason why people prefer WordPress over any other platform is its unlimited useful plugins collection.
Plugins are nothing but PHP scripts and what you can do with a plugin vary from script to script.
You can design plugins starting from simple modifications like changing colors of header and footer to working as functional modules for important features related to monetary transactions, auto-responding and likewise.
Once you know how to create a WordPress plugin, the possibilities become limitless.
Who Needs To Know How To Create A WordPress Plugin?
There are basically three types of users in WordPress. The first category of people is those who have no knowledge of PHP and depend on plugins already available to increase the functionalities of the websites.
The second category of people are those who know PHP, and whenever they need to modify something that cannot be achieved through plugins, they modify the files present in the editor like functions.php, sidebar.php, header.php and likewise. They do not bother about creating a plugin.
It is the third category of people who need to know how to create a WordPress plugin. These people are advanced users like web developers who want to have unique functionalities and features on the websites that are not achievable through ready-made plugins.
For example, a person is creating a social networking site, and he needs to have plugins to let users chat and become friends and send a request and likewise. They write codes for those plugins and integrate them on the website.
Apart from that, there are web developers who want to develop plugins to sell in the market so that people download them and they get money from WordPress in case it is free or directly from the users in case it is a premium plugin.
How To Create A WordPress Plugin From Scratch?
Step 1. Getting Started In A Proper Format
Open your file manager from cPanel and head to wp-content/plugins. Create a folder inside it with the name with which you want to name your plugin.
Once the folder is created, create a file with the same name as the folder which is also the name of the plugin you are going to create and keep the extension of the file as .php.
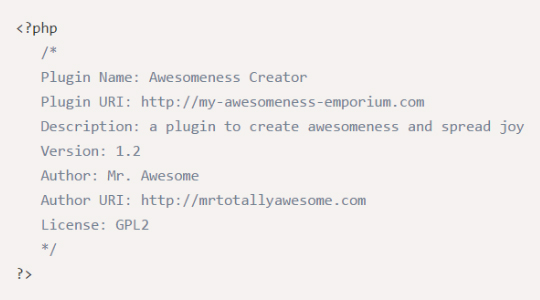
There is a specific standard format you need to follow to create a plugin. So, open the file and write the following.
Step 2. Structure Of A Plugin
Keep the plugin name same as the folder name, and you can change other details as you wish. As a matter of fact, this is the file where you have to write the code to make the plugin do whatever you want to.
If you are going to make a plugin with complex functionalities, it is better to create multiple modules in different files and folders and integrate them into the main file. This will help in easy debugging and adding more modules to the plugins in future.
Most of the plugins have a user interface for changing the settings. If you are planning to create a plugin of that type, you need to have CSS and JavaScript folder to keep the corresponding files in the right place without messing up everything.
Finally, whatever class or function you create, name them in a meaningful way so that later you can understand what is for what. Even better practice would be comments and documentation.
Related Post: Some Useful Plugins You Should Use in Your WordPress Website
Step 3. Adding Your Code
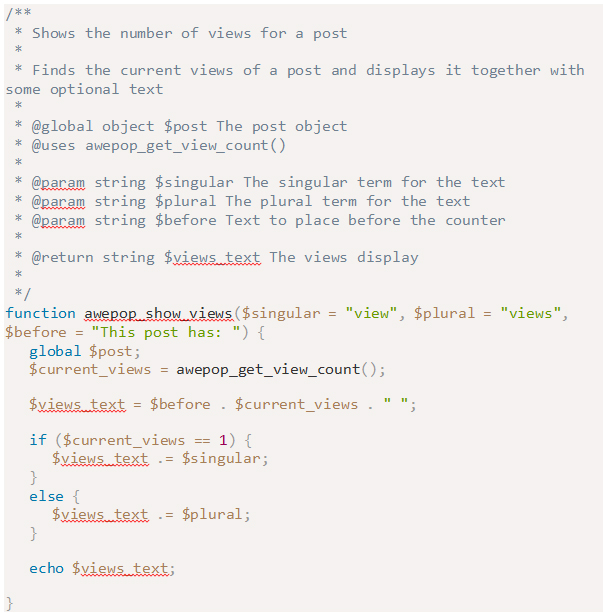
Now, it is up to you to add your code in the files as per requirement and have the main file from where everything will be called as and when required. For example, you want to create a WordPress Plugin for showing the number of views in individual posts.
The basic part would consist of recording the page views and displaying the page views. Additionally, you can have a function to display posts according to their page views in a list form.
The first step is to write the proper mandatory format.
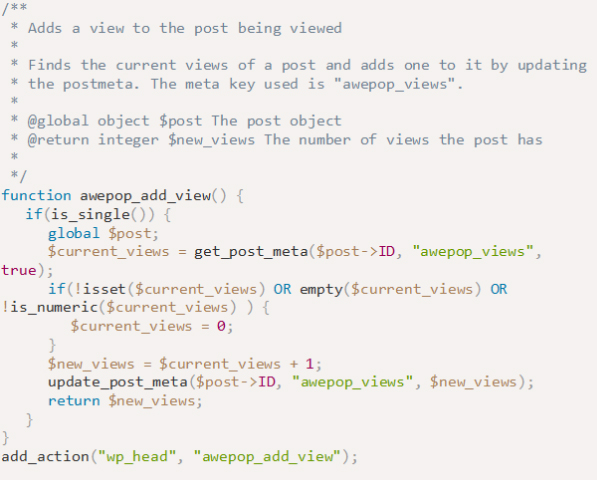
The second step is to write a function to record the page views.
Note you can write the function in the same file that has the name of the plugin. Insert the following code at the end of the previous section.
You need to call the function you created for it to execute. As you can see, the created function is called through the code add_action(“”, “”)
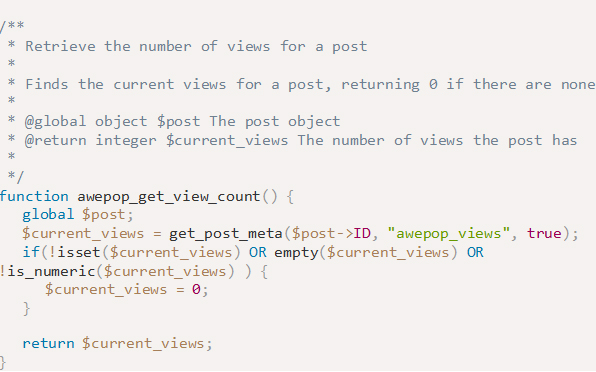
The third step is to write a function to retrieve the page views.
The fourth step is to write a function to show the page views.
Additionally, you have to insert this line to make sure that WordPress does not throw an error message when the plugin is disabled.
Step 4. Precautionary Measures
Safety is always the priority when you create something on the web. Coming specifically to a plugin, all plugins use internal and external data to run the code and act the way they are supposed to.
But once the work is done or the user deletes the plugin, it leaves behind a lot of raw data which are easy for the hackers to get access to.
Hence, the vulnerability of the website increases massively. Therefore, when you create a plugin, you have to make sure that, you clean the data as soon as your plugin gets delete.
i. register_activation_hook(x,y)
This method is to be used when you are calling a function. X stands for the file main from where the function is called, and Y stands for the function name.
Use it while calling a function for execution. This also helps a developer to know the version of the plugin and WordPress the users is having who installed the plugin.
ii. register_deactivatioon_hook(x,y)
Once the execution of the function is over, use this method to close the function. This ensures that the function is not accessible from outside.
iii register_uninstall_hook()
This function makes sure that when a user deletes your plugin, all the data used while the plugin was activated get deleted automatically. It ensures that hackers cannot get any trace of critical data even when they make an entry through a backdoor.
Once you are done coding, head over to admin dashboard and then to Plugins from the left menu and click on Installed Plugins. In the new screen, you will find your plugin, and you can activate that to see how it is functioning.
If you are just starting a website and still not sure how to go about it, then you have come to the right place; for there’s nothing to beat WordPress when it comes to basing your website on the same.
The fact remains that WordPress is an open resource, comes with free updates and most importantly, comes with built-in flexibility which is more than you can say about other platforms.
For example, if you know PHP coding, then you may want to check out WordPress plugin guide for plugin developers as this can allow you to tinker with the layout, footer, and header and even play around with the theme color as well as other settings.
It’s that flexible and much more. This is why you should opt for WordPress as the platform and check out the various themes (both free and premium) and choose the ones that you are interested in.
With the WordPress plugin guide for plugin developers, you should easily be able to change the settings as per your preference and make your website look even spectacular.
If you are still having issues in selecting the right theme for your website, then you may want to check out the tips posted below.
- Cheat sheet: It is always a good idea to plan ahead so naturally, you should check out your competition and some of the top websites in your niche to get an idea of what to aim for.
Whether it is collapsible frames, parallax scrolling, or sliders, the point is that this research would enable you to gauge the effectiveness of the said feature so that you can incorporate the same on your website.
You can then check out the various WordPress themes, and even use the search bar on WordPress themes to filter the search to the specified themes that fit your parameters.
- Always choose a responsive theme: This cannot be stated enough, you need to select a responsive theme so that your website can be viewed through multiple devices without loss of functionality.
This should enable your audience to view your website “as it is” through devices such as mobile phones, iPad and more.
- Do not go overboard with features: Choosing a theme that comes overloaded with various features sounds like a great idea but believe me, it is anything but that.
Choosing a bloated theme can result in slowdown and even affect your site performance; for example, your pages could take longer to load and this can result in the loss of several prospective leads and eventually loss of viable customers.
Remember that most customers tend to stay on a webpage for just a few seconds and you cannot afford to waste the same on extra features.
With these tips, you should be able to choose the right theme and even customize it as well. Since you are adept at PHP programming, you should be able to code it and tweak it so that it looks as you had envisaged it.

