If you are hoping to add Google Tag Manager to your website, then perhaps you are in the right direction. The Tag Manager comes with several benefits that can let you manage your coding scripts for the website.
Table of Contents
This article will let you know how Google Tag Manager is so important to include in your WordPress site. Besides, it will show a detailed process to add the Tag manager to your WordPress site and enjoy the benefits of it.
What you should know about Google Tag Manager?
Google tag manager is an effective tool that eases the process of managing tags along with gathering actionable data. It provides a singular dashboard for adding and managing scripts.
The website owners access multiple codes for tracking traffic, conversions and accessing analytical data through Google tag manager.
The tag manager comes with sets of in-built templates for the DoubleClick, Google Analytics and Adwords. It works in collaboration with third-party analytics and tracking platforms.
Aside from this, if you add Google Tag Manager it can help you customize HTML codes for serving the purpose of tracking and managing code.
Giving the benefits of time-saving, as you no longer have to add or remove tags from codes. You can simply use the dashboard and that all the scripts are in one place.
Methods to add Google Tag Manager
Creating a Google Tag Manager account
1. Sign up to create an account with Google tag manager.
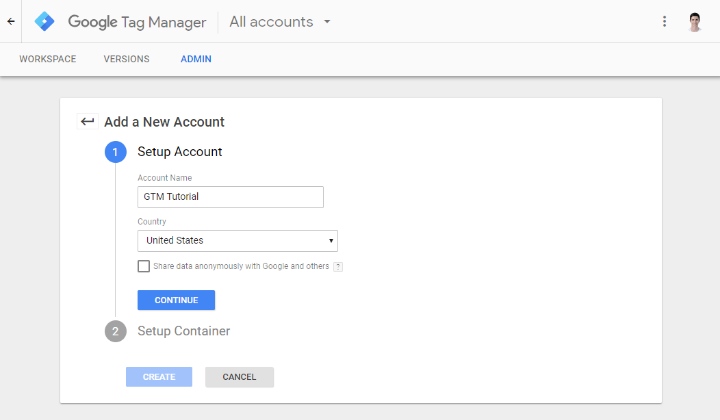
2. After signing up, you will be directed to the interface labeled Add a new account. Here, you have to add the name of the company.
3. From the section, Setup a container, add the name of the website within Container name and then select Web.
4. Accepting terms of service of Google, you will head to the interface of a tag manager. It will display two snippets of codes.
5. Let this window remain open, as you have to add snippets to the WordPress site.
Configuration of Google tag manager
Presently, the Google Tag manager accepts two code snippets at a time. The first code will go within the <head> tag and the second set goes within the <body> tag.
Apart from using a child theme, WordPress has no other option for inserting codes within <body> tags. This is because; the functionality of each theme has stark differences.
In case you are comfortable with editing files containing child themes, it is better to continue doing it. Or else take support from plugins to do the needful.
The free version of the plug-in named Head, Footer and Post injections shows an easier way to configure to add GT manager. The steps to follow are:
1. Install and then activate the plugin.
2. Visit Settings and then Header and Footer from the WordPress dashboard.
3. Paste your first code snippet in the box mentioned as On Every page in <Head> Page Section Injection.
4. Add the second snippet to the box named Desktop in ‘After the <Body> Tag’.
5. Save the changes.
Including the codes of Tag Manager
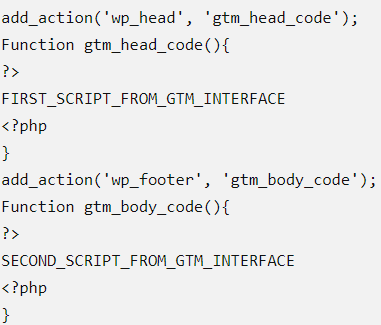
Alternatively, you can even edit the functions.php file, which may be efficient for most sites, but it is not completely optimal. To do so, add this code block to the function.php file of the child theme:
However, you have to remove the placeholder and mention the actual code. The Google tags manager does not put the second snippet just below the body tag but instead in the footer section. This helps to avoid the tag from firing when the visitor does not load the page.
Test the functioning of snippets
Make sure to install and add a Google tag manager by following these steps:
1. Check the free tool of the GA Checker.
2. Enter the website of your URL.
3. Click on ‘Check your site’.
4. From the tab marked as Tag Manager from the results that you receive.
5. Search for a green checkbox from the Tag manager.
Once you see that, your work is over. This means that the Tag manager has been successfully installed for the WordPress site.
Thus, it will require you to create the first tag using Google’s interface.
Creating the first tag
After successfully adding code snippets to the site, follow these steps:
1. After including code snippets within the WordPress website, head to the interface of the Google Tag Manager.
2. Create the first tag. A tag is just a specific script that you need to add to the WordPress site with the tag manager.
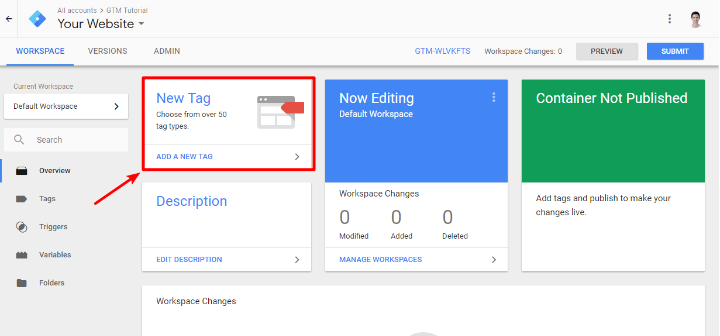
3. Create a new tag on the dashboard.
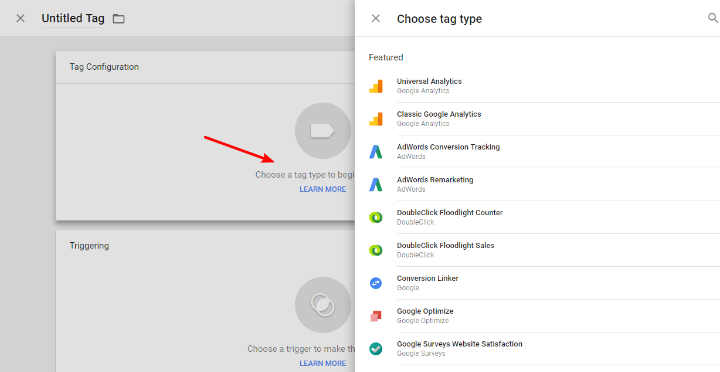
4. Click the tag configuration to choose an appropriate tag.
5. Google provides loads of in-built options for third-party providers along with Google Analytics or Google Optimize.
6. Alternatively use tags for Custom HTML and Custom Images for inserting codes on the client-side.
7. Select the Tag type and configure its settings.
8. Click the triggering section and select ‘fire’. Default is set as ‘All pages’ but you can change using + icon.
9. Click on Save to restore changes to the settings.
Publish Container
Tags that you add to the tag manager of Google cannot go live unless you publish them. To publish container follow these steps:
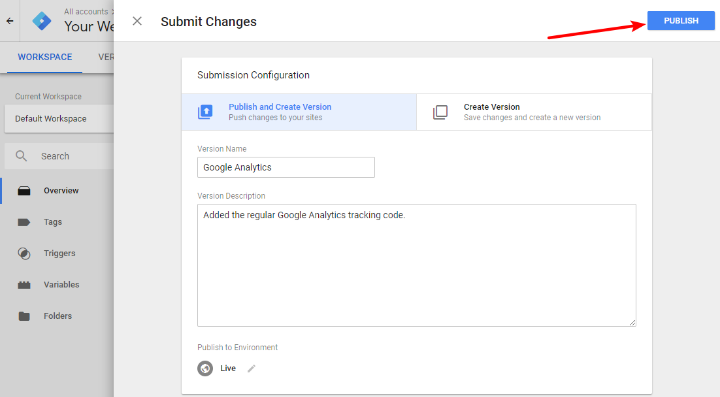
1. Click on the Submit button from the interface of Google Tags Manager.
2. Followed by this, enter the version name and description.
3. Navigate to the dashboard of the tag manager. Click on the button, Publish.
4. Preview the website as Google Tag manager shows the tags fired on all the page views
Test tag-firing
There can be instances where the tags keep firing. Multiple reasons can lead to this but in most cases; Google has some of the most effective free extensions to solve this issue. With the Tag Assistant of Chrome, you can simply solve this issue at one go.
Final Words
As you can see, the method to add GT Manager is quite easy and simple for WordPress sites. In terms of its functionality, it is quite critical and explains many interfaces that require a detailed understanding. These interfaces can help your website and you can incorporate them to enjoy more benefits.

