This article deals with and explains how one should add nofollow links in WordPress.
Table of Contents
Links that prevent search engines from passing on link authority from your page to another website that you are linking to is known as Nofollow links.
Now you do not control these other websites hence the best-recommended practice is to add Nofollow attributes to such links.
If you link to a website, a small portion of the page authority will be passed on to that site as search engines consider linking as a ranking signal.
It also believed by experts that promoting the use of Nofollow links will result in a higher ranking of your website.
In this article, we will explore methods to add Nofollow links in WordPress.
How to verify if a link is Nofollow?
The HTML attribute rel=”nofollow” is contained by all Nofollow links. The example of this HTML code is:
<a href="https://www.Google.com" rel="nofollow">Google</a>
Right-click on the link and select inspect. It will enable you to know if a Nofollow attribute is added to the link or not.
After right-clicking, you will see that the browser is split into two parts. Inspect the bottom and if the attribute is added you will be able to see it alongside the HTML code link.
How to Add Nofollow Links in WordPress (Gutenberg)?
The old Nofollow plugins of WordPress are not compatible with the new WordPress Content Editor Gutenberg. As of now the only method to add Nofollow links, Gutenberg, is by manually adding it. The steps of adding it are as follows:
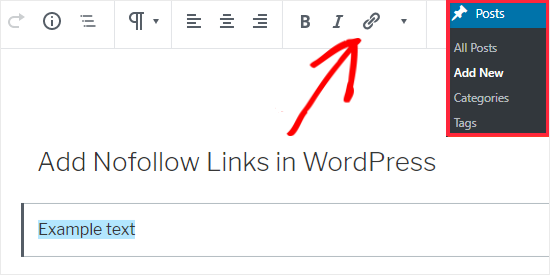
- From the Admin Panel go to Posts and then select Add New
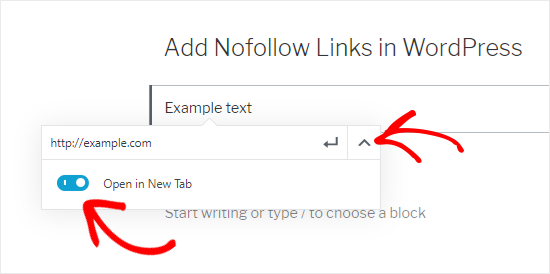
- Select the text where you want to add the link and then click on the anchor/link icon
- Paste the link in the box of the text field which has appeared after your click
- Click on apply
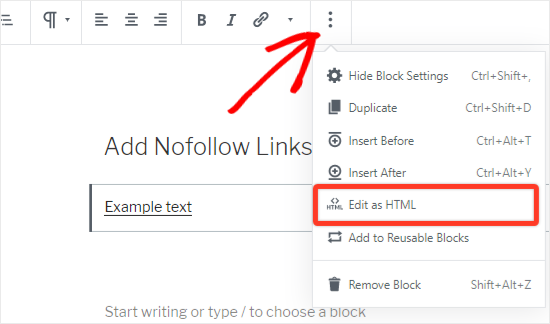
- Now select the box containing your link and then click on the three vertical dots like an icon from the top bar
- Now on the mini menu click on Edit as HTML option
- Now add the NoFollow attribute to the link element
- After adding your attribute again click on the three vertical dot icon and select Edit Visually
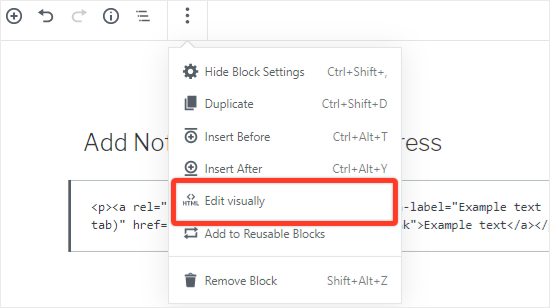
With these eight simple steps, you can easily convert a normal link to Nofollow link and return to the visual format. For adding the Nofollow attribute to external links the same format has to be followed.
Add Nofollow Links in WordPress Classic Editor
WordPress has already rolled out its update and it is highly recommended that all its users update the platform. For those who have not updated and do not intend to update anytime soon, you will have a hassle-free experience in adding Nofollow links to the classic editor. Following are the simple steps that you must follow:
- Install Title and Nofollow for Links plugin and activate it
- From the Admin Panel go to Posts and select Add New
- Add relevant text to the post editor and select the text that you want to link
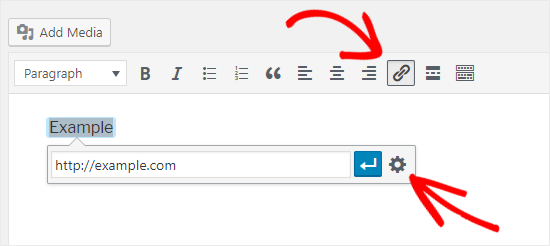
- Select the link icon from the toolbar
- Add external links to the text box and click the gear icon which will open the link options
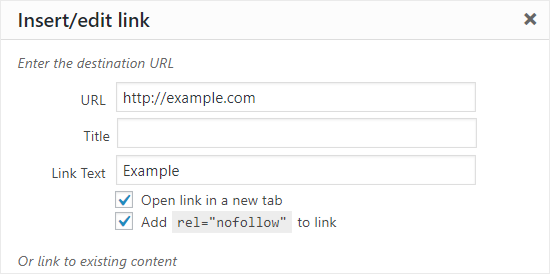
- Just below the Open Link in New Tab option, you will notice a Nofollow checkbox. Here you must select the Add rel=”nofollow” to link checkbox
- Click on the Update button
These simple steps will allow you to add Nofollow link to any text without any difficulties. For users who are not compatible with using the HTML code, this method is the best option.
Manually Add Nofollow Links in WordPress
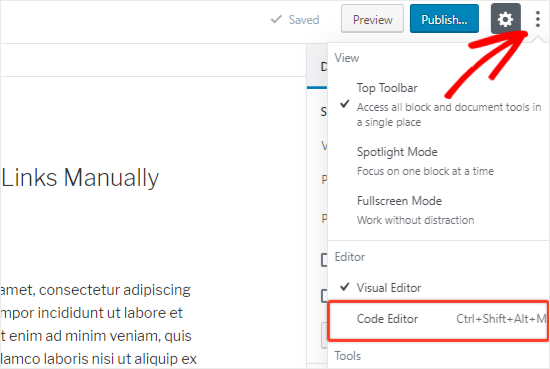
In the earlier section, we discussed adding Nofollow links to Gutenberg. But that method should only be used if you have to add only a few links in the entire text. In case you have a lot of affiliate and external links, then it is recommended that you switch to Code Editor which will result in adding Nofollow links faster. Follow the steps given below.
- Click on the three vertical dot icons and select the Code Editor Option from the Dropdown menu
- Search and find external and affiliate links from the text and add the Nofollow link to all of them
- Click on Exit Code Editor link and you will be redirected to the visual editor
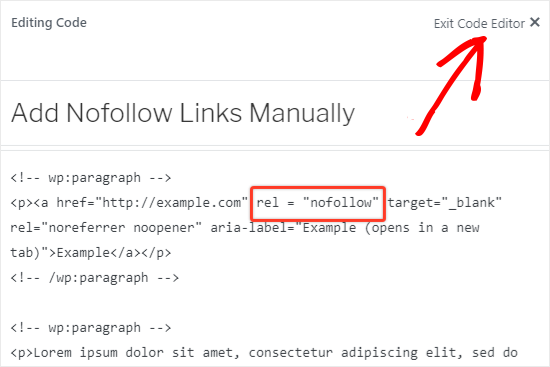
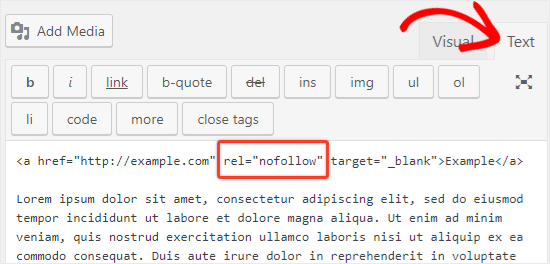
In classic editors you can easily install plugins to add Nofollow links and the same can be also be done manually in the following manner.
- Click on Text Tab and you will be switched to the Text Editor
- Add Nofollow link attribute to any text that you want
- Click on the Visual Tab and you will be redirected to the visual editor
Automatically Make All External Links Nofollow
Many WordPress developers prefer to add the Nofollow attribute to all external links on their site automatically.
Usually, such solutions are offered by programs run by JavaScript which is not useful for the SEO of the Website. In this case, one should prefer to manually Nofollow the links with methods prescribed as above.
Users in large numbers are also concerned about the comment section. For this, the best side is that Nofollow attribute to all comments link by default is already added by WordPress.
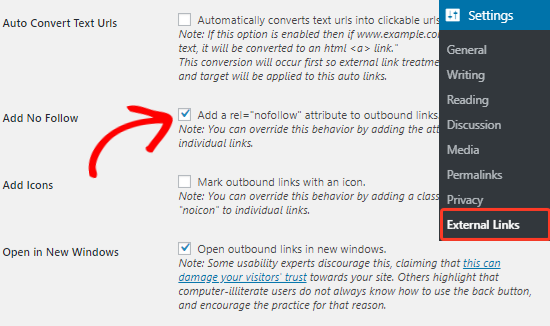
The External Links plugin are the best way out if you are still looking for a solution. The Nofollow attribute is easily added to the pages, posts, sidebar, and navigation menu.
For installing the external plugins follow the steps as below:
- From the Admin Panel head over to Plugins and select the Add New
- After adding activate the Plugin
- After activation move to the External Links option in the Settings menu.
- Select the Add Nofollow checkbox
- Save Changes
Besides this, you can also opt to select the Open in New Tab option. You can also add a list of domains and sub-domains where you want to include the Nofollow attribute.
The blend of Nofollow links on your website with the other links looks natural and search engines prefer such websites.
We hope you can follow different methods provided above to Add Nofollow Links in WordPress .


Adding nofollow links in Gutenberg was a little frustrating especially if you had many links.
But now there’s a free plugin that makes it easy to add nofollow links in the block editor without having to manually edit the html.
It’s called EditorsKit Gutenberg Page Building Toolkit, and with it you simply need to switch on the “No Follow” option and your link will become nofollow. I think many WordPress users (especially beginners) will find this useful.