Accepting Credit Cards with WooCommerce using Stripe
When it comes to the highly reckoned payment gateway systems for widely popular eCommerce sites, Stripe always excels.
Table of Contents
As a safer and secure payment gateway system, Stripe is helping people to experience a very smooth payment which is creating a revolution in online payment.
Unlike other popular payment gateways like PayPal, Stripe has a more reduced fee for the transaction. As you add Stripe to WooCommerce, it ensures that you are getting complete ease of transactions with your customers right on your website.
This makes it easier for consumers to buy the items with easy paying during their checkout. At the same time, Stripe also allows users to pay with their credit cards, which offers complete ease of payment management.
However, it can be a trickier task for you to add Stripe to WooCommerce. Hence, here is a complete guide on how do you enable the acceptance of the credit cards with your WooCommerce using Stripe:
What is Stripe?
Stripe works as one of the most useful credit card gateway for online business.
It easily connects the existing eCommerce stores and websites. It works with many ready-to-use connectors and has a prebuilt form for check out that you can easily integrate with your brand.
As you add Stripe to WooCommerce, it lets you accept all the payments in a much straight forward way from your website to the mobile devices.
At the same time, integrating Stripe with your WooCommerce store can also improve your conversion rate in a much effective way.
The simple and easy online payment processor of Stripe ensures the complete processing of the entire payment. At the same time, the software tools of Stripe are used by a myriad of businesses in every sector, which makes it highly popular.
What are the benefits of choosing Stripe as your payment gateway?
Why add Stripe to WooCommerce? There are plenty of reasons behind it, which is very beneficial for you to know.
Here is how it can help you in a variety of ways:
- It is very simple:
- Adds more value to your business:
- Offers complete security:
- Comes with a very lower charge:
The first thing that one will hear from any of the Stripe users is that it is very simple with its service. The checkout form that Stripe offers is very simple from the site of the customer. Hence the entire transaction takes place quite easily.
While you switch to WooCommerce for your eCommerce business, you need to ensure that the entire process of shopping you are offering is very easy for your customers. Hence the simplicity of Stripe makes sure that your service is feasible enough for your clients.
Using or adding Stripe to your WooCommerce can improve your payment security in a top-notch way. Stripe saves all the credit card information of your customer so that they do not have to enter the information again and again for the purchases.
Adding Stripe to your WooCommerce is very cost-effective. Stripe charges 2.9% + 30 cents for each of the transactions with its services. Stripe only opts for deducting the money from your account when you successfully make a sale.
There is simply no need for the monthly cost. At the same time, Stripe reduces all the PCI compliance cost as Stripe takes care of it conveniently. No early termination fee is required.
How do you set up Stripe for your WooCommerce?
Stripe does not come up with any official integration. But the WordPress community has a great solution for you. It comes with API utilization, which integrates Stripe to your site.
However, before you take any step, it is important to note that an SSL certificate is required for your Stripe checkout pages for improved safety.
Here is how you set up the Stripe step by step for your WooCommerce:
1. First, you need to start with creating a stripe account.
Before you take any further step for accepting the credit card with Stripe, you need to ensure that you are starting with a Stripe account set up. Here is how you do it:
Go to the: https://dashboard.stripe.com/register in your web browser area
For creating an account, you need to fill up a form that will appear. Fill up the form by adding your email address, password, full name, etc. Then simply click on the “create an account.”
After that, you have to verify that you are a company representative. For identifying you, Stripe will want some more information from you.
You can easily use your Google, Facebook, and LinkedIn accounts as an alternative. At the same time, you have to ensure that you are filling in all your personal identifying information.
As you are done with the verification, you have to enter your bank account information.
You will require your routing number and the account number for this. Go forward by filling in the blanks. Then you need to tap on the Activate Account to complete the entire process.
Generate the keys to link your Stripe, along with your website. For this, you have to go to https://dashboard.stripe.com/account/apikeys to get all of your API keys. Alternatively, you can also go to the Dashboard > Developers> API Keys.
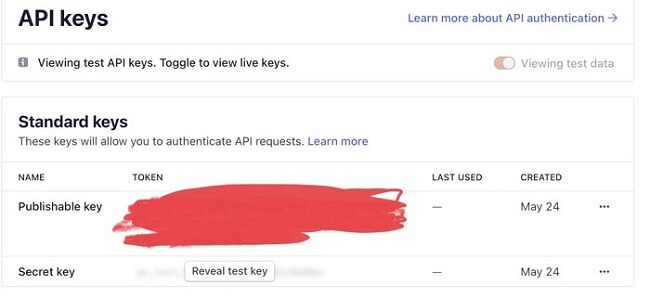
You have to provide the Test keys to your web developer so that they can verify that the website is connected to your Stripe account. They will also require your Publishable Key and the Secret Key.
You have to provide the Test keys to your web developer so that they can verify that the website is connected to your Stripe account. They will also require your Publishable Key and the Secret Key.
2. Opt for setting up an SSL certificate for your website:
To ensure security on your site, an SSL certificate is a must-have. Without an SSL certificate, your site will be marked as an unsafe one. The Secure Sockets Layer ensures that your sensitive information is safe.
SSL is used for encrypting the sensitive information which gets transferred over the internet so that the only receiver can access it.
This is highly significant as the information sent via the internet gets passed through the computer to the computer before it arrives at the destination server.
When it comes to integrating your credit card for the payment transaction, it is of higher importance that the SSL certificate is securing all the card numbers, usernames, and passwords, along with other sensitive information.
If it is not secured with the SSL certificate, then any of the machines can easily read it, which makes the information very vulnerable to hacking.
For collecting the credit card information on your website, you need to pass a series of audit demonstrations, which you follow with the Payment Card Industry standards. The must-have criteria for this are to use the SSL certificate properly.
Related Post: Why You Should Use SSL for Your WooCommerce Store
How does it work?
Acquiring the SSL certificate is highly crucial for your Stripe checkout page so that you can securely communicate with your payment data.
SSL helps in encrypting the data transfer between the browser of a user and website while offering protection to the information.
As a person goes to access the SSL/ HTTPS website, their browser checks to see if the SSL certificate is genuine or not.
After checking everything, the browser encrypts the data with the help of the public key. This information then gets transferred back to its target server and is decrypted with the help of the public key and an additional secret private key.
What are the essentials for the SSL certification?
- The first thing you will need is your certificate for the server. This works as the certificate for your domain that you receive from the CA. You can receive this via email. If you do not have it, then you can get it from your Account Dashboard while clicking on your order.
- The next thing you need is the intermediate certificate. The device that gets connected to your server can make use of these files to identify the issuing for the CA.There are usually several kinds of certifications.
As you receive your certificate in a ZIP folder, it will also include the Intermediate certificate. If it does not, then you will need to get the appropriate CA Bundle for the certification.
- Following the intermediate certificate, you will require the private key. In case you use a free generator tool for producing your CSR, then this file must be on the server or in your possession.
However, the private key is not visible on some of the platforms like Microsoft IIS. However, the server keeps tracking it.
How do you set the SSL?
To add Stripe to WooCommerce, you need to ensure that you are setting the SSL properly. Here is how you do it:
- Pick a hosting company for the free SSL certificate:
- Install the SSL certificate:
- Start with selecting the Certificates and Tools.
- Select Next as you enter your website/domain store’s name and click on the Accept for the Terms of Service. A Certificate Signing Request gets created as the result of CSR. Get one copy of your CSR.
- For generating the RSA private key, select Next. The RSA Private Key became available for download. It is safe enough to shut the browser tab as you download the CSR and RSA Private Key.
In case you close it before you save these two pieces of information, then you have to restart the process.
- The procedure of submitting the free SSL certificate varies as per the hosting company.
- Follow the SSL configuration.
- As you install the certificate on your server, you can have access to your store from https://yoursite.com. To indicate the security of your page, your browser may display a lock icon from the address bar.
Many WooCommerce hosting partners offer the free SSL certificate to WordPress customers, which can be installed easily with a few clicks.
Then you have to check a hosting provider to see if they provide the free SSL or not. If they do not have this choice, then move to the next section and install it.
If you do not have an SSL certificate, then get a domain name from a domain registrar. The SSL certificates from Let’s Encrypt are completely domain-based. Hence, you will need a domain.
If you already have one, then choose a hosting company along with a hosting plan. Then go to ZeroSSL.com for learning more.
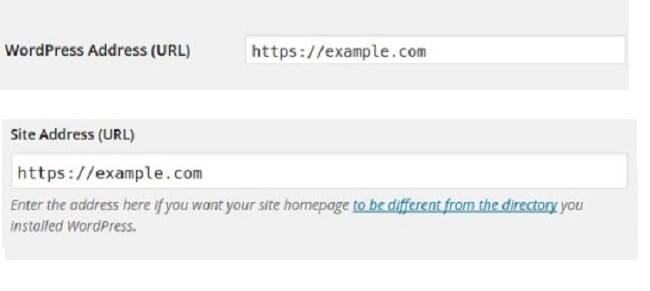
As you are starting a new website store, then the URLs for WordPress and WooCommerce must be modified.
Here is how you do it:
- Go to General > Settings
- Save the modifications for the WordPress Address and Site Address to include TTPS:// to mark that it is SSL enabled
- Using the SSL certificate is essential for your entire store and not just for the checkout page
- Force the SSL Setting
Based on the OS you are using, you can alter the .htaccess or web.config file for forcing the users to access your site using HTTPS.
For redirecting your HTTP users to the HTTPS version for your site, paste the following directive to the .htaccess file. Then just add this code snippet to your .htaccess file.
To double-check if the SSL certificate is set successfully, double-check it by going to:
https://yourdomain.tld from your browser to look at the site information to determine if the SSL is working properly or not. You might need to restart your server to let the action take effect.
3. Download Stripe plugin to your WooCommerce:
The next step to add Stripe to WooCommerce is installing the plugin. Stripe is much simpler to set up as a payment gateway. With the Stripe Payment Gateway Plugin for WooCommerce, you can swiftly accept credit card payments on your store.
Here are some of the cards that you can use:
- American Express
- Visa Mastercard
- JCB
- Diners Club
The credit card information can also be saved for use in the future by the customers. The payment transaction takes place in the Stripe iframe, which is integrated with your website. Your clients do not have to leave your site to make the payment, which makes the entire task very simple.
However, it is not included in the default payment gateway option. Hence, you must consider installing it.
Here is how you install it:
Plugins > Add new and look for the WooCommerce Stripe Payment Gateway > Locate Automatic release > Click on Install Now
4. Plugin Configuration:
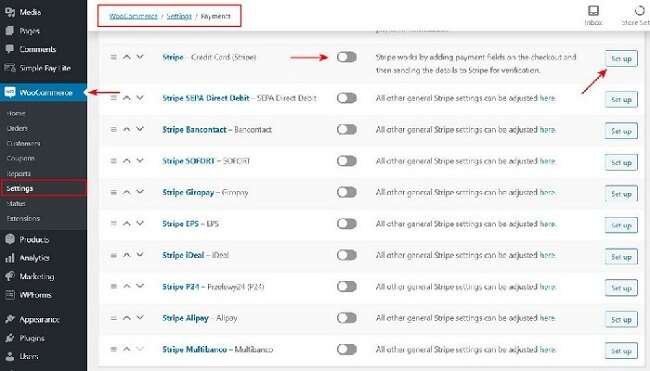
To add Stripe to WooCommerce, you must configure the plugin first. Go to WooCommerce >> Settings >> Payments after you enable the plugin. Select the choices which are preferable for you.
You can enable the Stripe service for your WooCommerce store from a page. As you activate the Stripe button, then click on Set up. Then you will be redirected to a particular page.
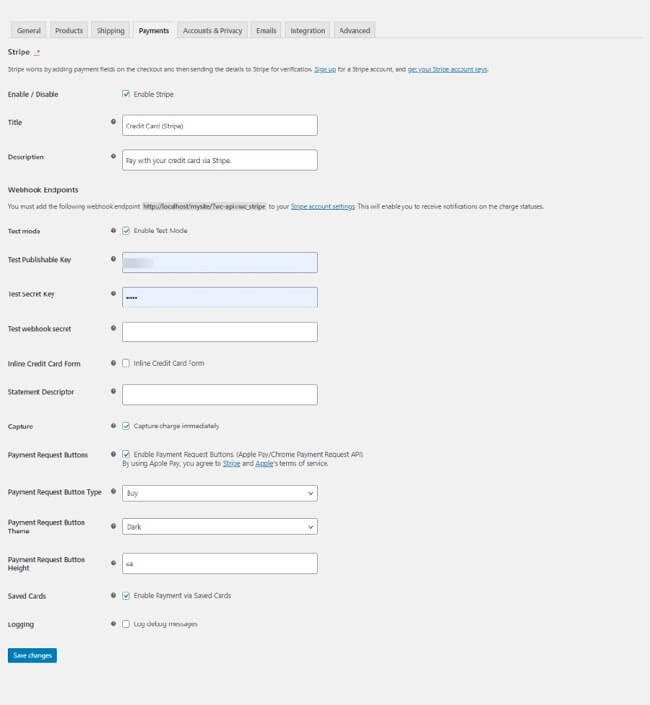
- Enable Stripe:
- Capture:
- Payment Request Buttons:
- Button Configuration:
You can manually capture or refund the payments using the Stripe Overview page. Also, you can see the order/ transaction details.
The capture Payment option gets enabled by default. It allows you to capture the payments instantly as payment takes place successfully.
Users can pay with the Chrome Payment Request if their browser supports it. Thus, the Payment Request Buttons need to be enabled.
You can choose between various types of Buy, Pay or Donate buttons. For the theme of the button, you can choose between dark, light, or a light outline. In the pixels, you can enter the appropriate height.
As you are done with the configuration, save the settings by clicking on Save changes
5. Select the Credit card option:
The final step to add Stripe to WooCommerce is selecting the Credit card option at the checkout area.
To complete this payment procedure, enter the card data and then click on the Pay Through Stripe Option. If it works properly, then you are done!
Conclusion:
To add Stripe to WooCommerce, the above-mentioned method works in the best way. Though it is quite tricky and time-taking, adding credit cards as a payment option will help your customers have a better experience with your WooCommerce site.

