If you’re new to WordPress, the navigation menu can sometimes seem like a daunting task. With so many options and settings, it can be tough to figure out where to start.
Table of Contents
However, once you get the hang of it, creating custom menus is actually quite simple and can make a big difference in the usability and user experience of your website. With WordPress menus, you can easily create navigation links to your pages and posts, as well as external links, custom links, and even categories and tags.
In this post, we’ll walk you through how to Add WordPress Navigation Menu in posts so you can take control of your website’s navigation and make it more user-friendly for your audience.
Why Add a WordPress Navigation Menu in Posts / Pages?
A website’s navigation menu consists of a set of links that direct users to significant sections of the site. These connections may assist visitors in locating the information they want, so enhancing their overall experience as customers and encouraging them to remain on your WordPress website for an extended period of time.

Your WordPress theme will determine the precise position of your navigation menu. Even while the majority of themes enable you to display menus in a variety of locations.
For instance, you could wish to include a specialized menu that links to all of the goods that are discussed on a certain sales page.
On your WordPress blog, you also have the option of displaying related content via the use of menus. You may encourage visitors to check out more of your material by including this navigation menu at the conclusion of a blog article and directing them to it.
Now that we’ve gotten that out of the way, let’s have a look at how you can add a navigation menu to any post or page using WordPress. Simply utilize the fast links provided below to get directly to the approach that you would want to employ:
The significance of navigation in the creation of websites
Web design cannot exist without navigation as a major component. It is the essential component that maintains the integrity of your website and assists site users in locating the information they want. When it comes to the navigation of a website, keeping things as simple as possible is essential.
Users should not be need to go through a number of menus or pages in order to discover what they are searching for; rather, this should be a simple and straightforward process.
Search for the “Navigation Menu” block and select the menu you just created. You can customize the menu’s appearance in the block settings, such as the layout, alignment, and color. By adding a WordPress navigation menu in your posts
The user experience may be improved by providing better navigation, which helps to reduce frustration and saves time. It is vital to bear in mind that visitors to your website are seeking for a certain piece of information or product, and if they are unable to locate it readily, they will soon go on to another website that can supply it. If you are unable to provide it, it is crucial to remember that visitors to your website are looking for it.
Search engine optimization (SEO) is improved when effective navigation is combined with it. Your website’s content will be better understood by search engines as a consequence of a navigation system that has been well-structured. This will make it simpler for search engines to crawl your pages and place them appropriately in search results.
Method 1: Using the WordPress Navigation Block (Best for Individual Pages and Posts)
Using the built-in Navigation block is the simplest method to add a WordPress navigation menu to posts and pages. This enables you to display a navigation menu anywhere on a page or in a post, but each menu must be manually added.
If you need to decide precisely where the menu displays on each page, this is a perfect approach. However, if you want to Add WordPress Navigation Menu in posts in the same navigation menu to several pages and posts, it might be time-consuming and annoying.
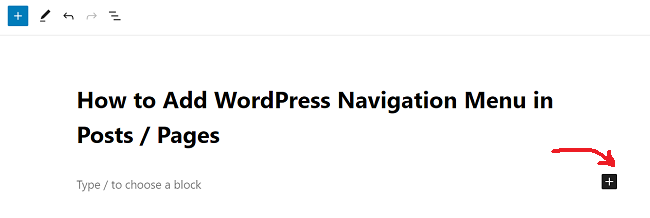
Simply visit the page or post where you wish to install a WordPress navigation menu to get started with this technique. Then, to add a fresh block to the page, click the “+” button.
A WordPress menu may also include social media buttons, which will entice visitors to follow you on sites like Twitter, Facebook, YouTube, LinkedIn, and others.
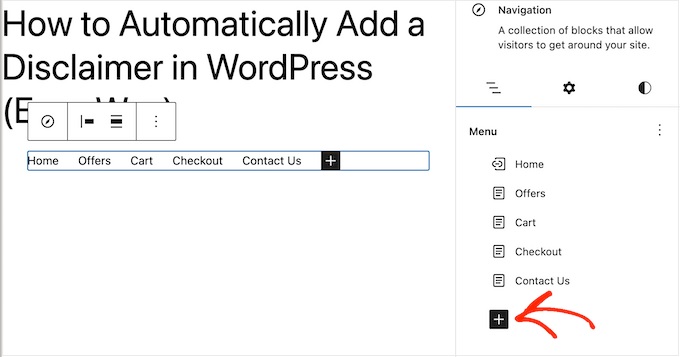
The ‘+’ symbol is located in the ‘List View’ tab. Click it to begin. Select “Social Icons” this time.The ability to add social media icons is now available in a new section.
Click the new “+ Click plus to add” area to begin going. WordPress comes with a simple search function that sometimes yields unreliable results. To enhance your site search, we advise utilizing a WordPress search plugin.
Even better, if you choose a sophisticated plugin like SearchWP, it will take the place of WordPress’ default search. All of your site’s search boxes, including those in your navigation menus, will utilize SearchWP automatically after the plugin has been configured.
No matter whether you’re using a sophisticated plugin like SearchWP or a built-in WordPress function, just choose “Search” to add a search bar to the menu. Finally, don’t forget to test the Navigation Block on different devices and screen sizes.
Ensure that it’s responsive and looks good on mobile devices as well as desktop computers. This will help to ensure that your users have a seamless and enjoyable experience regardless of the device they’re using to access your site.
Method 2: Using the Full Site Editor (Block Themes Only)
The Full Site Editor helps you save time as it allows you to visualize and well-organize your website design in a way that is intuitive and easy to understand. Whether you’re creating a brand-new website or redesigning an existing one, the Full Site Editor is an incredible tool that will help you get there with ease.
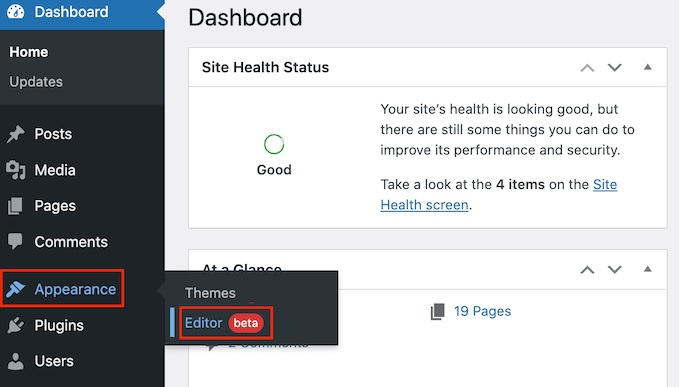
Go to Themes » Editor in the WordPress dashboard to begin.The editor will by default display the home template for your theme.
Click on “Templates” in the left-hand menu to add a navigation menu to your WordPress pages or posts. All of the templates that make up your WordPress theme will now be visible in the editor.
Choose the ‘Single’ template to include a navigation menu in your WordPress blog entries. Instead, use the ‘Page’ template if you wish to add a menu to your pages. WordPress will now provide a preview of the template you selected.By following the procedures in approach 1, you may expand the menu’s number of pages, add a search bar, and do other things.
Method 1 is a wonderful option to go with if you simply want to add a navigation menu to a small number of articles and pages on your website. If, on the other hand, you want to display the same menu across your whole website, this is not the greatest solution for you since it requires you to create each menu individually.
If you are using a block-based theme on your website, such as GB Patterns Pro, you have the option of including a WordPress navigation menu in either the page or post template. After that, this menu will automatically show on each of your pages or articles, and you will no longer need to add it manually.
If you constantly want to display the same navigation menu in precisely the same area, this is the best solution for you. After you have customized the appearance of the navigation menu to your liking, you can activate it by selecting the “Save” option. If you go to your website at this time, you will see that the navigation menu is consistent across all of your WordPress pages and articles.
Method 3: Creating a Custom WordPress Theme (More Customizable)
Another option is to design a unique WordPress theme. Although this approach is more complex, you have total control over where the menu shows in your posts or pages.
In the past, creating a unique WordPress theme required you to write code and follow challenging instructions. However, utilizing SeedProd, you can now quickly develop your own themes.
The greatest drag-and-drop WordPress page builder is SeedProd, and Pro and Elite subscribers also gain access to a powerful theme builder. You may use this to create your own WordPress themes without having to write any code.Please go to our tutorial on how to make a unique WordPress theme (without any coding) for further information.
You may include a navigation menu on any page of your WordPress website after designing a theme.
You may easily locate the template that manages the design of your posts or pages by going to SeedProd » Theme Builder. Usually, this will be a “Single Post” or “Single Page.”The drag-and-drop page builder on SeedProd will then launch the template.
Navigate to the ‘Widgets’ area in the left-hand menu. Drag the Navigation Menu block from this location into your layout.
The Navigation Menu block will then be selected once you click in the live preview.
Now choose the menu you wish to display by using the ‘choose menu’ option.
An optional title may now be included in the ‘Title’ box. This will show up above the WordPress menu of options.
Click the ‘Apply’ button to get a sample of how the menu will appear on your website.The options in the “Advanced” tab will then allow you to alter the spacing, apply custom CSS, and even add CSS animations.
Click the ‘Save’ button in the SeedProd toolbar if you are satisfied with the way the menu appears. Next, click “Publish.”
Bottom Line
We hope that our tutorial on how to Add WordPress Navigation Menu in posts has been helpful to you. Navigation is a key element of any website, and having easy-to-use menus can make a big difference in the user experience.


