Artists, photographers, and event managers usually prefer to add watermarks to the images which prevent the misuse of their image and always hold the credit of the author.
Table of Contents
But the real question being is it tough to automatically watermark to images in WordPress?
If you are an industrial professional, watermarking is quite important. Watermarking assures you of prevention from content theft. When there is a watermark on the image it is a clear sign of your authorization and sends a message that it cannot be used without permission.
Watermarks can also be a potential marketing strategy without technically paying anything for it. Not just this, but there are various advantages of watermarking an image.
We have covered the best methods which enable you to automatically watermark to images in this comprehensive article.
Using Envira Gallery and managing a system that automatically watermark to images
The best gallery plugin for WordPress which allows you to create mobile-friendly image galleries into your WordPress site is Envira Gallery. It is easy to add watermark to your WordPress images because Envira comes with a watermarking add-on.
1. Photo Gallery by Envira – Responsive Image Gallery for WordPress:
Just like in different plugins here the first thing you need to do is download, install, and activate the Envira Gallery Plugin. Upon activation visit the settings page and go to the Envira Gallery option and enter your license key. Visit the Envira Gallery website. After logging in you can access the license key from the account dashboard.
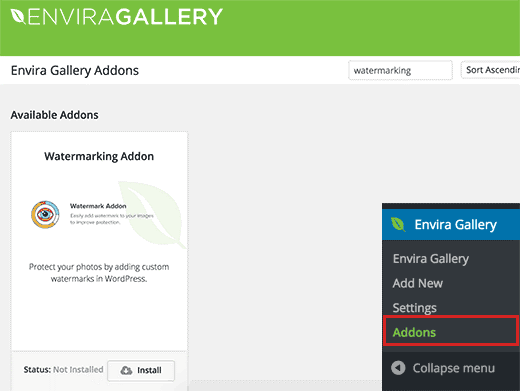
Head over to the Add-On page from the Envira Gallery once the license key has been entered and the account verification has been successful. Locate the Watermarking add on by scrolling down or searching for it.
After discovering it, install and activate the same. Your images can now be added to the responsive gallery with watermarks. Simply open the Add New option from the Envira Gallery and conveniently create your first image gallery.
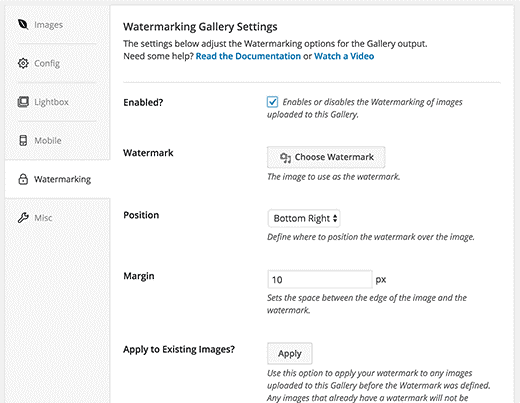
You will notice the watermarking tab as you scroll down on the page. When you click on it you can access the settings for the same. By clicking on the checkbox next to Enabled you will be able to see more options.
After clicking on choose watermark button, upload an image that you want to use as a watermark. The margin and position of the watermark can be changed and managed by you without any extra efforts.
You can move on to adding images into the gallery once the watermark image has been successfully added. Click on ‘Select files from other sources’ or ‘Select files from computer’ after scrolling up.
After adding a few images in the gallery you will be able to publish it on your site. It is very simple and quick to add this gallery into posts and pages on WordPress. All you have to do is click on the ‘Add gallery button’ by editing a page or post.
A popup will emerge after clicking on the button and you need to select the created image gallery and then press the insert button. In the post editor, you will notice the Envira Gallery shortcode will appear. You can successfully save and publish the page or post you have been working on.
After these steps, you will find the watermarked image gallery on your website.
Using Easy Watermark to automatically watermark to images
Just like every other plugin this plugin also follows the same route. The first thing to do to add watermark to images through this plugin is to download, install, and activate the Easy Watermark plugin.
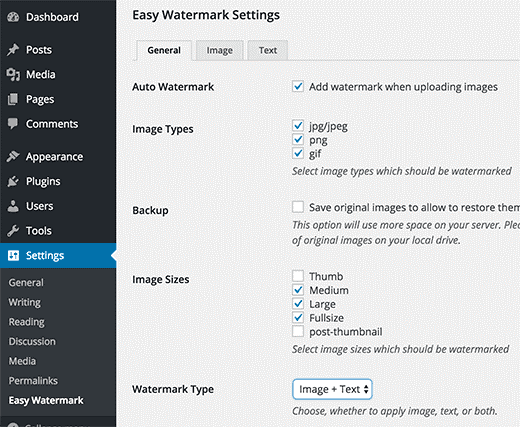
Go the Easy Watermark page upon activation from the Settings menu to configure plugin settings.
It is in three tabs that the settings page has been divided. When you check the General settings tab, you will discover the first option to automatically add watermark to all images upload.
Specific image files to apply watermark can also be selected from settings. The watermark also needs to be selected by you. For use as a watermark, the plugin enables you to add text, image, or both.
Review all rest of the options in the settings panel and then click on the save changes button to store your settings successfully.
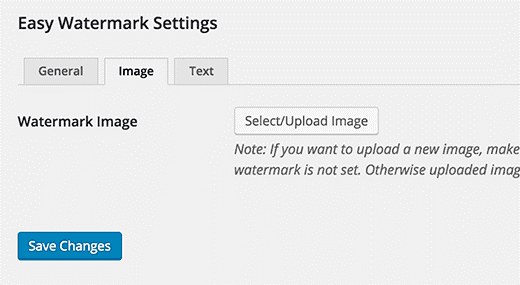
Further, on the plugins settings page click on the image tab option. The image that you want to upload as watermark should be uploaded here. In case you have selected text or text+image as the watermark type then you need to select on the text tab option.
In this option, you can conveniently add the text that you want to add for the watermark. You can select and customize the watermark alignment, font size, font color, and the fonts itself.
At the end, to store all your settings click on the save changes button and all the changes made by you will be live. In this manner, you can easily add watermark to images that you upload or add to your WordPress site.
Method to add Watermark to Old Images in your WordPress site
Automatically watermark to images is an essential feature for the new images uploaded on the WordPress site. But adding watermark is also important for the existing images on your site.
Go to the Easy Watermark option from the Media menu to add watermark to the old images and click on start button under bulk watermark section. Yes, you read it right, it offers you an option to apply a watermark to bulk images.
For all your media uploads in your library, we strongly recommended you to create at least one full back-up before executing this procedure as this process in no manners is irreversible. Once done it cannot be undone.
There is an option to select the backup of original uploads on the page you are working. If you have selected that option that you can restore the old images with the newly published watermarked images easily.
Manually Add Watermark to Images
Easy watermark provides you with a manual option to add watermark to your images in case you are not interested in adding watermarks to all uploaded images.
Go to the Easy Watermark options from the Settings menu and unmark the checkbox near the option which says Automatically add watermark to images.
Now you can go to Library option from the Media menu. As soon as you switch to list view on the window, you will see an option titled Add Watermark next to each existing image in the library. In this manner, you can also manually add watermark to the images on your WordPress site.

