WordPress to Dropbox or Google Drive For Free
The most impactful activity that you can do for your website is creating a backup. It helps you when a disaster strikes suddenly. All you have to do is quickly restore the copy and you will be good to go.
Table of Contents
There are lots of hacking and other vulnerabilities hitting various WordPress websites across the globe. Hence, creating a copy for free is highly important for you. In this read, we have included the necessary information and steps to backup WordPress to Dropbox. Plugins have an active role to play in this and they can also help you in the migration process.
It is necessary to create a weekly automatic backup for your website to Google Drive or Dropbox. This keeps you secured all the time. Before learning about the actual process we will understand the best practices for the same.
Best Practices
Storage
It is not recommended to have only local copies of your site. You will end up losing everything if someone hacks your account. Hence, it is advisable to create a copy in remote locations. Locations, that in any way are not linked with your main account. External drive storage or storing it at someplace in the cloud is the best option.
Frequency of the process
The frequency depends upon the number of times you update your website. The aim is to ensure that you lose minimum data in case of a crash or hack. If you are dynamic with your website i.e. post every day then it is recommended that you create copies three times a week.
A weekly schedule will perfectly suit you if you are publishing articles three times or less in a week. The backup strategy directly depends on the posting frequency. Hence, decide that and backup WordPress to Dropbox to Drive accordingly.
Do not depend upon the host
There are various hosting providers that offer to create a copy for their clients. Although it is being taken care of, there is no harm in creating a personal copy. There have been instances when the hosts missed creating a copy. It is also possible that the restoring time is quite long from their version.
The crucial thing is that hosts sometimes lock the accounts. This makes you completely dependent on them, which ideally should not be the case.
Testing
Blindly creating copies and storing them is not the ideal condition. The best practice will be to restore it. Restore a full copy on the subdomain once it is created. Check for everything and see if it includes all the elements and content. If the stored files are of no use then there is no meaning creating it. Thus, to remain at least risk does not store it in new places. Always prefer to backup WordPress to Dropbox.
Have an eye on the Logs
You have to check the logs and ensure that there is no error in the entire process. It is an automated process therefore it will become difficult for you to remember. Hence, test it once in a while and check if it is working properly.
Retention Period
Experts have advised that one file for an entire website is never enough. Think of a situation where a hack is ongoing for several weeks. When you find it out the damage it will be irreplaceable. Before importing the latest articles you will have to find a copy before the hack and restore it. Only if you have a retention period you will have multiple copies for a particular period. Now, this period also varies depending upon the activity of a website.
The process to Backup WordPress to Dropbox or Google Drive
We will see detailed steps in this section of creating copies of your website and then storing it on the desired location. In this guide, we have used the WPvivid backup plugin which is a free program. If you have any other programs of your preference then you can use that too.
Step 1 – Install the Plugin
In order to commence with the operation, the primary requirement is to download and install the program. Once it is done ensure that you activate it by navigating to the Add New option from the Plugins menu.
Step 2 – Configure Storage
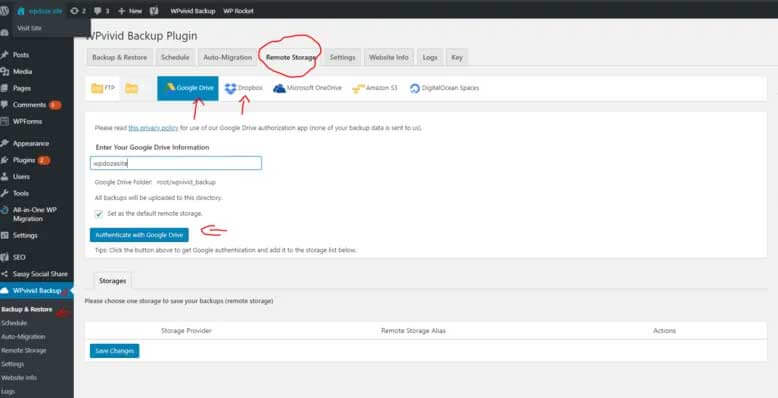
This is an essential step as you configure the remote storage location for the backup file. Navigate to the remote storage option from your activated plugin’s tab. Then choose either Dropbox or Google Drive, enter the necessary information, and authenticate. Make sure that in the end, you allow it to access your drive. When you do that the storage configuration process is successfully completed.
Step 3 – Automate the Process
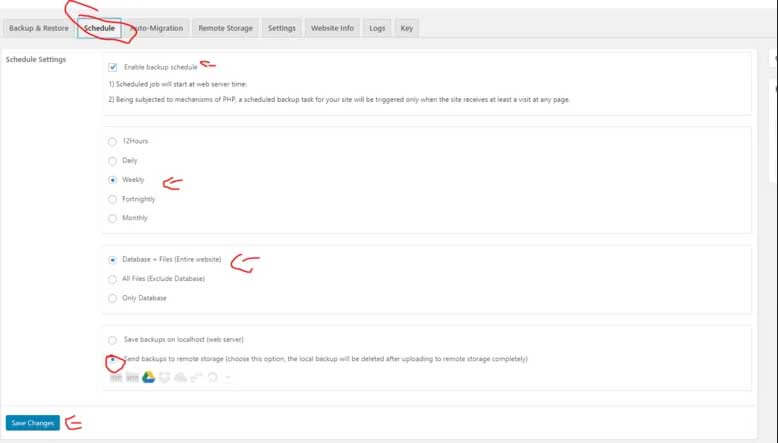
Here is the step where you have to enable the auto backup option for your website. Executing this is a simple task. First, navigate to the Schedule Tab and then do the following.
- Check the box that says Enable backup schedule
- Choose the interval. For instance, we select Weekly
- Choose the things to back up so we select database + files. This will enable creating a copy of the entire website.
- Finally, select the remote storage where you intend to send the files. Remember once the file is successfully uploaded to the remote server the copy from the local server will be permanently deleted.
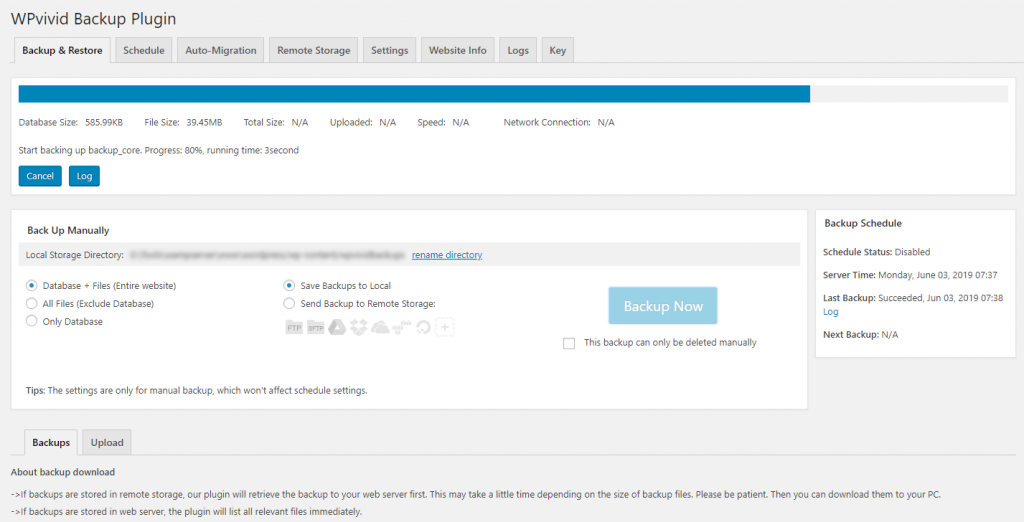
You are done with the process. When you go to the Backup & Restore window of your platform you will be able to see the schedule you just created.
Step 4 – Configure the file size and decide the retention
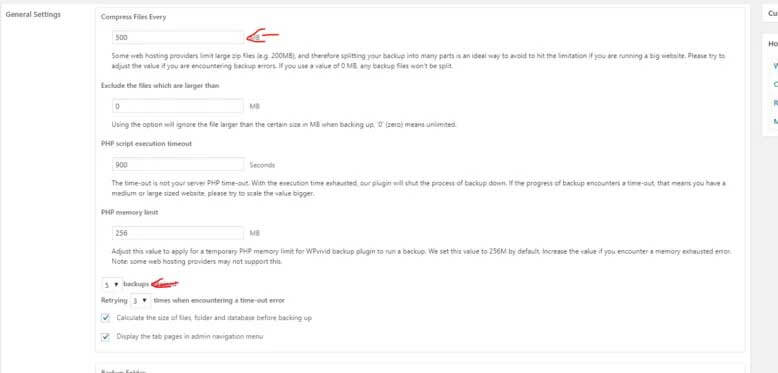
It is necessary for you to select how many copies are to be retained and file size for the same. The file size needs to be put into the function of the hosting provider. There are certain hosts that limit the size to 500MB, so you must select a size accordingly.
In the next step select the number of copies you want to retain. As discussed above it will vary depending upon the actives of your website. Five is an ideal number.
Step 5 – Create a Manual Backup
If you do not have any files created yet then you can quickly create one. You have to check on the Send backup to remote storage option first. Then from the main settings page hit the backup now button and the process will start.
After you manually backup WordPress to Dropbox you can visit there and check the file.


