It has been recommended by WordPress experts that images can add value to your content.
Table of Contents
For making SEO-Friendly content one must make sure to include non-copyrighted or original images which can engage the audience on the site.
Therefore, images have become an integral part of the content for connecting and engaging with the user for any WordPress site.
During the process of adding an image, often it happens that you cannot use certain images directly on the webpage.
It requires basic editing so that it suits the requirement of the article or the text along with which it has to be placed.
Many developers choose to rotate or resize the image so that the audience is attracted by it and chooses to stay on the site. Often content creators and developers use different software to make these required changes.
But what if we tell you that all these basic editing of an image can be easily carried out directly from the WordPress admin area?
The basic functions of image editing in WordPress includes scaling image size, flipping vertically or horizontally, rotation, cropping, and others which can be easily done straight from the WordPress admin area.
Such features are handy when you are not operating from your system or your regular editing software is facing issues. It helps upload edited images on the go.
Resizing image which is one of the most required editing features before uploading any image can be carried out in WordPress without any editing software.
Different methods to carry out basic image editing in WordPress are explained in detail in this article which will help you in polishing your skills as a developer.
Flexible image editing in WordPress admin area
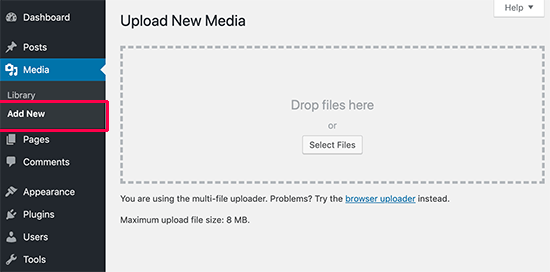
Before editing an image you must upload that image on WordPress. Uploading can be quickly done through either post editor when you are in the process of writing a post or by Adding New Page from the Media menu.
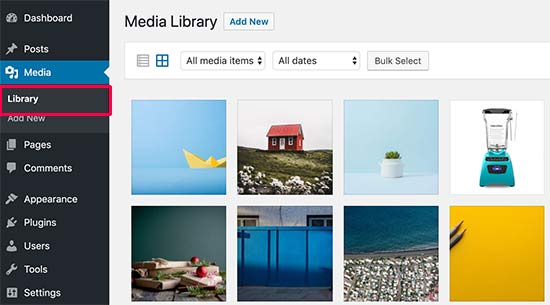
After uploading the image visit the library page from the Media menu which will help you locate the uploaded image.
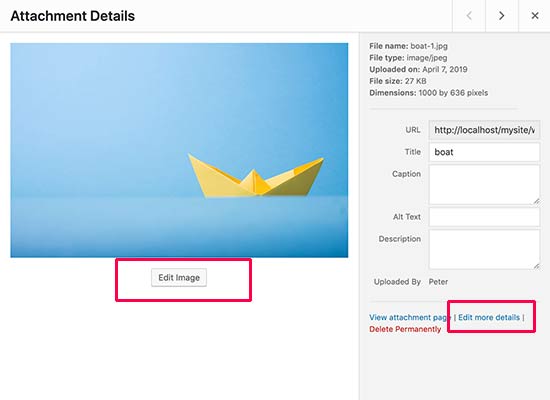
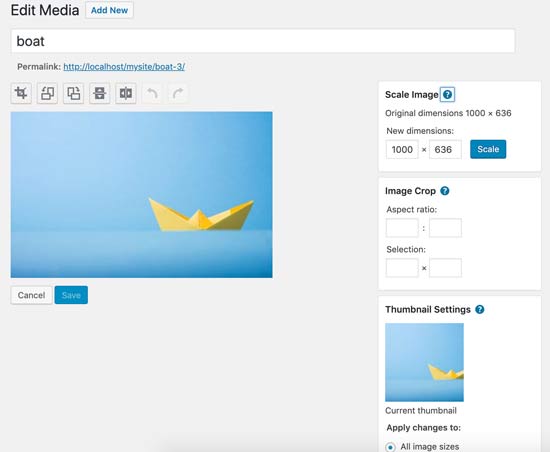
As soon as you spot the image double click on it and it will open in a popup window. On the left side, you will be able to see the image preview and on the right, you will see the image details.
In a built-in WordPress image editor, there are two unique ways of opening an image.
Selecting the Edit Image button below the image preview will result in opening the image editor inside the popup which is the first way.
The second way is clicking on the link which says edit image details.
By clicking on this link you will be redirected to edit media page and the media popup will be closed.
To open the image editing screen click on the edit image button, below the image preview. You will be able to spot a toolbar with different function option on the top of the image.
On the right side, a sequence of options will be available that can help you in resizing the image. Confused about what these options are? Here is a detailed explanation of them.
Function on the toolbar at the top for basic image editing in WordPress
- Flip: It is often required to flip the image in a horizontal or vertical direction. Sometimes content creators express adamant desires to replace the original image with a flipped version to create an emotional or dynamic aura of the content. This function lets you flip the image in any direction that you desire.
- Crop: One of the basic editing tasks that creators and developers intend to carry out is cropping an image. You can use this function by clicking on the button, selecting the area you want to keep and the rest of the area will be automatically cropped.
- Rotate: This function allows you to rotate the uploaded image to any specific degrees of rotation which is required. People usually prefer to rotate the image in 180 or 360 degrees. This tool enables to rotate your image to your desired angle as creativity has no limits.
- Undo/Redo: All of us create errors and to rectify those errors you can use the undo function even here in this photo editor. In case after making an undo you are not convinced with the output then apply the Redo function and the changes will revert.
Function on the toolbar at the right column for basic image editing in WordPress
- Scale Image: With this image, you can keep the original proportions and manually scale the image. It is recommended that this function is used before cropping the image.
- Aspect Ratio: If you intend to keep a certain aspect ratio of an image intact then this function allows you to do so. After using this function no matter whatever editing you make the aspect ratio will be maintained.
- Thumbnail Settings: This function comes with three options for you to choose from i.e. apply changes to only thumbnail, all image sizes except thumbnail, or all image sizes. It must be noted that in WordPress this thumbnail is the smallest image size. It must not be confused with the post thumbnail or any other featured image.
Click on the scale, update, or save button as soon as your satisfied with the image to make sure that the changes made by you are permanent. WordPress creates a new copy of the image with changes on your server.
Restoring Original images after editing in WordPress
Even after spending considerable time on basic image editing in WordPress editor you can easily choose to restore the original image.
Click on the edit option again. As soon as you click the option a new labelled Meta box “Restore Original Image” will appear.
Here click on the restore image button. By doing this WordPress restores your original version where you can choose to re-edit it or keep it as it is.
You might face technical issues in uploading images or making an edit sometimes depending upon the version that you use. But every issue has a solution. You can turn to the WordPress community for the resolutions of such issues.
If you are checking how to do image editing you should also check on how to do WordPress image optimization.
And also check image optimization for search engines in WordPress.

