Whether companies enter a new market or develop a new brand identity, sometimes changing domain names is inevitable. Since a website address represents the brand online, aligning the name with the latest changes is necessary.
Table of Contents
However, a domain change comes with some risks. For one, it may lower the website’s search engine optimization (SEO) score as Google has to reindex the site all over again, resulting in a traffic and page ranking drop.
The good news is that proper preparation and processes can minimize the unwanted effects of a domain name change. Read on to see our recommended steps, tips, and tools to change your WordPress domain without harming SEO.
Why Change Your Site’s Domain Name?
Most companies generally stick to one domain name. However, some web owners may change domains for a few reasons:
Rebranding: A business may change its domain due to a new brand name, management, or shifting industry trends in order to stay relevant.
Changing domain extension: Swapping from a generic domain extension to a country-specific one can be beneficial to gain local SEO benefits. Some businesses may do it vice versa to attract broader visitors.
Creating a more user-friendly URL: Many old WordPress websites’ URLs may use complicated characters. Therefore, it’s better to change them into simpler and shorter names to make them memorable.
How to Change Your WordPress Domain
Follow these 10 steps to change a domain name properly without losing SEO – from backing up current data to updating the domain in all marketing channels.
1. Backup Your Current WordPress Site
It’s vital to backup your current site before making any changes. Doing so will help with data recovery in case any error occurs.
Many web hosting providers offer a one-click backup tool to execute a full backup instantly via their hosting control panel, so check if your web host has this feature.
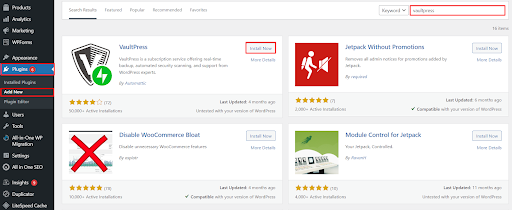
Alternatively, use a backup plugin like VaultPress or BackWPup. Most of these plugins are free and can backup the entire WordPress database, including plugins and themes.
First, install the plugin by navigating to the WordPress dashboard and clicking Plugins -> Add New. Type the desired plugin into the search bar and hit Install Now -> Activate.
Then, visit the tool’s window and choose Backup Now to start backing up the data immediately. Generally, backup plugins let you download the data to a local server or upload it to cloud storage, like Google Drive or Dropbox.
2. Check the New Domain
First, list potential domain names for your new WordPress website and check their availability via a domain checker tool.
If your desired domain is taken, consider similar alternatives or contact the domain owner and negotiate a price. To do this, look for the owner’s contact information using the WHOIS tool.
However, ensure that the pre-owned domain name has a clean past – no spam backlinks and low-quality content that may harm SEO. To check, go to Ahref’s Backlink Checker Tool or input the URL into Google Search Console to see if the domain ever received a penalty.
Finally, head to an accredited domain registrar to buy the new domain. Alternatively, check if your web host offers a domain registration service.
Keeping hosting and domain registration together can reduce hassle since everything is managed under one hosting account. Some providers also offer bundled domain and hosting packages, helping to minimize costs.
3. Add Your New Domain Name and Copy Files
Add the new address to your current hosting account by typing it under the Add Domain or Change Domain Name menu in the control panel.
Alternatively, sign in to your cPanel account and select Domains -> Addon Domains. Then, fill out the New Domain Name under the Create an Addon Domain Name section.
Next, move your WordPress files from the existing domain to the new one. To do this, go to your web host’s File Manager and check if both domain folders appear.
Locate the old domain’s public_html folder and click on Copy or Move, depending on whether you want to keep the file copy on the old domain or completely transfer all files to the new WordPress site. Then, paste or move the data to the new domain’s folder.
4. Update the Existing WordPress Website Address
Updating the old site address helps visitors and search engines find and index your content more easily. There are several ways to change the old domain to the new one.
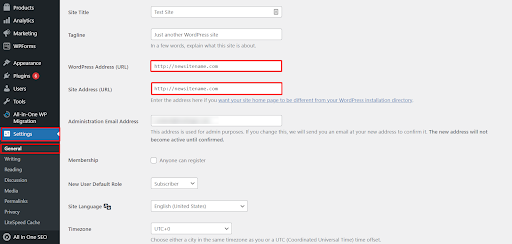
The easiest and most common method is to update the domain via the WordPress admin dashboard. Click on Settings -> General and change the WordPress Address (URL) and Site Address (URL) to your new domain. Then, hit the Save Changes button.
However, those fields may not be available for some users due to a fixed setting in the wp-config file. Follow these steps if you encounter this issue:
- Go to your hosting account’s control panel -> File Manager.
- Click the public_html folder -> wp-config.php.
- Right-click and choose Edit.
- In the following code, replace http://sitename.com with your new URL:
- Insert the updated code under $table_prefix = ‘wp_’; and click the Save & Close button.
define(‘WP_HOME’,’http://sitename.com’);
define(‘WP_SITEURL’,’http://sitename.com’);
5. Set Up 301 Redirects
After a domain name change, users may find a 404 Not Found error when visiting the old website. To fix this, set up a 301 redirect – a permanent redirection from one URL to another. This means users visiting the old URL will be automatically sent to the new one.
There are three ways to set up 301 redirects:
- Via a WordPress plugin. Install a plugin like Redirection or Simple 301 Redirects.
- Using your hosting provider’s control panel. Check whether the web hosting company has a Redirects menu on their control panel. This option should also be available for those using cPanel.
- Editing the .htaccess file. Navigate to File Manager and find the .htaccess file under the public_html folder. Right-click and select Edit. Next, copy and paste the following code at the top lines and replace sitename.com with your new URL:
#Options +FollowSymLinks
RewriteEngine on
RewriteRule ^(.*)$ http://sitename.com/$1 [R=301,L]
6. Notify Google about the Changes
Notifying Google about the domain change helps reduce any negative impact on your site’s SEO. That way, Google can find the new domain and prioritize it in search results.
Ensure you use the same Google account to handle the old and new site, then follow these steps:
- Sign in to your Google Search Console account.
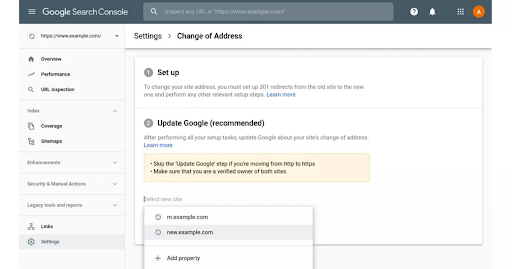
- Open the Change of Address tool under the Settings menu.
- Type in the new site address.
- Click the Validate and Update button.
Note that Google doesn’t process this change request immediately, so you should keep 301 redirects in place for a year after a domain change.
We also recommend keeping the old address active for at least 180 days to help users reach the new site and let Google process the redirection.
7. Submit a New Sitemap
A sitemap helps search engine crawlers find and index pages properly. Therefore, it’s essential for SEO that Google knows your new domain’s sitemap.
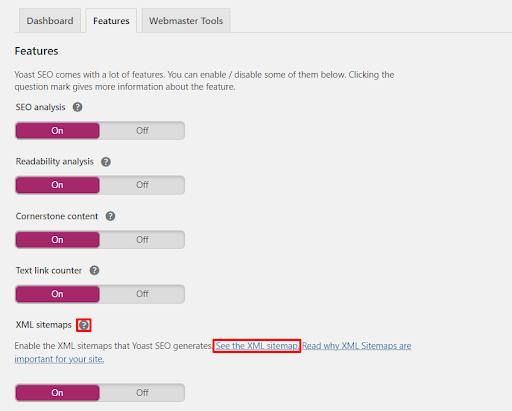
If you use the Yoast SEO plugin, simply navigate to the WordPress admin dashboard -> SEO -> General -> Features.
Then, ensure the XML sitemaps toggle is on. Click the question mark tooltip next to the XML sitemaps header and choose See the XML sitemap. Here, you should see the URL change to https://newdomainname.com/sitemap_index.xml.
Alternatively, go to Google Search Console and locate Sitemaps under the Index menu. Then, input the new sitemap URL above and press the Submit button.
8. Check the New Website for Broken Links
Perform an SEO audit after moving the content to the new site to ensure that you don’t miss anything during the migration process. This step includes checking internal and external links, since changing domains may cause broken links.
Google Search Console is a free tool to check for broken links and 404 errors. Click Coverage under the Index menu to see, replace, or remove links.
Alternatively, activate a WordPress plugin like the Broken Link Checker. This tool will scan your site and list broken backlinks and internal links across web pages. To fix them, hover over a URL and choose Edit Link. Then, input the new link or click Unlink to remove it.
9. Update Google Analytics
After updating Google Search Console and the sitemap, go to your Google Analytics account and change the profile to the new website. That way, you won’t lose data and the tool will display updated insights.
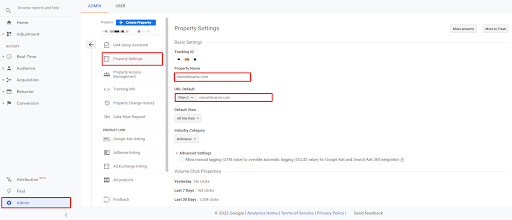
Here are four steps to change your site URL in Google Analytics:
- Click the Admin menu on the left-hand sidebar.
- Select Property Settings in the middle column.
- Change the Property Name and the URL Default to the new domain address.
- Scroll down and hit the Save button.
10. Update All Possible Mentions
When changing to a new domain name, consider creating a new custom email address for consistency – like [email protected].
To do this, go to your hosting provider’s admin area and add a new email account. Then, change the email address on the site’s Contact page or set it as the new destination address for your contact forms.
Also, update mentions of the old domain in any marketing content, like:
- Social media bio
- Email signature
- Business cards and merchandise
- Packaging
- Google My Business listing
If you use email marketing software or join an affiliate program, make sure to update them with your new domain, as well.
Finally, announce the new site to partners and existing customers through a blog post, social media campaign, and email marketing to keep them updated.
Conclusion
WordPress domain changes are sometimes necessary for businesses that want to rebrand their identity or have a simpler domain. However, changing to a new domain without the proper steps can decrease search engine rankings and web traffic.
Here is a step-by-step guide to change your domain name without losing SEO:
- Backup the existing website files.
- Check the new domain availability and purchase it.
- Add the new domain to your hosting account and transfer the old domain’s files to the new domain’s folder.
- Update the website address.
- Permanently redirect the old site to the new one.
- Notify search engines about the new domain.
- Submit a new sitemap.
- Check the new site’s internal and external links.
- Update your site’s Google Analytics profile.
- Change the old domain with the new one on all platforms.
Although there are a significant number of steps, carefully learning and implementing them helps reduce any risks associated with domain changes and ensures you won’t lose SEO benefits. Good luck!

