So, are you trying to add a countdown timer in WordPress? Have you tried a lot to do this, but failed? Don’t worry, you are in the right direction.
Table of Contents
Today, we will show you a step by step guide to creating a countdown timer quickly. Probably you know the importance of doing this.
A countdown timer usually used to create an emergency or excite users to make the purchase as soon as possible before missing out on the offers.
This helps in encouraging and empowering buyers to be part of exciting plans and offers, which proved beneficial for both buyers and sellers.
It is just a way to influence potential buyers y offering them appealing offers, so they feel they are shopping for the products at cheap price.
Special Tip- as a seller you need to assure, a countdown is for a short time plus appealing.
To use this outstanding feature, you can use countdown widgets that remind your active buyers about upcoming sales, so they know how and when to avail of this opportunity. With this, you can even enjoy return traffic to your site that better your site performance.
What Is The Right Time To Use Countdown Timer?
It usually depends upon you, when and how to use a countdown timer in your site. There are several reasons which you will need to check, so you can avail maximum benefits from this. Your main motive to start countdown is earned greater ROI, hence following is the right time to use this.
- When you are new in the industry, so use it as a coming soon offer.
- If your site is going back on the web after some time due to maintenance.
- When you are hosting a party or an event.
- When you’re intruding on the new product on your site.
- Festival seasons or any special days.
Advantages of Using Countdown Timer in WordPress
If you are ready to create a countdown timer in WordPress then you must look into the benefits that you may claim.
- This brings product value to the customer’s attention.
- This encourages buyers to buy the product immediately.
- It quickly improves your Revenue
- Boost purchases
- Boost ROI as well as the performance of the site
With the countdown feature, you will see the power of urgency. After all, the buyer is getting 50% off and other deals you have offered. This big sale offers used by almost all eCommerce platforms like Amazon, Snap deal and many more.
So, why not you as well? If yes, so let us know learn how you can create countdown timer.
How to Add Countdown Timer in WordPress
WordPress is a big CRM system along with high-quality tools and features that made blogging and online business easy. To add Countdown in WordPress you have two ways to do this such as:
- Add with OptinMonster
- Add with SeedProd
In this blog, we will show you both ways in detail. Hence you can choose your preferred one at your convenience.
Let us get started!
Add Countdown Timer with OptinMonster
OptinMonster is one of the best platforms if you want to make the whole process simple and safe. It is helpful to see the countdown timer as the form of a widget. How you can do this? It is very simple!
The benefit you can claim by using OptinMonster is you do not need to wait for a long time for its complete setup.
It is one of the strongest lead generation app that helps to achieve a huge number of audience in your site along with high conversion rates.
Moreover, you can create effective popup campaigns that displayed to your targeted audience perfectly and you will see the reactions.
To enjoy the advantages all you need to install the OptinMonster plugin in your WordPress and then create your Id. Let us study in-depth about it.
Step1- Connect OptinMonster App wth Plugin
Remember, a plugin work as a connector between the WordPress website and the app. So, first, install the OptinMonster plugin on the site and then activate it.
- Open your WordPress dashboard then click on OptinMonster plugin.
- The two options will appear and you will need to choose one. Get OptinMonster and the second one is Connect to your OptinMonster account.
- If you have created the account then choose the second option otherwise first.
- Then set up your account.
- Once you have completed with all formalities then choose Authorise OptinMonster.
- This will take you to the new window, where you will see Connect with WordPress option.
- Click on it and it will atomically link your app with WordPress Dashboard.
Step2- Creating Countdown Timer with OptinMonster
Once you are done with the first step, now you are ready to create a countdown timer. First, you need to go on the WordPress Dashboard and then click on OptinMonster to campaigns to create a new campaign.
Now, choose the best template and integrate the Countdown timer into it. For your better understanding, let us take an example.
Suppose we have chosen a Floating bar for the campaign. In this, you will be asked to enter the name and then choose the place where you want to show this timer.
If you are done with this, click on start building tab. After that, this will launch a drag and drop builder, where you need to design the timer. You can choose to Add blocks tab to add design.
Now, choose element blocks and here you will see countdown options. Drag the element and drop it into your designing panel, which is on the right side of your screen. Now, customize your timer with design such as color, fonts, etc.
Even more, you can edit the timer whenever you need it. Just reach to the countdown then settings. Here you will also edit the timer in the way you want to display it.
Select the time from when and where to start the timer and how long. For better working, you just select the visitor’s local time.
Step3- Publish the Countdown Timer
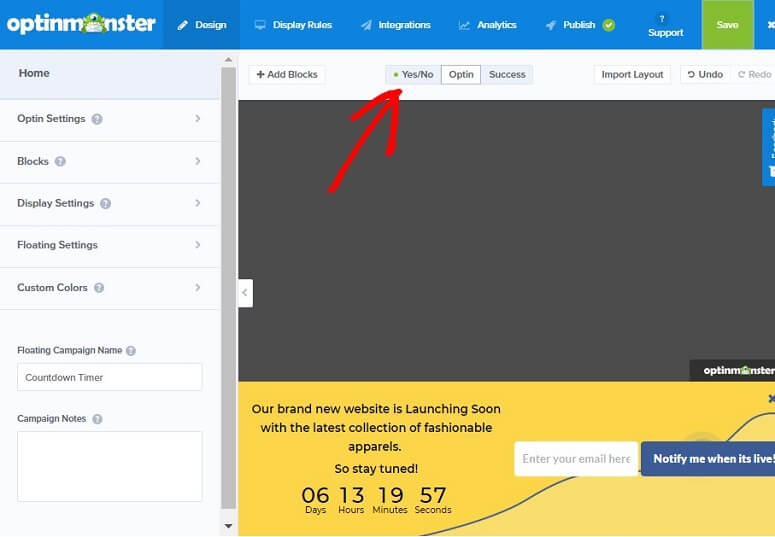
If you are done with all settings, click on the Save button. This will set your campaign to publish a Countdown timer. If you are ready to launch it then you’ll see Yes/No button on the top of the window. Click on the Yes button and activate it now.
Next, move to the Publish tab and enable the status to go LIVE. Below that, you can also customize your timer here. Click on the save button and see the results.
Congratulations! You are done.
Add Countdown Timer with SeedProd
It is yet another safe and 100% effective method to generate and display a countdown timer in WordPress. It is extremely useful when your site is under maintenance or new to launch.
It is an amazing plugin that will help you to create a smart and stunning timer that will give you the best benefits. This plugin also led you to add several elements in your timer. So, let us see the steps to do this.
Step1- Install SeedProd
You have to install the SeedProd plugin in Wordpress. Once it installs then activate it. Maybe you have to enter the license key into it, and it will be available on the SeedProd account. Copy and paste the key to get started.
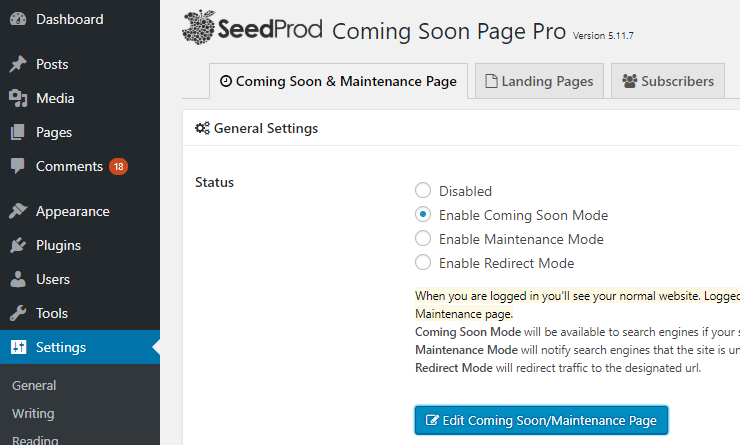
Now click on the Enable coming soon page option from the maintenance page/edit coming soon.
Then next choose the theme you like the most. Now get ready to create a countdown timer for the website.
Step2- Creating a Countdown Timer
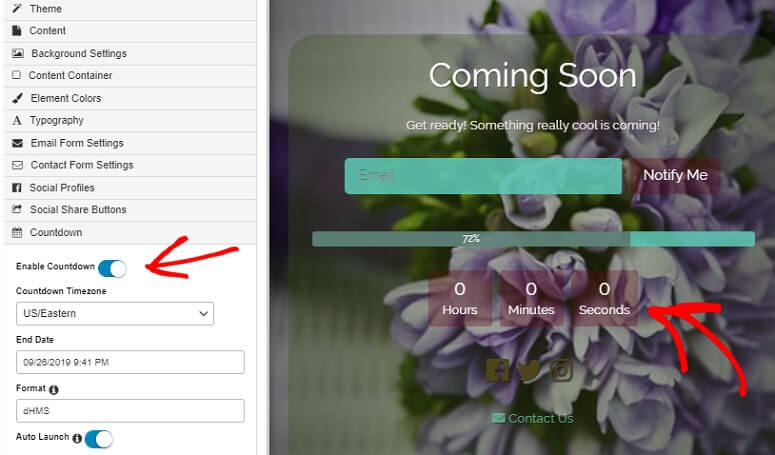
To create a countdown timer goes to the Page builder in SeedProd. Here you will see the editing options, left side of the window. Work on your coming soon page by customizing appearance like background, color, etc. from the background settings tab.
You can also add social icons, emails and progress bars. Now select the TimeZone to set the starting time & date and end date & timing for the countdown timer. With this, it automatically starts and deletes from your site.
Step3- Publish your Countdown
Now the coming soon page is ready to publish on your site. Click on the save option, which is available at Enable coming soon settings option. You can see the preview if you are okay with everything then publish it or you need changes then edit what you want.
Both of these methods are safe and perfect to create a countdown timer easily. Make sure you have performed each step carefully that never trouble you. We hope this blog will help you. Good Luck!

