Content access is defined as content that is only visible to specific visitors. In simple, content access is a permission granted to your members to see the particular content.
Table of Contents
Content access is important in sense to provide premium content to your visitors or members. Plus you can ask your customers to get pay or upgrade their plan for viewing premium content.
When we say about WordPress access levels solution the one thing comes in mind i.e. membership plugin. But are you aware of some other plugin that can be very useful for managing user’s permission? That tool is called a password protection plugin.
In this blog, we will discuss how we can create content access levels with the help of a password protection plugin and membership plugin. We will be using membership and PPWP i.e. password protection WordPress pro.
With simple membership, the plugin creates an access level
For content accessibility, a simple membership plugin is the most powerful and useful plugin.
More than 40,000 people have been installed this plugin and got 4.4. Star rating. This plugin was created by smp7, wp.insider. This plugin is available in 5 different languages including English (US), Japanese, Polish, Spanish (Spain), and Spanish (Venezuela).
Website visitors or customers will be allocated with a membership level once they registered and have a successful member on your WordPress website.
For utilizing these themes features you need to follow 3 basics steps mentioned below
Step 1: Install and integrate the simple membership plugin
- In WordPress admin dashboard click on add new button and then click on the plugin. And click on add new plugin.
- Now in the search bar type “Simple membership”.
- You will see the simple membership plugin is visible just click on the install button and activate. the plugin.
- Once clicking on the install and active button the plugin will get added to the admin navigation menu.
Step 2: Add new membership level
- In the left side, you will find WP Membership.
- And select the membership level section.
- Press on add new.
- Add all the details, for example, membership level name and the duration access and click on the default role.
- Duration time controls need to be mention to check how long members will be able to see the protected content after that time limit user will not be able to see that protected content. Different membership levels can be generated on our websites such as SEO editor, customers, and shop manager.
Step 3: With simple Membership, plugin protect pages and posts
- This step is essential to take into consideration because with this step you will make sure your website content is secured and the authorized person is accessing it.
- In WordPress dashboard click on a post or pages and select any page or a post that you are looking for.
- Over the edit screen of the post at the bottom, there you will see a simple WP Membership protection section.
- And check the box to say “yes, protect this content.
- Now pick the membership levels granted access.
- And save all the modification you have done.
Now the post or page you have selected previously is only visible to users who are logged in with the correct membership level.
Other customers or visitors who are not logged in will not be able to view the content they will ask to login first then try attempting. Hence they need to upgrade their membership plan.
Rather than using a membership plugin, you can also use a password protection plugin to modify or create content access levels for users.
Why go with password protection plugin for create content access levels
When you start using this plugin your users will not be required to login to the page to see the protected content. The premium users will just require entering the protected passwords to enter into the secured posts and pages.
This plugin is helpful for the users’ online course providers and tutors by which they can easily create a membership website. With this plugin, they can give access to students, secure learning materials, and manage the teachers in a smooth way.
For small scale business it becomes difficult to configure each and every setting for creating a membership website therefore this plugin comes into existence.
If you search for a password protection plugin to enhance the control access level you will found that there are not so many tools. Thus, the most powerful and effective plugin is considered to password protect WordPress pro. People will be able to unlock the lower level content via higher-level password protections.
Using the single plugin you can easily edit the passwords and apply the permission levels. To add extra access level on your WordPress website content, you need to follow these 3 steps while using a password protects WordPress pro.
First is to step up the access level and next comes password protection level and after this, you need to manage passwords.
With Password Protect WordPress Pro how to create content access levels
Arrange the categories by level
Rather than protecting separate pages and posts, you can also create categories. You can set the categories by level and then apply for protection on these.
All categories are having a different value. Like low level and high-level categories. Low-level categories some access or free whereas some high level ask you to pay or upgrade the membership.
The people having high-level category access will be able to access the content or can be able to edit it as per the accessibility provided. But these persons will be able to access all the content of lower-level categories as they are having access to a high level.
To start building categories you will have to download and install the Password access levels extension and password protect WordPress pro plugin.
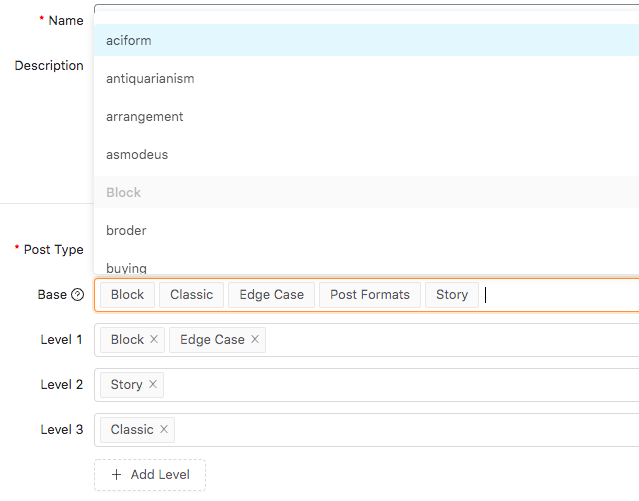
In the above screenshot, you will be able to see how levels are mentioned. Block, story, edge case will be the highest level whereas classic will be the lower level.
You first have to build a base having all categories that will be provided access to the people for adding the permissions to specific categories. 6 easy steps are mentioned below
- Click on password protect WordPress and then click on the access level.
- Click on add new.
- Add base name and description.
- You have to pick the post type. It can be custom post type, product, or posts.
- And after this from the dropdown list, select the base categories. In this way, you have to set up the categories.
- After authorizing the class categories, visitors will get permission to view the content from the block and story category. They don’t have to enter the passwords.
Make sure to add category must be satisfied with proper level otherwise each category will be defined by default as zero levels i.e lowest level.
You can easily select any categories and get the access level to it including WooCommerce product categories, custom post type category, etc.
Once done with base category now you have to apply for protection in manage password tab.
WooCommerce Product Categories and Password protect multiple posts
With some other password protection plugin, you can seal any particular category at a time. One of the best extensions is access level extension which allows you to active password protect various categories by levels at the same time.
In simple if you have added a password to that particular level then all categories related to that particular level will get secured with those passwords.
Follow the guidelines to password protect WordPress post or category by level
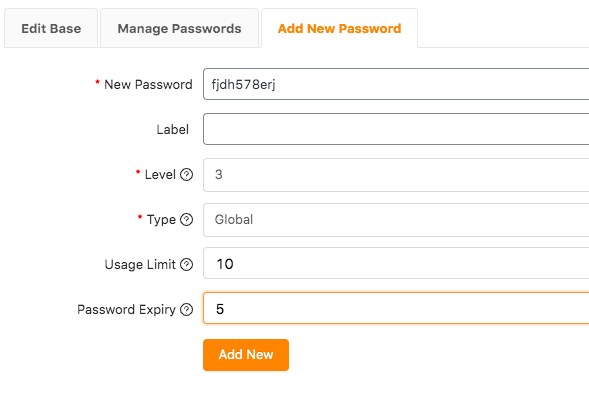
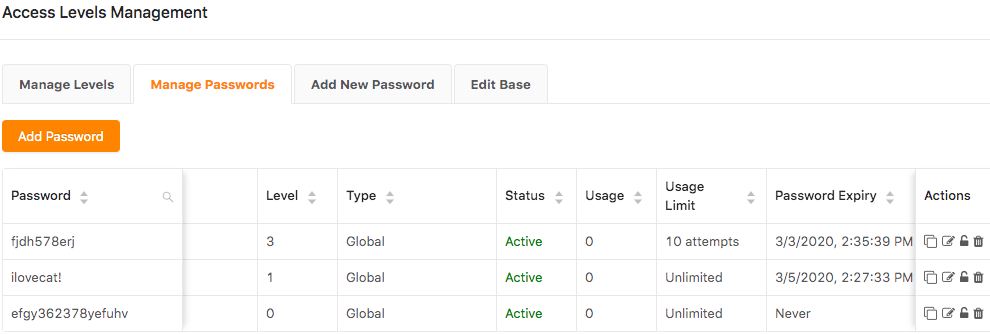
- In access level, popup screen click on add new password.
- Add password.
- Add the level that needs to be protected.
- Manage password type. Global passwords mean the visitors along with this password can access the categories which are set to be private. If you selected a particular role then the person will be able to perform that particular role such as edit, delete, view, etc.
- Set the limit to using a password.
- And set an expiry time for that password in the password expiry box.
In the above example, you will see that how we have added security to level 3 by adding a password.
Users will be asked to enter the password to access those posts. By adding passwords they will be able to access all post from category in level 1 and 2. An example is shown below
After adding a post to a protected category, the category you specified will be added with the passwords. The password you added on a category will be the same for this post.
Conclusion:
Password Protect WordPress pro is the best plugin to add levels for categories and secure it with a strong password. You can easily add different passwords to secure the levels in a single place.

