There are tons of things in customization that you can do with your WordPress site. Depending upon the client requirement and the target audience a website is designed. But when it comes to peculiar events, features, and broadcasts then it needs to be different from the site.
Table of Contents
It should be dedicated to a separate space with a bang on customization that it deserves. Only then one can make it look out of the box. Creating a Custom Blog Post Template is a unique decision to make.
Rather than sticking to a similar layout that is used in all blogs, one can create unique and user-friendly layouts. It is a tedious task to work out on the layout of all the sites as it requires attention to various factors. In this read, we have covered everything that you need to know about this topic. Happy Reading!
Importance of Custom Blog Post Template
Custom templates help you in avoiding a boring visual for a mass audience. It ensures that a particularly important post stands out from the rest of the other articles on the site. With customization, you can also ensure that a series of posts has a peculiar layout compared to the other series or standard posts.
Sometimes the content is extremely important and it needs to be displayed in a unique manner for a specific audience. In all such cases, customized templates will come at your rescue. It can be used multiple times and even assigned on a per-post basis with as many templates as required.
The WordPress platform itself has the capability of using and creating custom posts. Hence, we do not have to use any external plugin for the same.
Creating a Custom Blog Post Template
In this section, we will learn the easiest method to create such posts. Depending upon the theme that you are currently using there may be slight differences. But regardless of it, the basics will all remain the same.
It is necessary that you create a child theme if you are already not using one. If you are using a custom theme of any kind then it will work.
A child theme is important here because in case you happen to upgrade your parent theme you will lose all the data. But with a child theme, it will all be preserved.
A new file should be created in the root of the custom or child theme folder. Name the file with a title that you like and can easily recall. For example, we name it skt.php. Naming does not play any crucial role here, the only importance is that you should remember the file.
In the next step visit the code editor and add the following code at the beginning of your newly created file. You must also replace the template name, with your desired name.
<?php
/* Template Name: SKT Themes
* Template Post Type: Post
*/
/* The template is for featuring informative blogs of SKT. */
?>
In the above code, the post type indicates where this template will be used i.e. either on pages or on posts. The concluding line in the code is not a significant indication. But, it is, in fact, a comment that every author inserts for personal use. Such comments help in understanding the code at any time in the future.
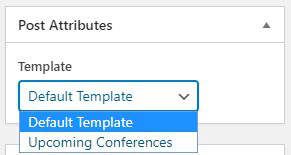
Once you are done with the code make sure you save the file. After the file has been saved visit the Template dropdown from the post attribute. This can be found on a meta box on the post edit screen. There you can discover the new post template that you created.
In the final step, the contents of the single.php file of the theme should be copied to the new custom template file. As soon as that is done you can start editing and customizing the page according to your requirements.
The other option can be to start from scratch as we did previously. This should be done if the layout of the customized post is going to be radically different from the standard posts.
Conclusion
Undoubtedly the above method will help you to achieve your desired results. The entire coding of a particular template depends on the theme and also on your requirements.
But the above method will be useful to understand the basics and get you started on the job. After starting, customization is an art and you can explore that as per the demand.


