Undoubtedly, WordPress is a blogging platform that can manage numerous posts, multiple categories, and tags in one place. The interesting fact about tags, categories, posts and all can be managed and replaced with custom post type or custom Taxonomy.
Table of Contents
Have you ever heard about Custom Taxonomy in WordPress? If no, so in this article we will show you what it is and how you can create a taxonomy.
Taxonomy
It is one that everyone uses, but many of them don’t know what it is and how they are using it. As per the biological point of view, Taxonomy is used to do group posts and custom posts together.
Taxonomies are classified into two methods, tags and categories in WordPress. You create a post according to categories and add tags, which means you bring both groups together in one place or post.
Let us consider an example. Suppose you have a category of fashion and you have to write on clothes, jewelry, shoes and more. So, you can divide the fashion category into subcategories like clothes where you can talk about clothes only, and so on.
Moreover, you can create more subcategories in clothes about men and women wears. This means you have a subcategory of each topic. This is called custom Taxonomy.
It’s simple and everyone doing this, but don’t know the exact name. Now, the point is how you can create a Custom Taxonomy in WordPress. To do this, we have shared two methods.
One method- Use Plugin who does not want to play with coding. The second method- you can choose the code method, or you can do everything without using of plugin.
If you would like to read more, then continue reading.
How to create taxonomy with the plugin
If you ready to install taxonomy then first you will need to install a plugin named Simple Taxonomy. To do this, follow the given steps:
1. Open the WordPress Dashboard and go to settings.
2. Click on Custom taxonomies and add New.
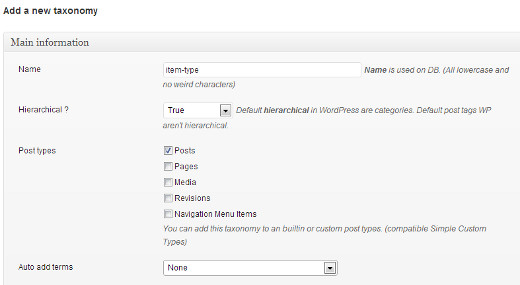
3. Now, your first step is to give a name to taxonomy as per your need.
Note- Make sure all letters in lowercase and without characters.
1. The next step is hierarchical, where you have to select true if you want to create taxonomy ad Category, where you can add a cub category. Choose false if you do want to add tags.
2. Next, you need to select post type so select posts here instead of others.
3. The next step is Associate, choose none. This will ask you to add auto terms.
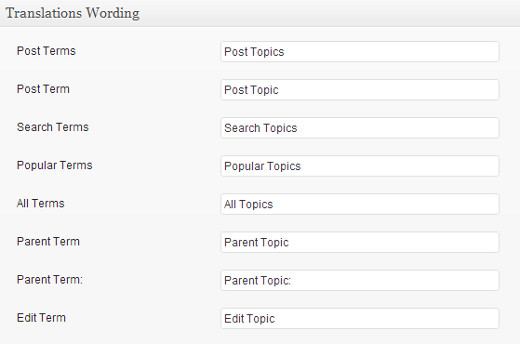
Suppose you have created a taxonomy and named its topics. Now, your job is to tell WordPress at which language you will need to translate that topic.
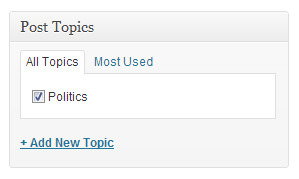
So for this, go to Translation wording and select the translation. Then click on the Taxonomy button and create it. Once it completed, it will come under the posts which further goes in categories and tags. This will also appear in the post edit area.
This is all about when you use the plugin, but what if you want to play with code?
How to create Custom taxonomy with Code?
We advise you to take this step if you are an expert in this. Add the following code in your coding. So, first, open the Functions.php file to create a taxonomy.
For hierarchical, use the following code:
//hook into the init action and call create_book_taxonomies when it fires
add_action( 'init', 'create_topics_hierarchical_taxonomy', 0 );

//create a custom taxonomy name it topics for your posts

function create_topics_hierarchical_taxonomy() {

// Add new taxonomy, make it hierarchical like categories
//first do the translations part for GUI

  $labels = array(
    'name' = _x( 'Topics', 'taxonomy general name' ),
    'singular_name' = _x( 'Topic', 'taxonomy singular name' ),
    'search_items' =  __( 'Search Topics' ),
    'all_items' = __( 'All Topics' ),
    'parent_item' = __( 'Parent Topic' ),
    'parent_item_colon' = __( 'Parent Topic:' ),
    'edit_item' = __( 'Edit Topic' ),
    'update_item' = __( 'Update Topic' ),
    'add_new_item' = __( 'Add New Topic' ),
    'new_item_name' = __( 'New Topic Name' ),
    'menu_name' = __( 'Topics' ),
  );

// Now register the taxonomy

  register_taxonomy('topics',array('post'), array(
    'hierarchical' = true,
    'labels' = $labels,
    'show_ui' = true,
    'show_admin_column' = true,
    'query_var' = true,
    'rewrite' = array( 'slug' = 'topic' ),
  ));

}
To create a non-hierarchical custom taxonomy like Tags, add this code in your theme’s functions.php or in a site-specific plugin:
//hook into the init action and call create_topics_nonhierarchical_taxonomy when it fires

add_action( 'init', 'create_topics_nonhierarchical_taxonomy', 0 );

function create_topics_nonhierarchical_taxonomy() {

// Labels part for the GUI

  $labels = array(
    'name' = _x( 'Topics', 'taxonomy general name' ),
    'singular_name' = _x( 'Topic', 'taxonomy singular name' ),
    'search_items' =  __( 'Search Topics' ),
    'popular_items' = __( 'Popular Topics' ),
    'all_items' = __( 'All Topics' ),
    'parent_item' = null,
    'parent_item_colon' = null,
    'edit_item' = __( 'Edit Topic' ),
    'update_item' = __( 'Update Topic' ),
    'add_new_item' = __( 'Add New Topic' ),
    'new_item_name' = __( 'New Topic Name' ),
    'separate_items_with_commas' = __( 'Separate topics with commas' ),
    'add_or_remove_items' = __( 'Add or remove topics' ),
    'choose_from_most_used' = __( 'Choose from the most used topics' ),
    'menu_name' = __( 'Topics' ),
  );

// Now register the non-hierarchical taxonomy like tag

  register_taxonomy('topics','post',array(
    'hierarchical' = false,
    'labels' = $labels,
    'show_ui' = true,
    'show_admin_column' = true,
    'update_count_callback' = '_update_post_term_count',
    'query_var' = true,
    'rewrite' = array( 'slug' = 'topic' ),
  ));
}
How to Display Taxonomy
To show taxonomy, use this single code:
the_terms ( $post-ID,’topics’,’Topics:’,’,’,);
You can add it in other files as well such as archive.php, index.php, and anywhere else you want to display the taxonomy.


