If you are operating a WordPress website, then you should know that there are various plugins out there that can help you increase the functionality of your website and in the process, enable you to offer your customers more user centric features and a better user experience.
Table of Contents
The problem though is that many of these plugins are third party plugins and most have not been developed as per stringent standards, laid down by WordPress.
As a result, these plugins are bound to cause your website to underperform, and can even shut you altogether from your admin panel.
This is why you need to resolve the same at the earliest but troubleshooting plugins without access to your admin panel is easier said than done.
More importantly, if these plugins, and most of them are external plugins, need to be deactivated right away, especially if you want your website to function normally again.
The good news is that WordPress comes loaded with all the advanced functionality and tools that you would need to resolve this issue and the step by step directions are posted below for your reference. But before you get starte, do a complete back up for obvious reasons.
Ways to Deactivate WordPress Plugins
1. Disable the plugins:
The first thing that you need to do is to disable all the plugins currently active on your website. The issue is that plugins can malfunction from time to time and can cause your website to develop several errors and what’s more, it can even affect your core files.
That’s why it is important that you deactivate the lot at the earliest opportunity. You can do this without accessing your admin dashboard; you need to access your root directory and you can do this with the help of the FTP client that your web host had provided you with.
Once you are logged in, check out the public_html file, it should contain the root directory for your website. Now, locate the plugin folder, it should be located under wp-content and once you do so, you may want to change the name of the folder in question.
By doing so, you would be deactivating all the plugins in question; so if you only want to deactivate a specific ?WordPress plugins, you can do so by heading over to that plugin and changing its name, to something else.
That should do the trick and now, you would have deactivate WordPress plugins in question. Once you have changed the name, you can revert to the original name again, this would not enable the plugin/ plugins in question yet.
Related Post: How to Prevent WordPress Plugins from Breaking your Website?
2. cPanel:
It is no open secret that some web hosts do not provide their users with FTP client credentials, in which case you need to access your host’s site and log into your cPanel.
Once you are logged in, you can try and access the root directory of your website, with the help of the same. Log in to your Cpanel account and click on “file manger” at the top right; this should take you to your root directory.
Now, you can either select the right domain by searching for it or open the public_html file as that should list your website along with its root directory.
You need to access the wp-content folder as plugins are listed right under it; once you have got access to the plugin folder, you can change the title to something like “plugins.disable” and that should immediately deactivate all the WordPress plugins on your website.
It is that easy; and remember to click on the rename button once you have finished renaming the plugins folder. Now, access your admin dashboard in WordPress to see if has indeed worked and whether all the plugins in question are indeed deactivated.
Once you have confirmed that’s true, head back to your root directory and rename the plugins folder back to plugins; you would not be enabling anything at the moment, at least, not unless you require these plugins again.
In case a faulty plugin is causing your website to underperform, then you can reactivate one by one and see if your website crashes again. If it does, then you would have located the faulty plugin in which case, you need to remove it from your website altogether.
Additionally, you can also inform the web host as well as the developer of the plugin of the issues that you had to face as a result of this plugin.
Related Post: The Many Ways to Updating Your WordPress Sites
3. phpMyAdmin:
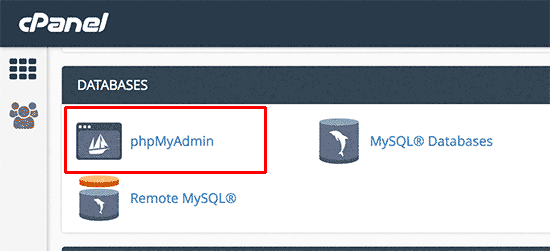
Of all the steps listed here, this is perhaps one of the most difficult ones and needs to be handled by someone who has some coding skills. Anyway, you need to access your cPanel account, and when you do, you need to head over to the database section and click on myPhpAdmin section.
Locate the database that you want to edit and you also need to click on the “+” to expand the same. Now, click on wp-options as that should display all your wp files.
Now, locate the one for plugins, you should find it under “active_plugins”, locate the ones that you need to edit and click on the edit link to the left of the same.
This should open up an options area with various characters and values filing the same, you need to delete all of this and replace it with the text given below.
a:0:{}
Now, click on the “Go” button below the field to save the same; this will cause all the plugins running on your website to be deactivated.
You can activate each one, reload your website and see if the plugin in question causes your website to crash. In case it does, then you may need to remove or delete it altogether.
These are some of the methods by which you can deactivate WordPress plugins without accessing the admin area. Granted that the last method is a bit tricky, but it works just as the rest of the steps listed here.
If a rogue plugin is causing you problems, then you need to troubleshoot the problem and remove the plugin altogether so that your website can function normally.


