Are you thinking of disabling Google AMP in your WordPress? Though many of the bloggers and webmasters made their shift to the Google AMP, they are now returning to the previous mode due to various reasons.
Table of Contents
However, making the decision to disable Google AMP in WordPress is easy, but the task is not. This is why it is important to follow the right method for it. Here we will discuss how you can easily get rid of the Google AMP to continue your work with ease. Have a look:
Why might you want to Disable Google AMP in WordPress?
The Accelerated Mobile Pages or AMP comes as an open-source initiative that helps in making the web faster enough for mobile users. It helps in improving the user experience.
The AMP works by serving pages with very minimal HTML and JavaScript. This helps the content to get hosted on the Google AMP Cache. Google can serve this version which is cached to the users instantly as they click on your link from the search results.
However, many website owners, bloggers, and online publishers have stopped using Google AMP. There are a variety of reasons behind this kind of decision.
Many of the users have experienced that there is no growth in the traffic, and it remains the same while all the other metrics keep improving.
Here are the most common concerns that many users have been facing while using the Google AMP in their WordPress.
- Visible drop in the conversion rate
- Low user engagement:
A significant drop in the conversion rate is one of the many reasons why the users are making their shift from the Google AMP. The AMP world has a very restrictive set for JS and HTML.
The site owners fail to do anything more about encouraging the users to subscribe to it or fill out the contact forms or anything else related to purchasing.
A low number of user engagements is another reason why users are shifting their minds. Many of the websites are highly dependent on user interactions.
Various tasks like clicks, tweet the widgets, comments, user ratings, etc., are the foundation of many websites. Google AMP makes it quite tough for the owners to maintain user engagement and have easy interactions in their content.
So, will you disable the Google AMP?
Based on the type of your website, you might consider disabling Google AMP in WordPress. As mobile users are the major audience base that you have, then using the AMP still might be a good option for you.
On the other hand, in case you have tried the Google AMP, and it left some negative effects on your conversion rate, then you should consider disabling your Google AMP on your WordPress website.
How do you Disable Google AMP in WordPress?
To disable the Google AMP from your WordPress, you need to follow a few steps. Here is how you can disable it easily:
Step 1: First, you need to disable your Google AMP from WordPress:
You can use a few plugins to disable the Google AMP from your website and add another AMP to support your WordPress website. However, the basic setting will remain the same regardless of what kind of plugin you are using.
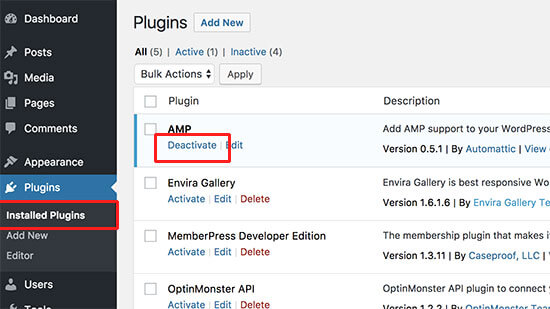
First, you must deactivate the AMP plugin. For that, you need to visit the plugin page. Then click on the deactivate link given below the AMP plugin. Deactivating your plugin will disable the AMP support from your website.
Step 2: Now, you need to set up the redirects:
Disabling the AMP plugin will remove the AMP version from all your articles on your website. This is not enough, especially in case you have turned on the AMP for more than a week.
There are many chances that Google has already cached those pages in its index. Thus, it will keep showing those pages in the search results.
In such cases, to fix the problem, you have to set a redirect so that users can keep coming to your non-AMP pages from your AMP pages. Here are the two different methods for the redirect adding:
Related Post: Beginner’s Guide to Create Redirects in WordPress
You can use a redirect plugin:
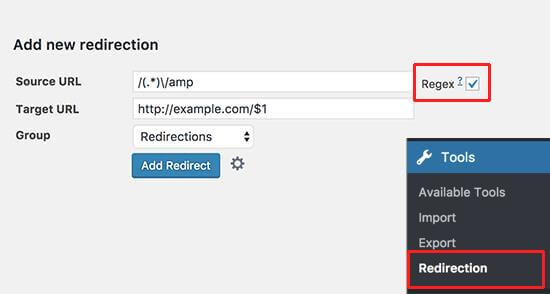
One method that you can use is, adding a redirection plugin. For this, you need to install and activate the Redirection plugin first. Upon the activation after the install, you need to go to the Tools >> Redirection page to set up the redirects.
You need to add the following codes to the source URL field first:
1 /(.*)\/amp
in this target URL field, you should add the URL of your website in the following format
1 http://example.com/$1
You must replace example.com with your domain name.
After that, check the Regex checkbox and then select the Redirections under the Group drop-down menu.
After that, click on the Add Redirect button to save your changes. Now, you can visit an AMP page on your website to check if the redirect is working or not.
You can manually set the redirects in .htaccess
In case you do not want to use plugin setup redirects, you can set up the redirects with the help of a .htaccess file on account of WordPress hosting.
First of all, you need to connect your website with an FTP client or a File Manager in the cPanel area. After connecting, locate the .htaccess file from your root folder and then edit it.
After that you can add the following code at the bottom area of your .htaccess file:
1 // Redirect AMP to non-AMP
2 RewriteEngine On
3 RewriteCond %{REQUEST_URI} (.+)/amp(.*)$
4 RewriteRule ^ %1/ [R=301,L]
After that, save all your changes and then upload the file to your server. Make sure you are visiting the AMP version for any of the posts on your website to see if it’s working or not.
Conclusion:
So, if you want to disable Google AMP in WordPress, you can easily do it by following the above-mentioned methods.
In case you see any negative impact on your website, you must consider working on it by disabling the Google AMP to retain the workability of your website.


