Free email newsletter service
People always look for free email newsletter service using WordPress instead of going for paid email newsletter options like MailChimp, Aweber, and others.
Email Newsletter is increasingly becoming a mandatory part for the success of a website.
It is more important for bloggers as they have a lot of subscribers whom they should send updates from time to time to keep them engaged.
As a matter of fact, sending daily or weekly newsletters helps in getting a lot of organic visitors automatically.
Even companies send newsletters to their customers and clients to keep them updated about the new products and services as well as useful blogs.
Those paid plugins or tools come handy only when you have a very large subscribers’ base and you want to send different newsletter updates to a different chunk of subscribers based on certain advanced criteria.
But the following steps will help you get free email newsletter service using WordPress using FeedBurner.
You can have all the basic functions like sending email newsletter, checking your subscribers’ number and how many clicks you have received for each link and likewise.
Free Email Newsletter Service Using WordPress (Using Category)
Step 1 – Add An Email Newsletter Category
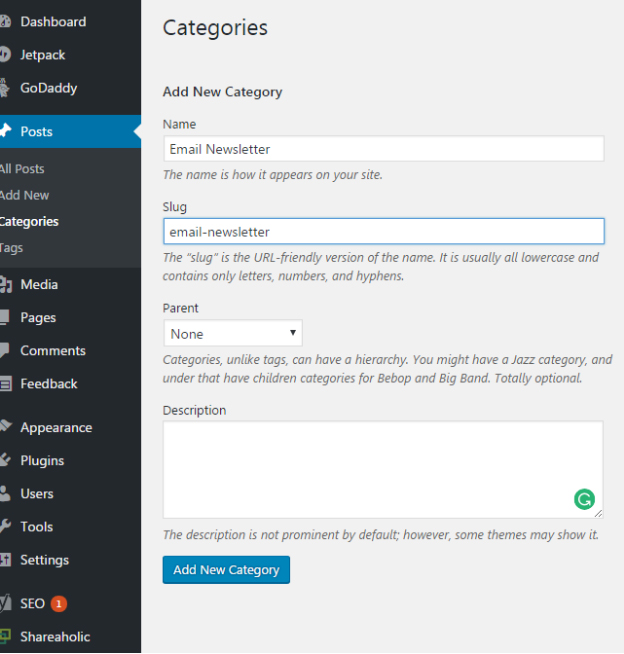
Go to your admin dashboard and then to Posts option on the left menu and click on Categories. Add a new category under heading Add New Category. You can name it anything like Email Newsletter.
Make sure that category parent is none and category slug is what it should be. Leave the description blank and click on Add New Category button.
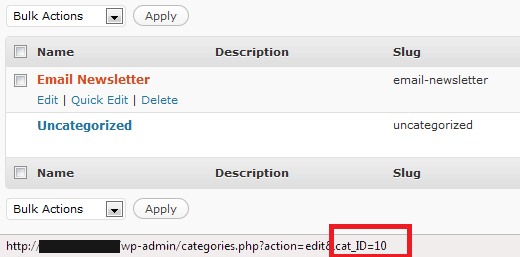
Once the category is created, you have to note down the category ID which you can get by placing your mouse pointer in the newly created category and check the status bar for text like ‘ID=’ and the number that follows after the equal sign is the category ID.
Step 2 – Hiding Email Newsletter Category
Since Email Newsletter is something that should not be seen on the website but should stay as an internal item to send email newsletters, it should be hidden from displaying on the website.
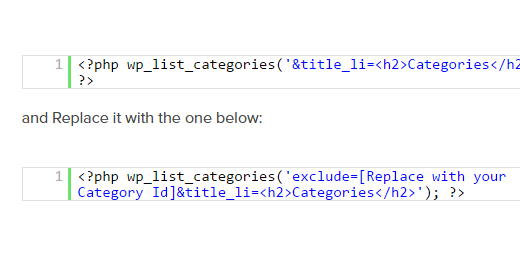
For that, go to Appearance on the left menu and click on Editor. Find the file sidebar.php and locate the following line.
Sometimes, the following line may not be present in sidebar.php and may be present in some other file depending on the theme and hence, if you do not locate it in sidebar.php, check other available files for the same.
Now, replace that line with the next line. Make sure you replace the mentioned part with the ID you noted in the previous step. Once done, save the file and check whether the category appears on the website or not.
Related Post: Best WordPress Newsletter Plugins for your blog or website
Step 3- Hiding Posts From Email Newsletter Category
In the last step you hid the category from view, now you have to hide the posts from appearing on the website and other pages.
It is natural that you would only place a few posts under Email Newsletter category as you want the subscribers to read useful and viral posts.
Also, you can make a few posts exclusively for the subscribers and place them directly under Email Newsletter category.
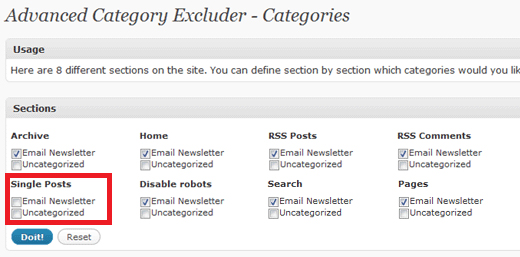
Those exclusive posts will appear on the homepage if not kept hidden. To do that, you have to install a plugin named Advanced Category Extractor and after installing go to its Settings. Select the menu name and under Sections heading, uncheck Single Posts.
Step 4 – Setting Up An Account In FeedBurner
Open FeedBurner and under the heading Burn a Feed, provide the URL of your category which should be like www.yoursitename.com/category/ and click on next.
Note that you should already have an account in FeedBurner, not if, create one and then do the steps. After that, click on Next button.
Enter a meaningful Feed title and a Feed address where the users can find your feed. Click on Next and in the next screen, you will have all the settings and options.
Go to Publicize tab and click on Email Subscription. Then you will find an Activate button towards the end, click on that.
You will see a code that you have to copy and paste in your website’s sidebar widget so that visitors can see an option to put their email address in order to subscribe and get email newsletter as you set it up.

