If you’re a WordPress user, you know how powerful and versatile the platform can be. But did you know that you can take your WordPress experience to the next level by connecting multiple sites together? By doing so, you can manage multiple sites from one central location, share content and themes between them, and even improve your SEO.
Table of Contents
If you’ve ever wanted to unlock the full potential of your WordPress sites, this comprehensive guide is for you.
In this post, we’ll cover everything you need to know about connecting multiple WordPress sites together, including how to set up a multi-site network, how to manage and share content between sites, and how to optimize your network for maximum performance.
So, whether you’re a blogger, an e-commerce owner, or anyone in between, this guide will help you take your WordPress game to the next level.
Why you might want to connect multiple WordPress sites together?
There are several reasons why you might want to connect multiple WordPress sites together. Firstly, if you run multiple websites that are related to each other, such as a blog and an online store, you may want to share certain features and functionality between the sites. This could include things like user accounts, products, or content.
Secondly, if you manage websites for multiple clients, connecting them together can help you streamline your workflow and make it easier to manage all of the sites from one central location. You can share themes, plugins, and other resources between sites, which can save you time and effort.
Thirdly, if you run a large organization that has multiple departments or teams, connecting multiple WordPress sites can help you improve communication and collaboration between teams. You can share resources, such as documents and calendars, and ensure that everyone is working towards the same goals.
Overall, connecting multiple WordPress sites together can help you improve efficiency and make it easier to manage your online presence. It’s a powerful tool that can be used in many different ways, depending on your specific needs and goals.
We’ll show you 3 simple ways of making different websites work together. You can click the link below to jump ahead to any section you’re interested in:
1. Connect Multiple WordPress Sites Together Using a Plugin
2. Create a Subdomain to Connect WordPress Websites
3. Use Interlinking to Connect WordPress Websites
Method 1: Connect Multiple WordPress Sites Together Using a Plugin
The Uncanny Automator plugin is the finest solution to link two websites together and have them communicate with one another. The greatest WordPress automation plugin, it aids in the development of automated processes for your website.
The plugin may be compared to Zapier for WordPress websites. You can quickly link many websites together with Uncanny Automator.
Developing a WooCommerce Store Recipe for Product Purchase
When consumers buy your product, you must next create a recipe on your WooCommerce shop. A recipe is an automation.
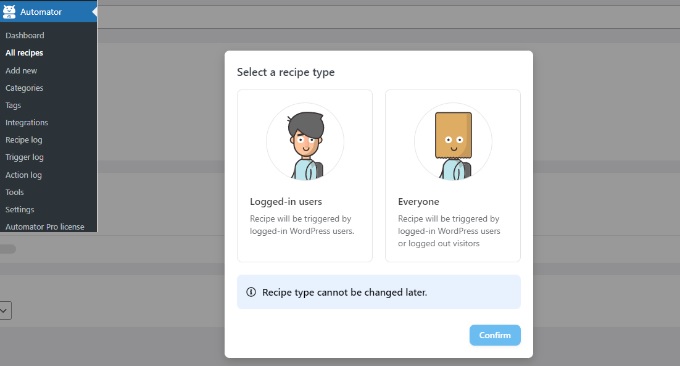
From your WordPress admin panel, go to Automator » Add new to get started.
You will then be prompted to choose a recipe type. ‘Everyone’ recipes can be activated by all users, whilst ‘Logged-in’ recipes can only be triggered by logged-in users.
Since your consumers will be establishing accounts and signing in to make purchases, go ahead and choose the recipe type “Logged-in users”. Then press the ‘Confirm’ button.
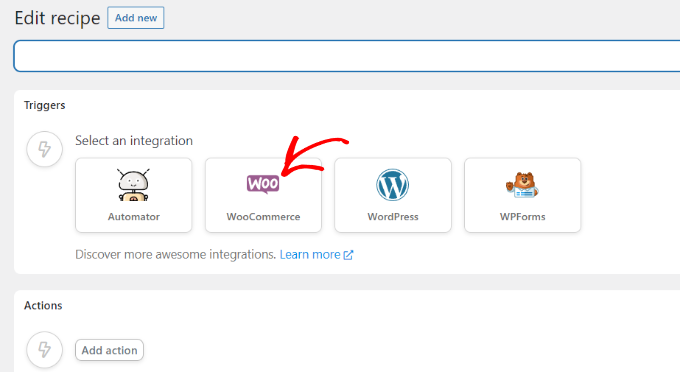
You may then choose “WooCommerce” as the integration and add a name for your recipe. Your users won’t see the name; it is exclusively for your own usage.
The next step is to choose a trigger for your formula.
You just need to choose the trigger ‘A user completes, pays for, and lands on a thank you page for an order containing a product’. Uncanny Automator will then prompt you to choose a product for your recipe.
Select the digital item from your WooCommerce shop if necessary.
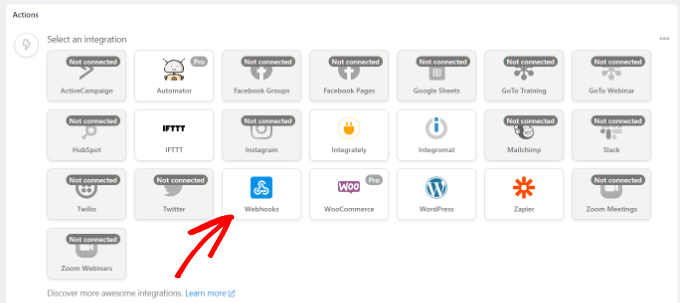
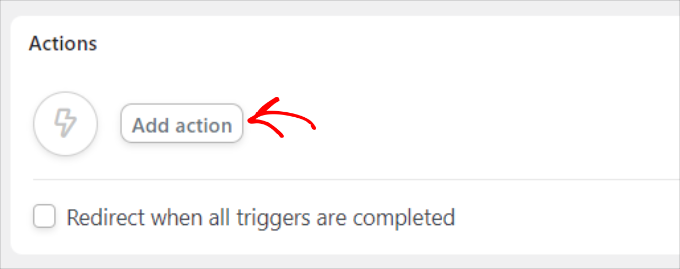
You must choose an integration before you can build the activity.
Using a webhook, you may quickly communicate the customer’s registration information to your membership website. A webhook is a little piece of code that enables various tools and applications to instantly share data with one another.
You won’t need to know how to code in order to utilize it, so don’t worry.
Select “Webhooks” for the integration now.
The webbook URL will then be shown by the plugin. Since we’ll need the URL later to complete the recipe on your WooCommerce shop, you may write it down in a text file.
Scroll down to the Fields section after that. Subsequently, put “Email” in the Key box and choose “Email” as the Value type.
You may select from a variety of integrations for your activity. Just choose the plugin that you used to construct the membership site.
You may then decide on an action for your chosen integration after that.
You have the option to “add the user to a membership.”
The next step is to choose either a New User or an Existing User.
Simply choose the ‘New User’ option.
By choosing the Membership dropdown menu, you can then choose the membership plan you want the WooCommerce client to sign up for.
You’ll also notice additional fields for the subtotal, tax amount, tax rate, status, gateway, and other things. You may let them run on automatic.
When finished, don’t forget to click the “Save” button.
You may add extra steps to the recipe if you’d like, such as enabling WordPress to send the customer a confirmation email or signing them up for a Zoom webinar.
The next step is for you to post your recipe. Simply switch the “Draft” option to “Live” by clicking it on the right side of the page.
Recipe for Completing Your Purchase in WooCommerce
It’s time to complete the recipe on your WooCommerce shop now that it’s operational on the membership website.
Return to your WooCommerce website and open the recipe we previously prepared. Next, fill up the ‘URL’ section with the webhook link that we put into a text file to use when generating a recipe on the membership site.
Keep the Request Method and Data format at their default settings by scrolling down after that.
You may choose ‘Billing email’ as the option by clicking the asterisk (*) in the ‘Key’ column under the Body section. Similarly, you may use ‘Billing email’ for the Value box.
Sending test data is another method for checking the setup of your connection.
Don’t forget to hit the ‘Save’ button when you are finished.
Then, proceed to publish your recipe by switching it from Draft to Live by clicking the toggle.
By using a WordPress plugin, you can connect all of your WordPress sites together and manage them from one central location.
Method 2: Create a Subdomain to Connect WordPress Websites
Creating a subdomain to connect WordPress websites is a great way to organize and manage multiple websites. A subdomain is a domain that is part of a larger domain, allowing you to create a completely separate website with its own unique content and URL.
To create a subdomain, you first need to log in to your domain hosting account and navigate to the domain management section. From there, you can create a new subdomain and assign it a unique name. You will, however, need to actively update both of these websites since they will not be automatically kept in sync with one another. Thank you for bearing this in mind.
Subdomains are extra components of your principal domain name that enable you to arrange various aspects of your WordPress website in a more logical fashion. You may use them to section off different features on your main website using this method.
Take, for instance, the scenario in which you wish to Connect Multiple WordPress Sites Together and make an online shop but keep it separate from your primary domain. In this scenario, you will want to build a subdomain for your online shop, and the structure of your website will be as follows:
You are also able to set up a subdomain for your website that is exclusive to a certain country, such as uk.yourexamplesite.com or fr.yourexamplesite.com.
Method 3: Use Interlinking to Connect WordPress Websites
Websites may be connected using interlinking. You may also link numerous WordPress sites together in order to integrate them all under one umbrella. Your WordPress SEO will be improved as a result of the links since they will convey authority, also known as link juice, to each site. For example, set up automatic backups and security scans across all your sites to ensure that they are always protected.
Adding a user-created link to the main navigation menu is a frequent method for accomplishing this goal.
You may also choose to include a link in the footer of your website.
Bottom Line
We hope you found our guide on how to connect multiple WordPress sites together helpful. Interconnectivity between different WordPress sites can be a daunting task, but with the right tools and knowledge, it is possible to master it.
By following the steps we outlined in this article, you can easily link your WordPress sites together, streamline your workflow, and improve your overall online presence.

