Do you want to quickly install and setup WP Super Cache and make your site’s performance much lighter and speedy? In this article, we are going to hand carry you through the shortest and practical way to it.
Table of Contents
We all perfectly know that the optimal performance and speed of any site matter heavily when it comes to higher SEO rankings on the one hand, and web user’s satisfaction, on the other. WP Super Cache is one of the best tools in this relation designed and coded to considerably optimize your site’s operation with the help of caching.
All you need to do is to spend a couple of minutes to install and setup WP Super Cache plugin and let it generate static html files to respond to your web user’s inquiries and serve their needs
1. How to install WP Super Cache:
First of all, you need to install and activate this plugin. Actually, there are 2 ways you can do it. One goes through WordPress directory of plugins where you need to search for WP Super Cache plugin, find and download it, extract the downloaded archive to your PC, use some FTP client in order to upload the extracted to wp_content/plugins/folder.
As soon as these steps are followed, all you need to do is to head over Plugin page in your WordPress dashboard and activate the installed plugin.
The second way is much easier than the first one. In this case you are going to use only your WP dashboard. Just go to the Plugins, Add new, search for “WP Super Cache”, install and activate it. Finished!
2. How to setup WP Super Cache:
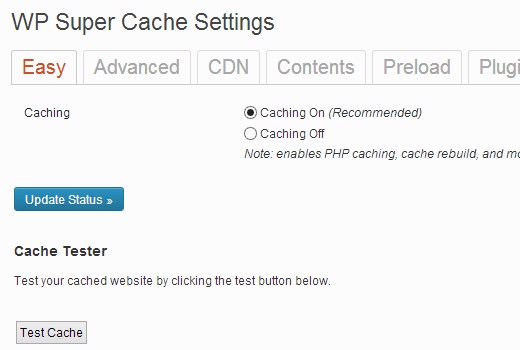
Once this plugin is activated on your WP website, it will let you know that caching is not enabled on your website. In order to setup WP Super Cache and enable caching, you need to go to Settings, WP Super Cache. Here you will find different tabs like Easy, Advanced, CDN, Contents, Preload and more.
We’ll start with the easy way and will advise you to select Caching on under easy tab and clicking on Update Status for enabling caching. Further, you will be offered to use Cache Tester to check whether it is working properly on your site.
3. How to setup WP Super Cache with advanced settings:
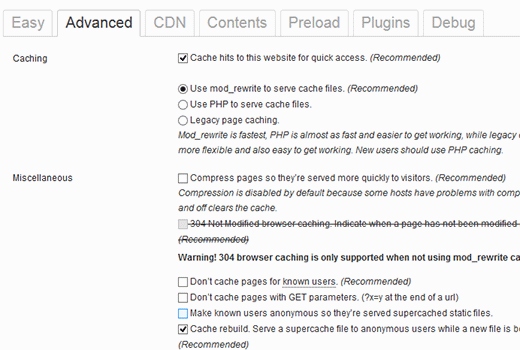
From simple to advanced, from basic to powerful, the possibilities of WP Super Cache are many. And if you want to take advantage of the advanced settings of this plugin, you need to jump to Settings, WP Super Cache and choose Advanced tab instead of Easy one.
Under Advanced tab you will find two basic groups of settings, Caching and Miscellaneous, with each of them several options which are pretty easy to understand and enable. First and foremost, check the box before “cache hits to this website for quick access”, which is also recommended by the plugin itself.
Basically, WP Super Cache utilizes PHP for serving cache files. However, in order to have optimal settings for the majority of hosting servers and environments, whether shared or dedicated, we recommend you to select “Use mode_rewrite to serve cache files” instead of “use PHP to serve cache files”.
Once the above discussed options are selected and checked, click on Update Status button to save them. As soon as your changes are saved, a yellow box with a long text will appear on your screen.
It will notify you that in order to serve static html files, your server must have the correct mod_rewrite rules. Here you need to scroll down, find “Update mod-rewrite rules” and press it. When the rules are updated, the yellow box will turn green.
Along with the request to update rules, you may also be notified about garbage collection scheduling. In order to setup this part, scroll the advanced setting page down until you find the section “Expiry Time and Garbage Collection”.
Here you can easily set up the frequency and time you need optimal for garbage collection of the cached files on the server. If you want to be notified each time the garbage collection runs, you can enable email notifications as well.
In the “Miscellaneous” part under Advanced tab, you will find “compress pages so they’re served more quickly to visitors”. This is another highly recommended setting to choose for enabling compression in your plugin.
In this case, the cached files will be presented as compressed files and it will take less time to the browser to download these files as they are smaller in size.
4. CDN integration with WP Super Cache:
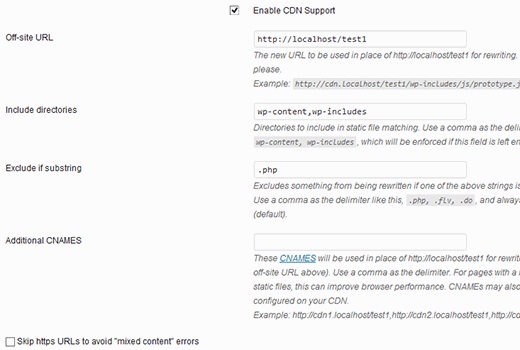
The next important step is to enable CDN in your plugin. You can find CDN tab next to the Advanced tab, under which you can enable CDN option. CDN is a content delivery network of servers delivering cached static content from the sites to their users taking into consideration the geographical location of those users.
Accordingly, using this CDN functionality on your website will do good to your site’s speed, better user experience and better search engine optimization.There are lots of high quality CDN providers you can consider for using together with your WP site.
Once CDN support is enabled, enter your offsite URL, which is going to be something like http://cdn.mysite.com and will be the url of your pullzone. The last action to perform in this part is to check the box stating “skip https URLs to avoid “mixed content” errors”. Then save the changes and you are done!
5. Serving a static site with WP Super Cache:
WP Super Cache makes it possible to disallow PHP processes and serve a static site with super cache static files. By default, refresh preloaded cache files is set as 0, and the minimum requested time is at least 30 minutes.
Enable “preload mode” to preload your WP post and disable garbage collection for old cached files. When the preload “acts”, the cached files of the updated post are deleted and then regenerated.
We are done! Hope our article explaining how to install and setup WordPress Super Cache plugin will help you optimize your WP site with this wonderful caching solution.
One of the reasons that your website may not be getting much traction online or any reasonable amount of traffic could be on account of the fact that your site is slow and this is impacting user experience.
Google and other search engines often use various metrics such as speed, user experience to rank sites and if your site is slow, then it is going to be displayed several pages down on the SERPS (search engine results page).
And this is exactly the reason why you need to install and setup WP super cache plugins. With these plugins, your website should speed up, noticeably so and more importantly, your SERPS should improve and so should your traffic. Setting it up is fairly easy, just read on to know more.
It is important that users find your website easy to use and enhanced user experience would result in return customers and if you are looking to retain your current customer base, you definitely need to ramp up your website and make sure that it is easy to navigate and fast at the same time.
That’s why it makes a lot of sense for you to use WordPress as a platform for your website and to install and setup WP super cache plugins, right away. Check out some of our WordPress themes, do a dry run and see which one is a good fit and you should have your website up and running in no time at all.
After that, all you have to do is to tweak the layout as per your preference, set in place some good content that would be of interest to others and make sure that you install some of the super cache plugins.
It is vital that your website performs along expected lines as this can have an impact both on the incoming traffic as well as your rankings. Just read on to learn how to set up the super cache in a matter of minutes.
There are two ways by which you can install the WP plugin; the first one requires you to use an FTP to upload the downloaded plugin and maybe a little cumbersome for those who are not that familiar with FTP.
The other way is a lot easier and can be done instantly; all you have to do is to head over to your admin area, go to plugins and search for “Super Cache”.
Now you can install it via the WordPress site itself and activate it right away. Once you have activated your WP super cache, you need to head over to settings and to WP super cache – here you are bound to come across various tabs such as easy, advanced, CDN, contents and much more.
Just opt for the easy one to start off with and the cache should get updated automatically and you should also be able to use cache tester to see if it’s working properly. That’s it, now your website should be performing extremely very well and soon you can expect a jump in both traffic and rankings.


