What do you do to create a creative and enticing website that aligns with the interest and experience of your customer? You use a good theme, right?
Table of Contents
But does it take a long time to do the customization and designing of your themed website? Maybe not when you are using the right WordPress Theme Customizer.
WordPress comes with its in-built theme customizer, which allows you to make useful changes to your website design quickly.
While each of the themes comes up with some level of support for its default customizer option, many themes also include additional tabs and various options in the customizer that lets you create a stellar website.
Do you know what is the best part? There is no need to be at home in coding. You can simply do it by using a few more straightforward methods. So, how do you use the WordPress Theme Customizer properly? Here is a guide for you.
First, you need to know how do you access the theme customizer of WordPress:
The Theme Customizer on WordPress comes as a default feature. You can get it on every WordPress website. It lets you access it easily with the help of logging in to the WordPress admin area.
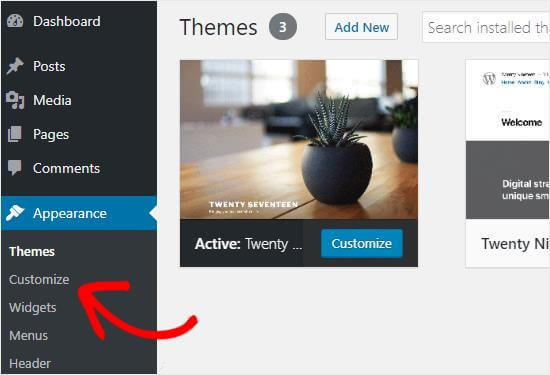
You just need to go to the Appearance >> Customize option from the left area of the sidebar of your WordPress admin panel.
It is going to open the interface of the customizer for the current theme you are using. At the same time, you can also use the WordPress customizer page for any of the installed themes you are having on your website.
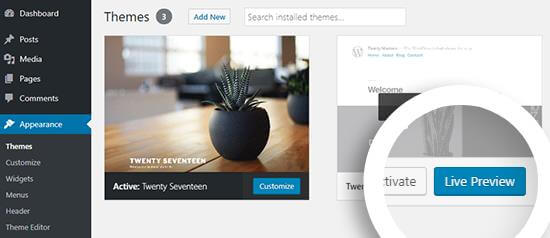
Even if the themes are not active, you can still work with them. It allows you to have a live preview of the theme. At the same time, you can make suitable changes before you go for the activation.
For doing it, you need to go to the Appearance >> Themes page. After that, you need to go to any of the installed themes you are having. Simply click on the Live Preview button to open the customizer page of the WordPress theme.
So, how do you use the WordPress Theme Customizer properly?
As you are now having your access to the WordPress Theme Customizer, you need to know how to make use of it properly.
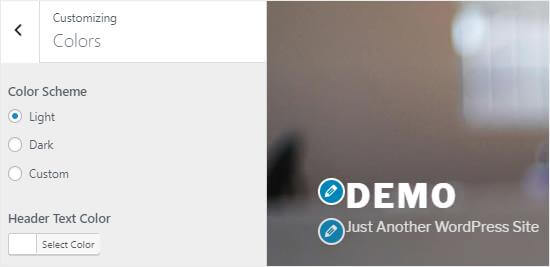
After opening the WordPress theme customizer, you can see the customization settings on the left side of the screen. There will also be a live preview of your website on the right side.
The WordPress theme customizer comes up with a set of the default panels for any of the themes you are using. All you need to do is, click on the individual panels to make useful changes to them.
At the same time, you can also make your click on any of the blue pencil icons on the right side of your screen. It will open the settings for the chosen item.
On the other hand, the advanced WordPress themes come up with additional setting panels. It allows some extra customizations.
What are the default options for the Theme Customizer of WordPress?
The WordPress Theme Customizer includes some default settings, which are easier to use, and gives you complete control over the customization. Here are the default settings it offers:
Change colors on your website:
The theme customizer of WordPress comes up with the option for Colors panel, which lets you change the shade of the theme. However, the control on the color is highly dependent on the theme you are using.
The themes on WordPress can have different color options based on the themes you are using. Also, the colors can be different for various areas like body text, headings, background, links, etc.
Make addition of title, Favicon, and logo:
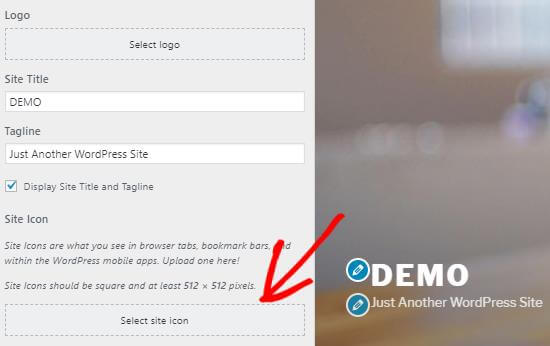
The Site Identity panel in WordPress Theme Customizer comes with the option for adding or changing the title and tagline onto your website. WordPress by default adds the tagline as, “Just Another WordPress Site.”
It is recommended to change the tagline after the installation of your WordPress account on your site. You can also leave it blank.
The Site Identity panel in WordPress theme customizer also lets you add your site logo. All you need to do is, click on the Select logo option and upload the logo of your website.
For adding the Favicon to your site, you can simply do it by clicking on the Select site icon option. It simply takes a few seconds and shows you instant results.
Add navigation menu:
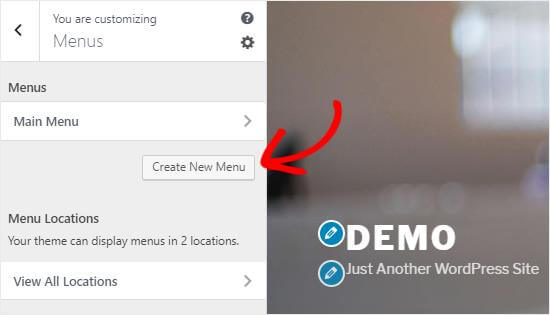
The Menus panel of the theme customizer lets you create navigation menus. At the same time, it offers you complete control over the location of the menus on your site.
To add this, you simply need to click on the “View All Locations” button to check the available menu locations that your theme supports.
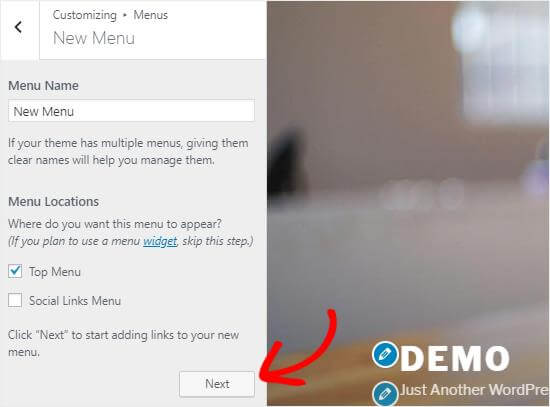
For creating a menu, click on the Create New Menu button. After that, you have to give a name to your menu so that you can manage it quite easily. You can also select the menu location. Click on the Next to proceed further.
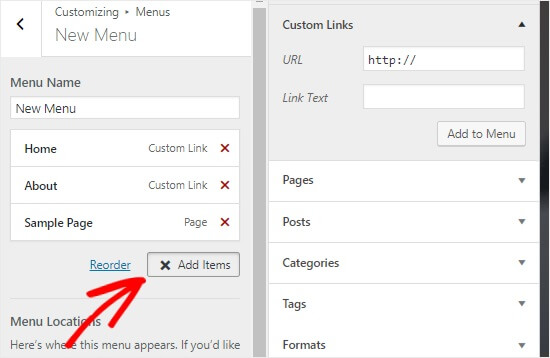
For adding items to this menu, you need to click on its Add items bottom to open a completely new panel. At the same time, you can also proceed by clicking custom links, posts, pages, tags, and categories in the menu items.
You can also consider reordering the items. Click on the Reorder link to make use of the arrow icon for adjusting the menu items.
Homepage Settings Panel:
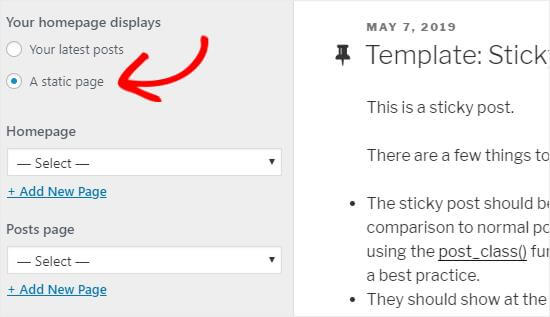
WordPress displays the recent blog posts on your homepage area by default. For business websites, you can prefer creating a custom homepage. It lets you have a proper landing page that displays all your products and services.
For using a custom home page, you will need to select the “A static page” radio button from the Homepage Settings panel.
It will simply open up two of the new dropdown menus. You can use it for selecting a page for your homepage area. Another one will help you to display your blog posts.
If you are not having pages on your site, then you can simply create a new one by making clicks on the “+ Add New Page” link, which is present below the dropdown menu area. It will create a completely blank page where you can put the name of your choice.
Controlling the widgets on your website:
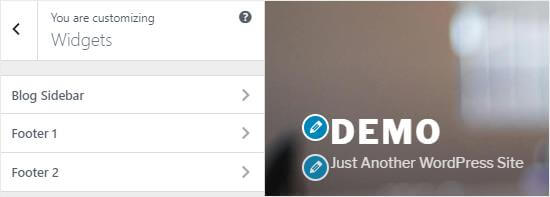
In your WordPress Theme Customizer, you can easily find the option for your Widget panel that lets you add and manage the widget on your site easily.
As you click on it, this will show you various locations where you can add all the widgets. It is also dependent on the theme you are using.
As you click any of the themes of your website, you can see the widgets that you have added previously to that location.
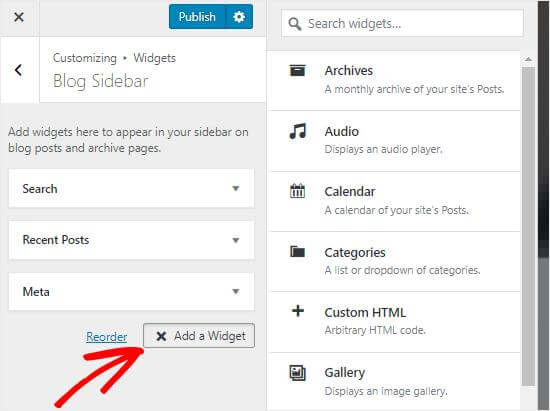
For adding a new widget, you need to click on the “Add a Widget” button. It opens a completely new panel where you can see a list of all the available widgets. You need to click on the one that you want to add.
You can also consider making changes to the newly added widgets. Then simply add the position with the help of dragging them up or down.
Adding CSS Panel:
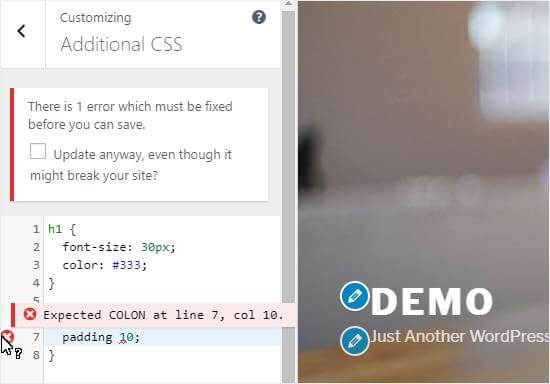
Do you want to do some more styling for your website? Then the custom CSS codes can be the most helpful option for you. You can easily add the CSS coding with the help of the Additional CSS panel.
Most of the advanced WordPress users tend to style and customize their site with the help of CSS code directly to the style.css file. However, this requires some of the additional steps, which can be time taking and trickier.
But for beginners, the in-built option of CSS panel of the theme customizer helps in better ways. You can easily add all your custom CSS code to your Additional CSS panel in your WordPress Theme Customizer area.
It lets you make positive changes to your site. You can see them live from the right side of your screen.
As you start with writing some of the CSS Code, WordPress will suggest to you the attributes based on the letters you are using. At the same time, it also displays the error messages in case there is something wrong with your proper CSS statement.
What is the other theme customizer option you can get?
The WordPress Theme Customizer has something more to offer you to make your customization task more impressive. Some of the free premium themes come with theme customizing options.
Based on the theme you are using, you can also make changes in the font style, background image, etc. You can even consider changing the layout or modifying the colors. You can add a few random header images along with many other changes to make it look creative and impressive.
You can also add some specific features to the theme customizer with the help of plugins. It lets you add custom fonts in the WordPress area using Easy Google Fonts plugin.
Previewing the changes that you have made to your website with different screen resolutions:
As you make changes with your WordPress Theme Customizer, it is important to make sure that you are reviewing all the changes before finalizing.
To build a unique user experience, it is crucial to make sure that you are creating a mobile-responsive site that looks good on every type of screen size.
The theme customizer of WordPress lets you easily check how your website is looking on different screen sizes.
From the bottom area of your Theme Customizer panel, you can find three icons, along with the “Hide Controls” link.
These icons will allow you to test your site on various screen resolutions on a variety of devices.
Finalize and save your customizer setting:
As you are done with making all the necessary changes, you need to apply all the edits to your site. Unless you are saving it, the changes will not work.
Click on the Publish button to apply all the changes. As you are done, you can click on the close button to finish it.
The Close button is present at the left corner of your screen.
On the other hand, if you are not done with finalizing the changes, then you can save the changes as a draft. You can even share the new design with others by giving them access to the admin area.
Click on the gear icon from the right side of the Publish button. It will open up the Action Panel.
You can find the option like Publish, Save, Schedule, and Draft here. You need to select the Save Draft button to save your settings in the draft.
You can also copy the preview link and share it with others. The Schedule option at this place lets you publish all your changes at a specific time and date. You can use this option to schedule your theme changes.
To reset the changes, you can click on the Discard Changes button from the Action Panel area.
How do you preview your themes without going live?
You might not want to go live every time. But previewing the themes without going live lets you have an idea about how the changes will look on your site.
You can do it by opening the WordPress Customizer for testing new themes without any need to go live. From the customizer panel, you will find the name of the theme you are currently using along with a Change button.
As you click on the button, WordPress will display all the installed themes on the right side of the page. To check a particular theme, you can click on the Live Preview button.
You can also preview the themes for the WordPress Themes repository area. Select the WordPress.org.themes checkbox from the right panel. It will show the themes from the WordPress.org directory. Click on the Install & Preview button to check the theme.
How do you import or export the theme customizer?
Do you want to share the changes you have made? Then you can easily import or export the settings on your theme customizer.
This becomes quite helpful when you are making changes to the theme to scale a site. Copying the settings manually can take a longer time, but exporting the customizer setting can save a lot of time.
What are the alternatives of theme customizer that you can use?
Though the theme customizer of WordPress is highly functional and useful, you can still use an alternative if you want. So, what alternatives can be the best option for you?
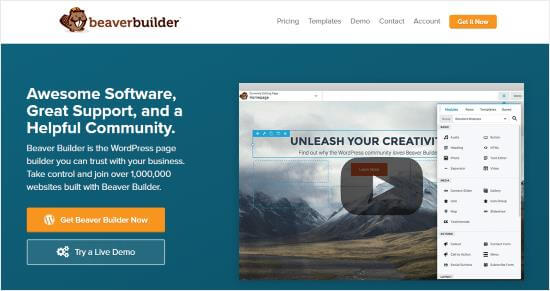
Beaver Builder:
This one allows you to create stellar pages for your site with the help of a drag and drop interface. At the same time, it works with almost all themes and lets you make the essential changes you want to have.
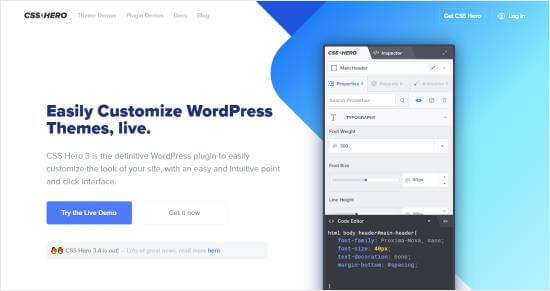
CSS Hero:
The CSS Hero comes as a WordPress plugin that allows you to customize your site without the need to write any code. You can change all the style elements easily without any advanced coding skills.
Conclusion:
So, are you thinking of making some useful changes to build a highly impressive website? Then WordPress Theme Customizer is simply the best option for you to make impressive changes to your site.
You can also consider its alternatives if you want, but the service and functions of the Theme Customizer in WordPress are satisfactory enough that they do not require any other additional plugins.

