Install XAMPP and WordPress on Windows
If you have a WordPress website, then you may already know about the security risks which this CMS generally comes with. Among these risks, untested plugins and themes, created by some third party users, are considered to be the most menacing.
Table of Contents
Thus, to avoid these threats, which can affect your website severely, you would have to test these themes and plugins on a local environment. This is where XAMPP becomes extremely helpful.
Why XAMPP?
XAMPP is a free-of-cost cross-platform software stack package which has been developed and distributed by Apache Friends. The package contains a MariaDB database, an Apache HTTP server, and some interpreters, which have been made by using the Perl and PHP programming language.
Because of this reason, XAMPP is not only used in WordPress but also on any other web development procedure, which requires a Perl or PHP-enabled web server.
XAMPP is very efficient and will be able to help you to set up any kind of WordPress installs, such as themes and plugins, quite quickly. In addition to this, if you have installed XAMPP on your PC, then you will not face any kind of difficulties while working on your WordPress website.
Another benefit of developing your website with XAMPP is security, as it helps you to work while being offline, which minimizes the risk of your site being exposed to pesky hackers and clients.
Thus, like many others, if you are also thinking to install XAMPP and WordPress on windows localhost in the correct way, then, make sure to check out the whole blog properly.
Installation Process of XAMPP
The installation procedure of XAMPP is quite easy and simple. To complete the whole process, you would have to follow the steps that have been listed below.
Step 1- Download XAMPP
The very first step of installing XAMPP on your PC is to download it. To do this, you would have to visit the official site of Apache Friends and click on the ‘XAMPP for Windows’. The file is somewhat big, around 115 MB, thus, the downloading process might take a minute or two, depending on your network connection.
The same procedure is also viable in the case of using either OSX or Linux. However, you would have to make sure that you are downloading the correct version of XAMPP, which suits your OS.
Step 2- Install XAMPP
After your PC completes the downloading procedure, you would have to run the downloaded file to launch the XAMPP installer. However, if you are using any antivirus software, then you may get a warning. To continue with the installation, you simply need to click on ‘yes’.
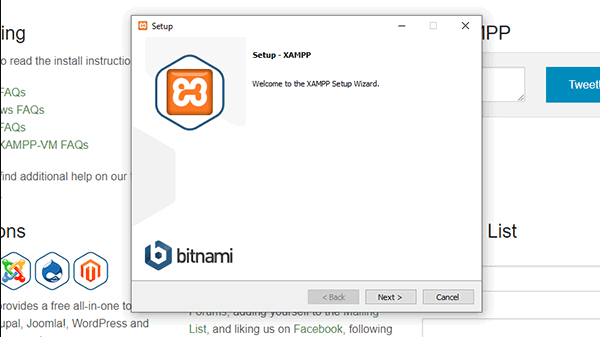
After getting through all the prompts and warnings, a standard installer screen will appear on your computer’s display. Click on the ‘next’ option to go to the next page.
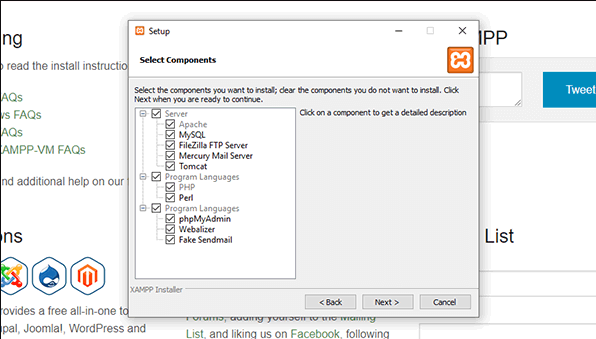
The following screen will come with some components, among which, you would have to choose the ones that you need for your purpose. To install XAMPP and WordPress on windows localhost, you will need only two components, which are PHPMyAdmin and MySQL.
So, check the boxes of these two components and uncheck all the others to proceed on to the next screen by clicking ‘next’.
Now, you would have to select the folder, which you are thinking to use to install XAMPP in. On the following screen, you will receive a prompt, which will ask you to install Bitnami for XAMPP. However, you do not need this application to install and use XAMPP; so, you will have to simply uncheck the box.
After clicking ‘Next’, you will be forwarded to a screen called ‘ready to install’. Now, you will only need to click on the ‘next’ option to finally start installing XAMPP on your PC. The installation process may require a few minutes to complete, and once it finishes, you will need to launch the control panel to start the setup process of XAMPP.
While going through this, you might see a Windows Security Alert after the installation process finishes. To make the XAMPP software work, it is very important to check the option named ‘Private networks, such as mu home or work network’.
Step 3- Launch the Control Panel
Once the installation is done, the control panel of XAMPP will open automatically. However, if you had unchecked the option previously, then you will need to go to the XAMPP folder and open it manually.
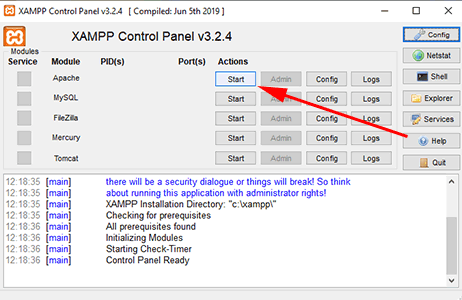
The control panel of XAMPP comes with a simple interface, where you will find all the components of the local server. It allows the users to either start or stop the modules as well as helps to gain access to their Logs, Admin area and Config files.
Apart from these, some other buttons, which the control panel features, are:
• Netstat: This option helps to display all the active TCP ports and connection on the PC of the user
• Explorer: It helps the user to gain access of the root folder of XAMPP
• Shell: With this option, you can start the XAMPP software in a CMD or custom command line
• Help: You can talk or connect with the Apache Friends Support Forum with this option
• Services: This option provides all the information about the Windows services under MMC or Microsoft Management Console
• Quit: It is the last option of the control panel and helps you to close the software
The bottom part of the panel is known to display all the actions you have taken as well as the errors that you have made.
Step 4- Run the Modules
The next step, which you need to follow to install XAMPP and WordPress on windows localhost correctly, is to run two modules named MySQL and Apache. You will find both of these modules on the control panel.
After clicking on the ‘start’ option, you will see that the status of the components has turned to green. However, you might face a security alert from the Windows while going through this process. To proceed further, you will need to click on ‘Allow Access’.
After running these components, you will see that the admin links have become clickable. After that, you will need to select the ‘Admin’ option under MySQL for proceeding to phpMyAdmin.
Step 5-Test the XAMPP Installation
This is very important for the people who are dealing with XAMPP for the very first time. Taking this test will help you to understand if you have installed and configured the software in the correct way. To do this, you will only need to make a PHP test page and place it in the localhost folder of XAMPP.
If you can access the page through your browser, then you can consider your installation process to be proper and correct.
So, to install XAMPP on your computer you would have to follow these four steps. However, while going through this procedure, you might get a User Access Control, also known as UAC, prompt by the Windows. This can be dealt with quite easily. You only have to make sure not to install the XAMPP file under the ‘Program Files’ directory.
Installation Procedure of WordPress
If you have ever installed WordPress before, then this process might seem like a piece of cake to you. However, if someone is doing it for the first time, then they might feel a bit intimidated. Thus, if you are also new to this context and looking for some help, then, make sure to check out the following steps.
A) Create a Database
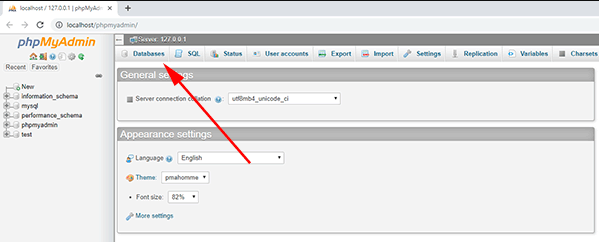
Before installing the WordPress software, you will need to create a database. To do this, you would have to go into the Control Panel of XAMPP and click on the ‘Admin’ option under the MySQL section.
After doing this, you will be able to find a brand new browser window, with the interface of phpMyAdmin dashboard, which will open automatically.
On this window, you will find an option named ‘Databases’, which will be situated near the top-left of the page. After clicking it, you will be prompted to make a new database. Once you have entered the desired name, you would only have click on ‘create’ to make a brand new database for the WordPress installation.
B) Download WordPress and Unzip the Zip File
After you have successfully created the database, you can go to the official page of WordPress and download it. After downloading the zip file, keep it in the folder where you had installed XAMPP.
Next, you would have to find the ‘htdocs’ subfolder and create a new folder that will be used for your test website name wptest.
After creating this folder, you will have to extract the zip file of the WordPress, which you had downloaded earlier, into wptest folder.
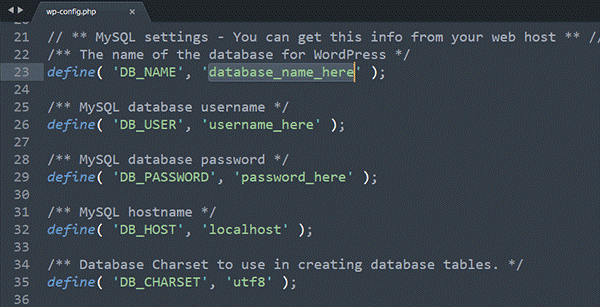
After that, you need to go to your website’s WP folder and have to find the ‘wp-config-sample.php’ file. Once you have found the file, you would have to rename it as ‘wp-config.php’. After you are done renaming, you have to open the file and start scrolling down until you see:
Now, you would have to update these codes. Follow the instructions that are listed below:
• Replace the code ‘username_here’ with ‘root’ and remove the ‘password_here’ field
• After that, eliminate the code ‘database_name_here’ and write the name your own database
• Once you are done, you can save the file and close the window
C) Select a Language
The next step to install XAMPP and WordPress on windows localhost is to open your browser and go to http://localhost/wptest/. After entering this URL, you will be forwarded to a page where you would have to select a language. Once you have selected your desired language, you can click on the ‘continue’ option to proceed further.
D) Fill the Database and Website Information
After selecting the language, you would have to fill all the information on the database, which you had created earlier. The fields, which you will need to fill, are ‘User Name’ and ‘Database host’. You will only need to fill the last field named ‘Table Prefix’ if you are thinking to run more than one WordPress installations by using a single database. After completing the required fields, you would have to click on the ‘submit’ option to proceed to the next step, which is filling up the website information.
Just like the previous one, on the screen of website information, you will also be able to find some fields and fill it, such as password, username, email, and site title. After filling up all the fields, you will only need to click on the ‘Install WordPress’ button, to successfully install XAMPP and WordPress on windows localhost.
After installing the software, you can click on the login button for proceeding to the dashboard.
So, these are the steps which you need to follow to install both XAMPP and WordPress on Widows locally.
The whole process of installing both XAMPP and WordPress on your PC locally is quite long and can sound quite intimidating if you are doing this for the first time.
However, if you are patient and follow all the steps, which have been listed below, in the proper way, then it will be quite easy for you.
Nevertheless, if you still think that the process is tough and need some more information on this context, then you may also opt for some YouTube videos.
Related article: Moving WordPress from localhost to live.

