Sometimes the situation arises that you want to write something in WordPress without using WordPress editor or maybe you are not able to use the editor at that time so what you need to do then? You can write a post to WordPress site via email.
Table of Contents
WordPress allows you to write and publish posts directly from the email so you do not need to login to the WordPress editor each time. There is a process on how to add post to WordPress site via email.
Who needs to post to WordPress by email
In some countries, some websites are banned by the government so those websites are not accessible by the people. This type if your site is banned then you can post in your site from the email without accessing the site. You can publish content from your email directly to your WordPress website.
This feature in WordPress helps many journalists to access the websites and write the post from their email when they are in poor internet connectivity.
It is also helpful to the school, colleges and office networks where the external networks are restricted so you can publish your content and directly post to WordPress site via email by Microsoft AZ-305: Practice Test Dumps.
The safety and the flexibility of the WordPress post by email
Originally the WordPress has default post via email feature but this is not flexible and also not secures enough. According to wordpress.org, this feature will be removed in the future. You can go Setting> Writing to get this feature.
But this is not an acceptable process for the post to WordPress site via email. The most acceptable and easiest way to post to WordPress by email is through the help of the plugins.
Security- With the help of this process it will post a single mail from a private email to the WordPress site. You need to keep the privacy of your email as each post from that email id will create a post in the WordPress blog. As long as privacy is maintained then no need to worry about security.
But if anyone got the details of that emails then they could post anything from that email to that WordPress site.
Flexibility- It does not provide the flexibility to format your content and this is one of the problems. In this way, you can write only plain text.
Two recommended plugins may be used to post to WordPress site via email.
– Jetpack
– Postie
You need to follow some steps to create a post to the WordPress site by email through the help of the plugins.
1. Account set up
You need to create an email account that you will be used to post content from the email to the site. The email account should be unique and unknown and will not be used for general purposes. The email account should be spam-protected.
2. Plugin installation
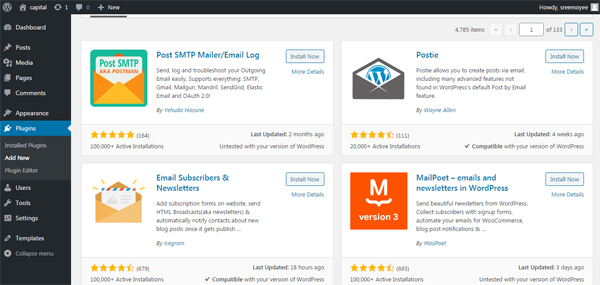
You need to go to the Plugins section from the left of the dashboard. Click on the “Add new” button on the top left corner. You will get a search bar at the right top corner.
Then write “post by email” in the search bar and hit enter. Then lists of plugins will come. Select any of the plugins you need to install then click on install now button and then activate.
3. Roles of individuals for posting content
Some plugins allow to anyone to send content to the WordPress site. This will create a problem so there should be some authentication or verification to check the sender address. Some plugins compare the sender address so any post will not be entered in the WordPress site.
4. Default gateway configuration
Most of the plugins can post content from your email to your default gateway. In the normal installation, the gateway is assigned as “Uncategorized” but it should be good post the content in the category then it will not accessible by the general public so easily then you can get time to revise the content before it goes to the live.
5. Put the shortcodes
Some plugins allow you to add some shortcodes to format your post. When you entered the series of these codes then you can modify your post such as you can change your category etc. Each plugin has a series of shortcodes and you can use it when you are going to post content from the email.
6. Attachment in email
Different plugins handle images differently. Some plugin uploads any images as an attachment with email in the media folder of the WordPress and some plugins post the image as a default image with the post itself.
WordPress post by email through the Jetpack plugin
You need to install the Jetpack plugin in WordPress. There are many reasons to use the Jetpack plugin but the most important feature is that you can post the content by the email to the Wordpress site.
You can install the Jetpack plugin from the “plugin” section of the left of the dashboard. After installation of the Jetpack, go to Jetpack > Settings in the WordPress dashboard.
You need to scroll down and find the “Post by email” box.
Then you need to turn the toggle button on.
Click on the “create address” button. Jetpack will create an email address. You need to send your email to this email address to post any content by email. Be careful to keep the privacy of this email that if the email can be known by others then anyone can post anything to your blog.
One of the nicest things is that Jetpack allows you various options to format your post content, images and can control other information.
WordPress post through the Postie plugin
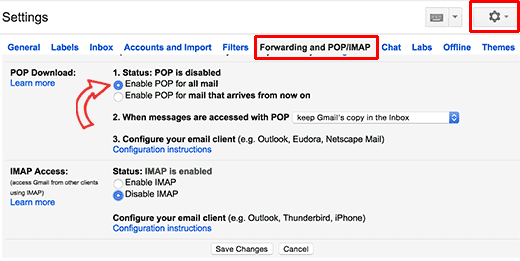
This process is a little bit complicated. First you need to installed Postie plugin. First, you need to create a free Gmail account so you can send mail to this account and then the content will be going to the WordPress blog. After creating the account you need to the “Settings” of the Gmail account.
Then choose the Forward and POP/IMAP tab and the enable IMAP. Then click on the Save changes button. Now you can configure the Postie interface from your WordPress dashboard.
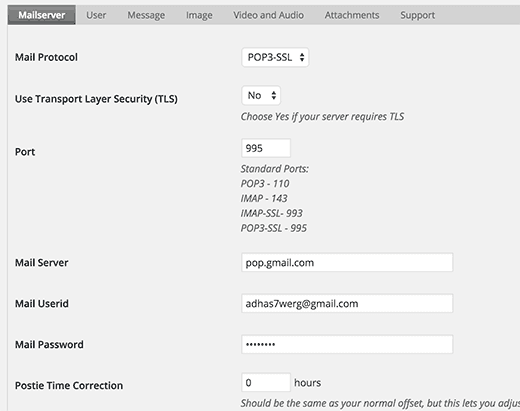
Click on the Postie option in the WordPress dashboard and then you need to enter some information.
– Connection – Sockets
– Mail Protocol – IMAP-SSL
– Port – 993
– Mail Server – imap.gmail.com
– Email Userid –Put the Gmail email you created
– Mail Password – the password of the Gmail address you have entered.
Once you have completed then save the changes.
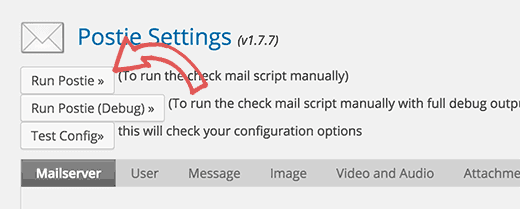
You need to click on the “Test Config” button to check whether everything is working or not. If everything is okay then you will get a success message.
You may need to explore some extra Postie settings for working Postie. Then you can write any content to post to your WordPress blog, you need to send an email to the specified Gmail account.
Now, you have two options to post in WordPress by email through two plugins. If you want a simple process then you can choose for Jetpack plugin, remember to keep the email private. But if you need more security then you can choose Postie plugin so you need to go through with a little bit setup.


