Rearrange Post Edit Screen in WordPress Website
Sometimes you might feel the need to change the look of the post edit screen while creating the WordPress posts.
Table of Contents
WordPress comes with a large range of content editor toolbars and sections that you can use to customize the screen of your WordPress post edit screen.
If you want a screen that is less distracting with multiple menus, here is how you can rearrange post edit screens on the WordPress website. But before that, the following are a few questions that you need to ask yourself before opting for rearranging.
1. Is it necessary to rearrange post edit screens in WordPress?
No, not necessarily. If you are not feeling good with the WordPress Post Edit screen’s arrangements, you can easily opt for rearrangement. However, there is no need for editing or arranging if you don’t want to.
2. Is rearranging going to pose any trouble?
Rearranging those tools you need to use frequently can impose problems while working, as you will not have direct access to those while working. However, if you keep the essential tools on the screen and hide the unimportant ones, it will help you.
Rearranging the WordPress Post Edit Screen:
The WordPress Block Editor comes with a well-enough user experience. Once you get easy with it, you will notice that you are occupying more space than others.
There are built-in options for customizing the post editor of your own. There are multiple methods to rearrange post edit screens.
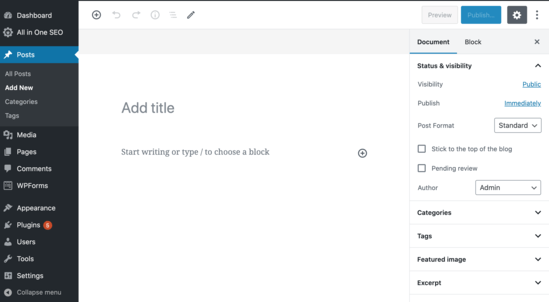
On the right, you can get the document set and the block settings, which shows up when you are clicking on any of the block posts.
If you are using WordPress for a while, then the default editor view is going to include the WordPress admin sidebar. If it is not showing you, then there is an option for viewing the admin sidebar. You need to switch off the full-screen mode.
Show/ Hide the Panels in the WordPress Post Editor:
In case you want to hide some of the panels in the content editor area of your WordPress site, then there are options to help you out.
You can easily customize the tags, categories, excerpts, and featured images. Here is how the process can be executed step by step.
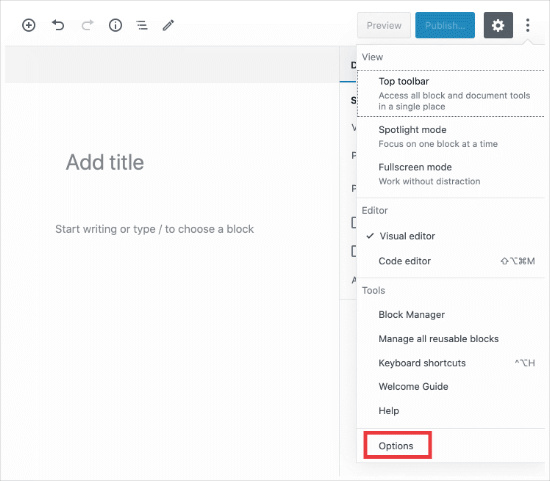
Step 1: Click on the 3 dots menu at the upper right corner of the WordPress screen.
Step 2: Select the “Options” from the menu.
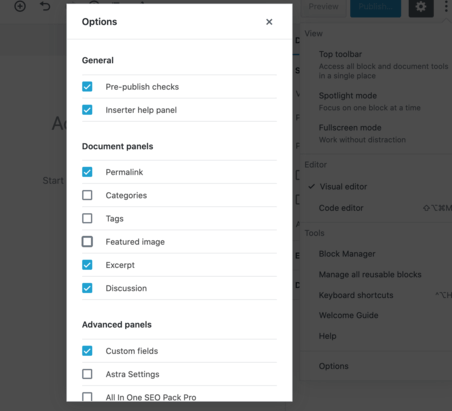
Step 3: A pop-up is going to appear with the list of the panels that you can choose for showing or hiding.
Step 4: Check or uncheck the boxes that you want to display in your right panel.
Related Post: How to Set HTML Editor as the Default Post Editor in WordPress
How to Stick the Block Toolbar to the Top?
If you are working on a block, then the editor comes with a block toolbar right above it. The toolbar is displayed when you move between the blocks.
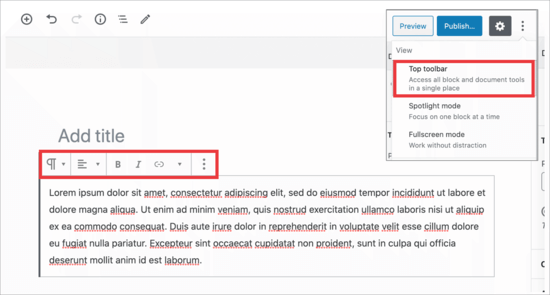
However, if you feel it distracting or unnecessary when you work, then you can move it to the top. Below is given the procedure on how you can do it easily.
Step 1: Click on the 3 dots at the upper right corner of the screen.
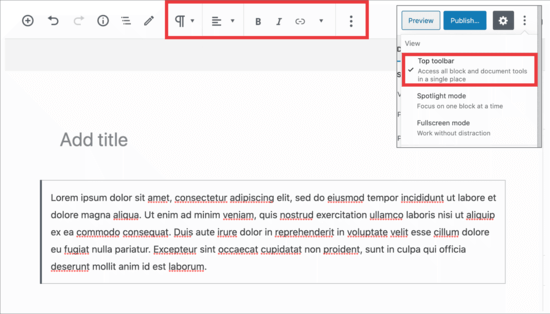
Step 2: You are going to see a “Top Toolbar option.”
Step 3: Click on the “Top Toolbar option” to move the block toolbar to the top of the screen.
This setting is much useful and easier to edit each of the blocks when you want to work with the complex layouts, columns, tables, and groups.
Settings to remove the Right-Side Panel:
When you work on your WordPress, focusing on the content might feel difficult if the right-side panel keeps distracting. It is effortless to change the settings for the displaying of the Right-Side Panel on WordPress. Here is how simple it is-
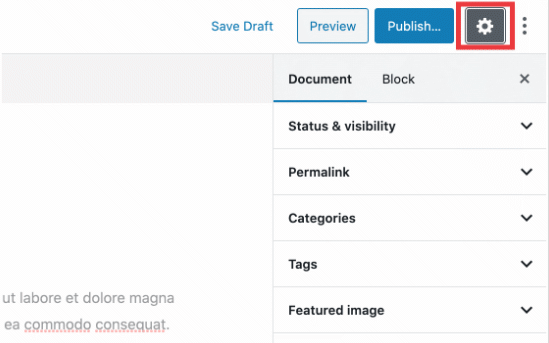
Step 1: Navigate to the gear icon at the top and click on it. The right column will disappear.
Step 2: To get it back on the screen, similarly, click on the gear again, and it is going to display the right column to help you with the document and block set.
How to use the Fullscreen Editor in WordPress?
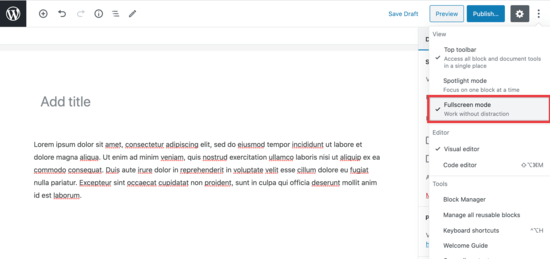
WordPress editor offers a full-screen editor, which removes the WordPress admin toolbar and the sidebar. You can easily use the fullscreen editor by entering into the rearrange post edit screen. You can also exit at any time when you want. Here is how you can do it:
Step 1: Go to the 3 dots in the menu at the screen’s upper right corner.
Step 2: Select the “Fullscreen mode” in the dropdown.
Step 3: If you want to exit from the Fullscreen Editor, repeat the same steps as the previous one.
WordPress saves the user’s preference, and next time it opens with the post editor, along with the same view that you have selected earlier.
Related Post: WordPress Post Revisions Made Simple: A Step by Step Guide
How to use the spotlight mode in the Post Editor?
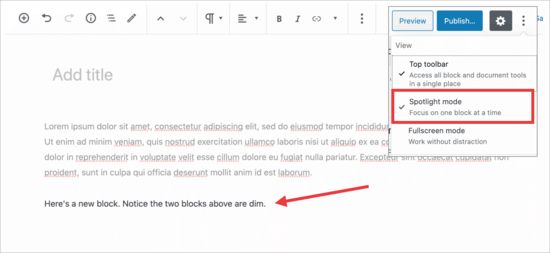
WordPress uses the default spotlight mode to highlight the block that you are using to work. It dims the opacity of the other blocks. Thus, it helps in focusing and locating the block that you are currently using for editing.
If you want to see all your blocks together to make them display together, you can quickly turn off the spotlight mode through a simple and easy step. Here is how to do it:
Step 1: Give a tap on the three-dot menu icon.
Step 2: Select “Spotlight Mode.”
Step 3: Turn off the spotlight mode by simply clicking it.
Step 4: If you want to turn it on again, merely repeat the same steps to turn it on back.
Collapsing the Document Panel Section:
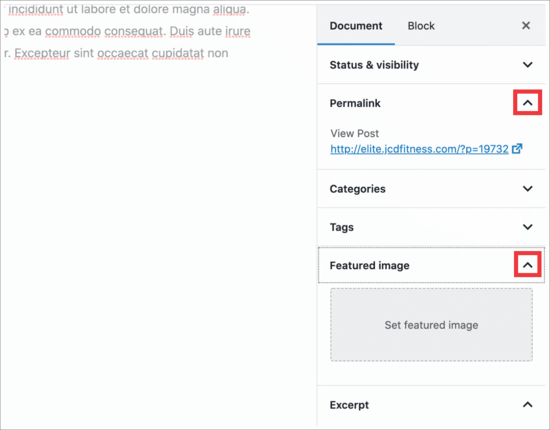
The document panel at the right-hand corner of the columns comes with all the standard WordPress settings. It helps you to post. With the WordPress plugins and themes, you can add the sections to this panel.
It makes the panel look a bit longer. However, it makes things much more difficult to locate. Here is how you can do it:
Step 1: Click on the upward arrow beside each of the sections.
Step 2: Click on the arrows to collapse them. Make the document look much cleaner than before.
Conclusion:
For a customized user experience, you can easily set up and do rearrange post edit screen of a WordPress site. Knowing the easy steps makes your WordPress post edit screen look much cleaner and well organized, helping you work with ease.
Thus, it also helps you to have fewer distractions on your WordPress screen. We hope the information is going to help you with ease.

