You may have often observed that once you visit a website, it tries to redirect you to another website. The reasons for such actions are plenty and once you have developed a website, you might have encountered such a situation as well.
Table of Contents
Considering which webpage or which section of the webpage you have visited, WordPress will guide you to the profile part within the admin section of WordPress or even to the dashboard in some cases.
In case you wish to add the same functionality on your website too, this will assist you in attaining it. For that, you have to log in to your WordPress account and follow these simple steps before you set up redirects after successful login.
Because variations in roles or permissions help you to redirect the users differently, this will help you understand the process easily.
Ways to set up redirects in WordPress
Using the WPForms plugin
The best thing about using WPForms is that you can do custom login from WordPress with the function of redirection after login. It is the most popular plugin in the market for the fact that it allows users to create beautiful forms for including them in the WordPress site.
To access all the features of this plugin, you need to get hold of the pro plans of this plugin. Therefore, follow these steps to set up redirects after successful login using WPForms:
- Activate the plugin and then go to WPForms, followed by the settings page. Here you have for simply adding the license key. The license key and is required information is provided for your account in the WPForms website.
- Adding the license key, you will now install all the addons.
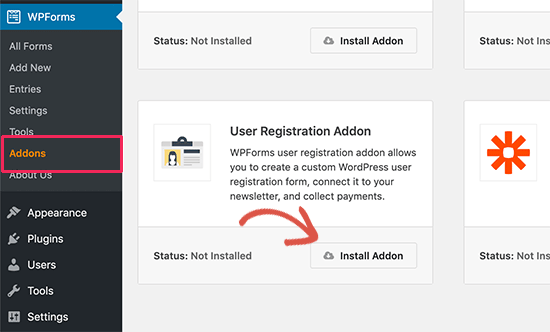
- Visit the WPForms page and then go to the Addons page. There, you have to locate Registration Addon.
- Click on the button for Install Addon for which you have to download and then activate them. This will help to create the forms for custom logins.
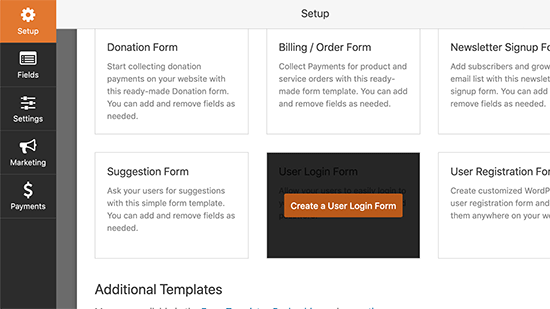
- In the WPForms, head to the page named Add New. Scroll down your template named, ‘User Login Form’.
- Click on the button named, ‘create a user login form’.
Followed by this, WPForms will go onto loading the fields for the form of user login.
- Click the fields that add a textual description in them. Alternatively, if you click on the submit button, you have to change the label as ‘login’.
This will finally help you to set up redirects after successful login following steps:
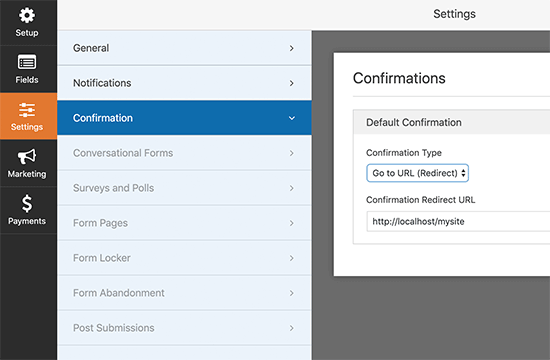
- Navigate to the settings tab and then to the confirmation tab in the left column. Here you need to click on ‘Go to URL’ for the redirect to occur as per the type of your confirmation.
- Below this section, you have to place the URL, where you wish to redirect the users.Therefore, the login form for your redirection is prepared but you have to place the settings before you wish to exit the builder interface of WPForms.
You can thereby include this login form to your website to set up redirects after successful login. In that case, you need to follow certain measures. Just make changes to your page in the location where you need to add the login form. Alternatively, you can even create a new one by:
- In the edit screen, include your WPForms section within the content section.
- Then, check the login form that you created and then WPForm will automatically upload that in the content area.
Using plugin, Peter’s Login Redirect
This is an easier method to allow your WordPress site to redirect users, simply. This is because; it considers the roles as well as permissions for the same.
Step 1: Configure the settings of Peter’s Login Redirect
- Install and further activate the plugin, Peter’s login redirect.
- Once you have activated, visit the Settings page and then to Login redirects for setting the plugin. This will help in setting up the post logins for redirecting to a different situation.
Step 2: Setup the login for the users
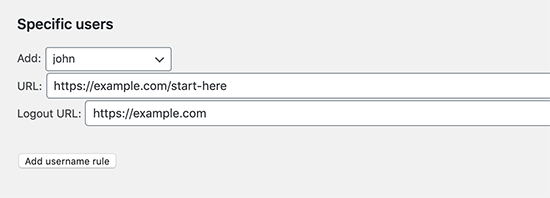
- The first option on the setting will redirect to a specific user. For that set user name in the drop-down menu and enter URLs for letting users login and logout.
- After this, hit on the rule button named, Add username for saving the settings.
In case you need more redirects, you can simply repeat this process.
Step 3: Setup the login based on Capabilities
Considering the capabilities and user levels, you can also set up the redirects. This finds use when you are implementing the user roles including custom capabilities for WordPress.
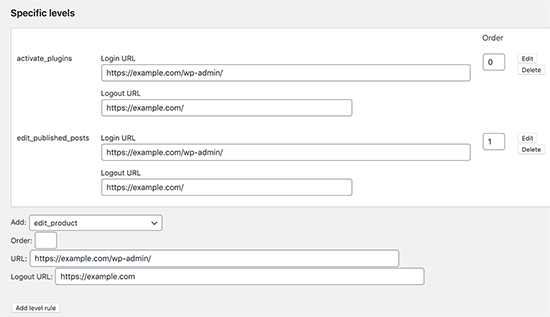
- Select the level of user from the drop-down menu to enter the URLs for logins and logouts.
- Set the orders through numbers, to understand the way this rule can be displayed from plugin settings.
Step 4: Setup the login for all users
In the settings page, click the option that applies to all the users. This will help to redirect the user who does not match with the set rule. This can be a way to create a redirect for a site for all the users.
Step 5: Setup redirects using the user registration feature
- This will redirect the new user to another webpage, mostly the WordPress login page.
- Set up a URL that serves the purpose of redirects that will take you to another page named as the Post-registration area.
Thus, you can even direct the user to the welcome page, which has other links that they can access on the website. However, the most important thing is that you need to edit the permission level using the section as Custom settings for plugins. The plugin will help you to change the categories for redirecting URLs.
It also states that if the user role is Editor, then you can easily make redirects. In that case, opt for intall_plugins. This will help only the user with the administrator role to set the redirects.
Why will you redirect Users after Successful Login to their sites?
Several website owners prefer to handle multiples WordPress websites separately dedicated to blogs, online stores, and membership community. In such cases, each of the websites requires individual logins to access information or perform actions.
It is for this reason, the membership plugins by WordPress helps to redirect the users for the homepage to the membership page easily. The software restores pre-defined functionality to help the redirection to occur, automatically.
In case the website does not have that particular facility enabled by plugins, it will redirect you to the admin area of WordPress. However, it is not the ideal way, as the admin page does not provide any clear guidance for further proceedings. This works fine with bloggers but not for the actual user experience. So, it is better to use plugins to make the process easier.
Final words
Thus, as you can observe, the steps are quite easy to allow the feature of redirecting users to another webpage. Added to this, plugins always simplifies the otherwise complex procedures. However, before you start the process, you need for successfully log in to your account on WordPress to set up redirects after successful logins.

 Followed by this, WPForms will go onto loading the fields for the form of user login.