Many people begin their website creation process on a variety of different platforms. They eventually become aware of the constraints imposed by the platform and express a desire to switch to an alternative that is superior and more adaptable, such as WordPress.
Table of Contents
In this post, we will check the steps necessary to make a smooth transition from Squarespace to WordPress.
Why You Should Move from Squarespace to WordPress
Squarespace is a website creation and construction platform that features an intuitive user interface. However, many people quickly come to the conclusion that it places restrictions on the things that can be done on your website.
WordPress is significantly more adaptable than other content management systems and enables you to create a website with a great deal of versatility and independence.
To gain insight into the advantages and disadvantages of both platforms, check out our article that provides a side-by-side comparison of Squarespace vs WordPress.
Take a look at our article that contrasts Squarespace and WordPress, which includes a side-by-side assessment of the benefits and drawbacks of using each platform.
1. Install WordPress
After creating your account, you’ll be taken to the WordPress dashboard. This is where you can manage your website, install themes and plugins, and publish content. Before you start the migration process, it’s a good idea to familiarize yourself with the WordPress dashboard and its various features.
One of the great things about WordPress is that it’s highly customizable. There are thousands of plugins and themes available, many of which are free. This means that you can easily customize your website to fit your specific needs and preferences.
2. Exporting Squarespace Content
The next stage, which should be taken after downloading WordPress on your brand-new site server, is to transfer your content from Squarespace. Squarespace only has a restricted amount of functionality for exporting. Some of the content that is currently displayed on your website may be downloaded, but this is determined by the contents of your site.
The remaining content will continue to be hosted on your Squarespace site’s built-in address, and you will be required to physically copy and transfer it.
- Log in to your Squarespace account and go to the Settings » Advanced » Import/ Export menu
- This opens import/export options
- Click upload to proceed.
- Squarespace now displays a WordPress logo popup. Squarespace only saves WordPress-compatible text
- Squarespace stores can obtain product info as a CSV file.
- Next, Click the WordPress logo next.
- The left side of the import-export keys shows export progress.
- After exporting, an icon will appear to obtain the file.
- Download the output file.
- Importing content into your new WordPress website requires it.
3. WordPress Content Import from Squarespace
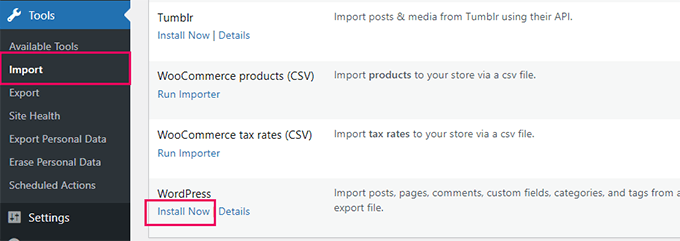
The content you got from Squarespace needs to be imported into your WordPress website as the next stage. Go to Tools in your WordPress dashboard section after logging in. the left-hand navigation item for import. You will see a selection of available devices.
Because it distributes content in an XML file format suitable with WordPress, Squarespace won’t be included there. This simply indicates that in order to proceed, you must select the “Install now” option underneath WordPress.
- WordPress will now fetch and install the importer for you.
- When completed, you must select the “Run importer” option to proceed.
- Select the “Choose File” option on the following page.
- By selecting it and clicking the “Upload file and import” option, you can upload the file that you previously obtained from Squarespace.
- Now that the file has been uploaded, WordPress will review it to see if it is in an approved format
- WordPress will show you the import preferences screen if everything is in order.
- You must select an author name for the transferred content on this screen.
- Users of Squarespace can be imported into WordPress and added to the Subscriber position. The creator can also be a current executive user or even a new account that you make.
- Click the “Submit” option to enable WordPress to begin transferring the data from your Squarespace export file.
- WordPress can also import Squarespace users and add them to the Subscriber role in WordPress. You can also choose an existing admin user as the author or even create a new user.
- The choice to upload file pictures is also available, but it is ineffective in this situation.
4. Getting in Pictures from Squarespace
Unfortunately, your Squarespace website’s pictures cannot be imported into WordPress. There is an automatic method to upload those pictures, but you will need to do it directly. The Auto Upload Images component needs to be installed and turned on first. See our step-by-step tutorial on installing a WordPress extension for more information.
You must update all sites and messages with pictures after registration. The moment you save a post type, this will start the picture upload procedure.
Fortunately, WordPress lets you mass update content, so you can do it with a few keystrokes rather than individually updating each piece of content one at a time.
- Simply go to Posts, All Posts page and then click on the Screen Options button at the top.
- The “Number of items per page field” must be increased to 999, then you must select “Apply.”
- The next step is to pick each of your articles, and then choose “Edit” from the mass options selection.
- Then, you must press the “Apply” option.
- WordPress will display a fast update window with a summary of all the chosen articles. WordPress will change all of your articles after you simply select the “Update” option
- Keep in mind that by selecting the “Update” option, you are not making any changes.
- When you do this, the Auto Upload photos tool will transfer the external photos from Squarespace and save them to your WordPress media collection.
- The application might not be able to start an upload for every article and picture at once, depending on how many you have on your website.
- In that case, you can select and update the posts again.
- Only the pictures that are currently unimported will be imported by the application; those that were previously imported will be skipped.
5. Correcting Permalinks
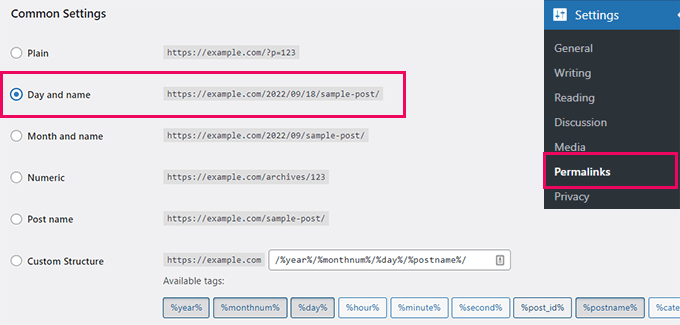
We must make sure you receive visitors from the connections on your previous Squarespace page. With WordPress, you can easily alter the link structure thanks to its SEO-friendly URL structure.
Making your link structure resemble that of your Squarespace website is the aim here. For blog entries, Squarespace employs the URL structure year/month/day/post-name.
Additionally, the article URLs contain a word like “blog” or “blog-1.”
6. Adding Additional Content to WordPress from Squarespace
Only a small amount of content can be exported from Squarespace. You will need to carefully transfer every single one of them to your WordPress site if you used their eCommerce tools, events, or storage for audio and video assets.
This procedure might take some time, depending on how much content you have there. A WordPress eCommerce component like WooCommerce is required for the products you sell. We advise storing your video clips on websites like YouTube and Vimeo that offer video storage.
7. Adjust your website design and layout
Once you have successfully migrated your content from Squarespace to WordPress, it’s time to adjust your website design and layout.
You may also want to add widgets or plugins that enhance your website’s functionality, such as a contact form or social media sharing buttons. By adjusting your website design and layout, you can make sure that your new WordPress website is not only functional but also visually appealing and user-friendly.
8. Learning About the WordPress Platform
If you are new to website building or blogging, WordPress is a great platform to start with. It is easy to use and has a lot of customizable features. To start, you will need to sign up for a hosting service and domain name.
Once you have that setup, you can install WordPress and start building your website. WordPress has a wide range of themes to choose from, allowing you to create a unique design for your website.
You can also install plugins to add more functionality to your site. WordPress is a robust framework that offers an exceptional degree of customization. You can get a head start on getting to know yourself by personalizing your website.
You can choose from thousands of WordPress themes (also known as website design templates) that have been developed by professionals and are either free or available for a fee.
9. Conclusion and Next Steps
In conclusion, moving content from Squarespace to WordPress may appear to be a challenging undertaking; however, this is not necessarily the case.
You can simply transition all of your content and data to WordPress and continue to operate your website without any difficulty if you have the right tools and are guided in the right direction.
Take your time, make sure you have a backup of your data, and make sure you follow each stage in the process very meticulously to prevent any problems or complications.
After you have finished the conversion, set aside some time to familiarize yourself with WordPress and all of its capabilities.
Bottom Line
Making the switch to a new platform can be daunting, but with our easy-to-follow guide, you should be able to make the move with confidence. We understand the importance of having a website that reflects your brand and goals, and we hope that WordPress will help you achieve that.


