Clear Your Browser’s Cache
In case your WordPress keeps logging you out, the issue can indicate the browser cache problem. The page is most probably cached in your browser and will authenticate the session using an expired cookie.
Table of Contents
Clearing the cache of your browser becomes a quick fix for the problem. Here is how you can do it:
Chrome:
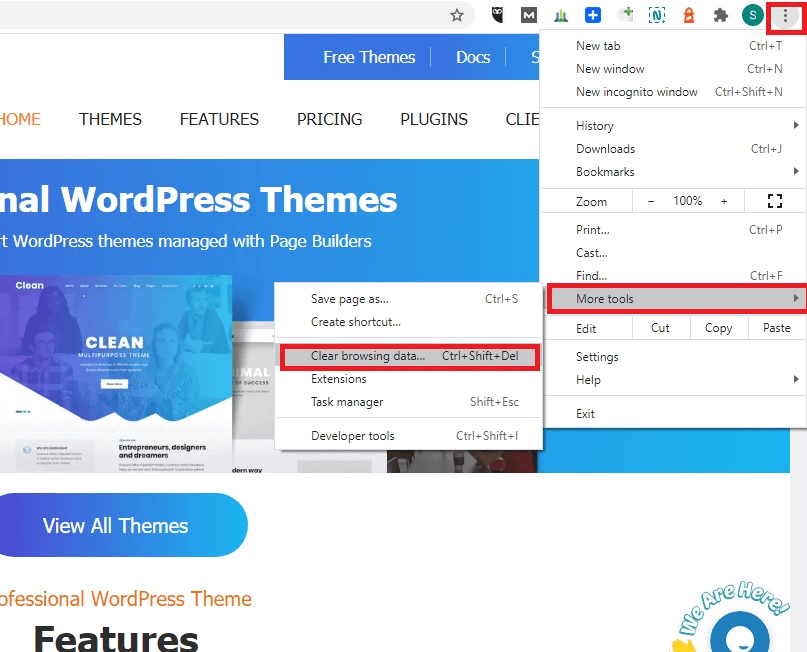
If you are using Google Chrome, tap on the three dots icon given on the top right side of the browser window. Look at the More Tools option for selecting the Clear Browsing Data from the Submenu area.
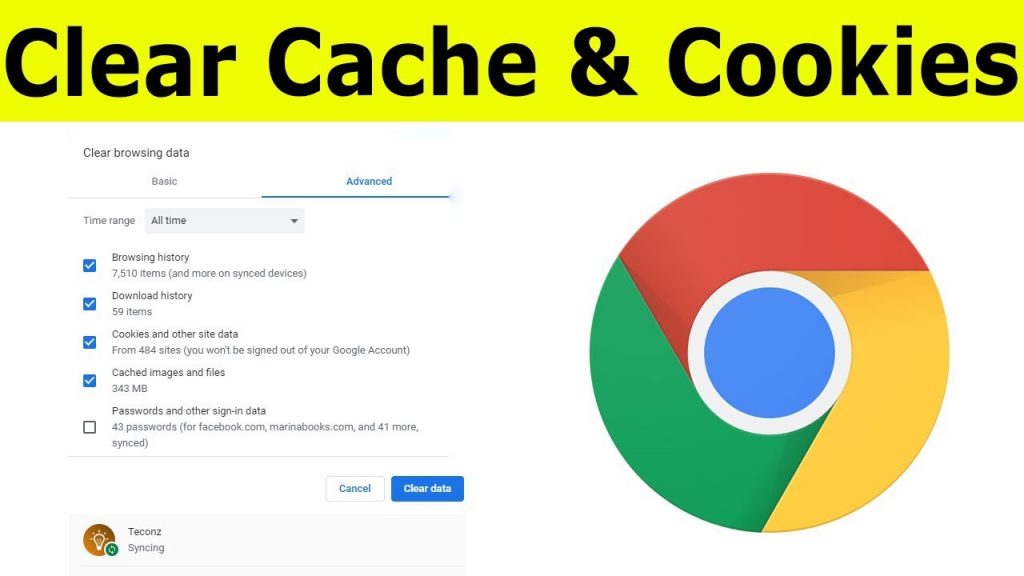
Also, you can use the CTRL + SHIFT + DEL option. Chrome is going to open a new tab from where a pop-up window called Clear Browsing Data is going to appear. Check the Cached images and the files box only. Make sure any other boxes are not checked.
Also, you can change the timeframe from the top area. Click on the Clear Browsing Data button and clear the cache.
Firefox:
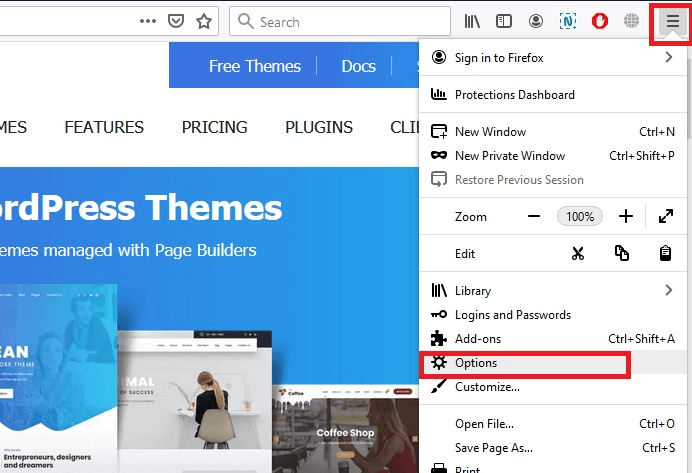
If you are using Mozilla Firefox as your browser, click on the Hamburger icon from the top and select the history button. From the next menu, select the Clear Recent History.
You can also use the CTRL + Shift + DEL. Firefox is going to open the pop-up. From the Time range area drop-down, select Everything. Check the Cache box only and then click on Clear Now to clear the cache.
Clear Your Browser’s Cookies
If the issue is the saved cookie in your browser for the site, and also, in case the cookie is expired, your WordPress may keep logging you out. Here is a way how you can delete the cookies from your browser:
Chrome:
From Chrome, go to the top and right-hand corner, then click on the More Button. From the hamburger icon, click on the vertical lines or the dots. Now you need to click on the drop-down menu for selecting the More Tools > Clear Browsing Data.
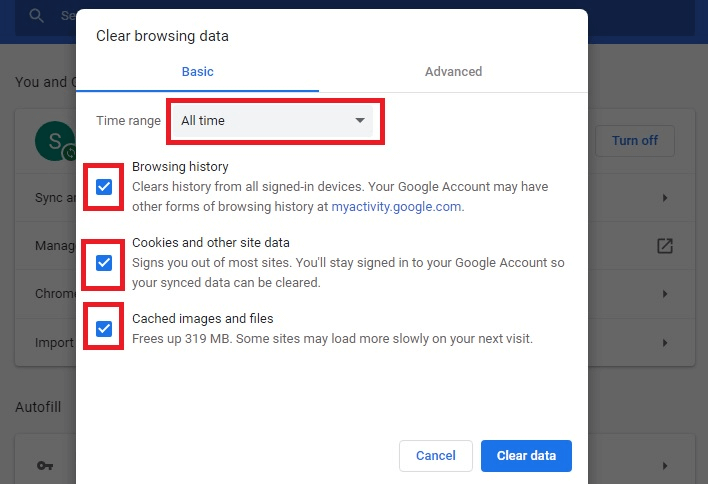
From the top section of the Pop- up you need to select the time range for how far you want to clear your cookie data. If you want to delete everything, click on the All-time from the drop-down box.
Now you can check in the Cookies, and the other site data along with the Cached images and files boxes are changed or not.
You can also check for the Browsing History option. After that, click on the Clear data button. The process will take time-based on how much data you are erasing.
Firefox:
If you are using Firefox, tap on the hamburger setting icon from the top, right-hand corner areas. Now you need to click on Select Preferences from the drop-down menu area.
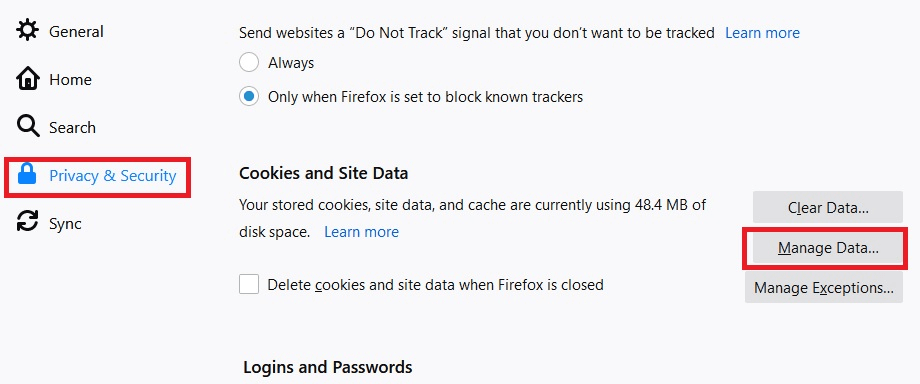
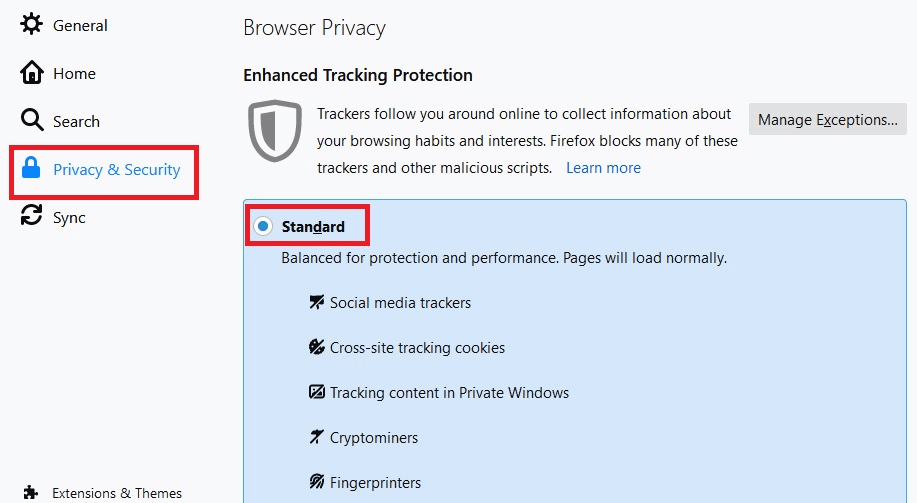
This is going to open a new tab with the settings. Click on the Privacy & Security from the left-hand side. Scroll downwards with the cookies and Site Data action and then click on the Manage Data Button.
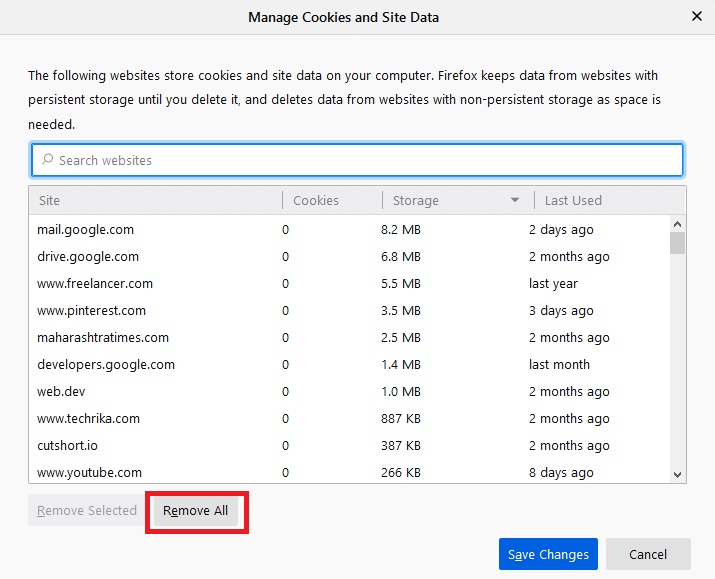
From the pop-up areas, click on the Remove All Shown button to delete all the cookies. Now you need to click on the Save Changes.
Safari:
To clear your cookies on Safari, open the browser and select the Preferences button from the menu.
Now you need to click on the Privacy tab and theme you need to click on the Manage Website Data button. Then click on Remove all button and delete all the Cookies from Safari.
Edge:
For Microsoft Edge, you need to open the browser first. Then click on the ellipsis from the top right corner.
Go to History > Clear Browsing Data. From the Time Range drop-down box, select a suitable situation. Choose a time for how long your WordPress keeps logging you out.
Then you need to check the Cookies and other site data along with the Cached Images and files. Then select to clear your browsing and download history. After that, click on the Clear New Button.
Check Your Browser’s Settings
If it’s still not working, then you need to check the browser cookie setting. In case they are set up for forcing the cookies to expire, you need to change it. Here is how you can do it:
Chrome:
From Chrome, click on the menu icon from the top right corner. Then you need to click on the Settings. A new tab is going to open from where you are going to get plenty of options.
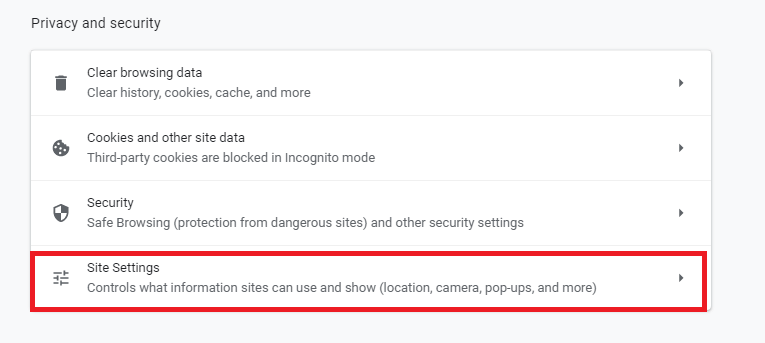
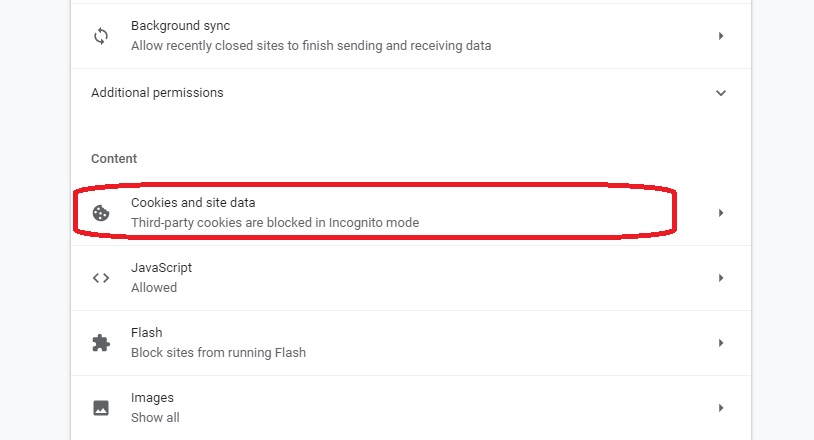
Scroll down to the bottom and click the Advanced option. From the additional options, click on the Site Settings from the Privacy and Security section. From the Permission section, you need to find the Cookies and the site data settings.
It is either going to come with the Allow or the BLocked label. Click on it. Now you need to click on the toggle button from the Blocked label near the Cookies and site data section. After that, it is automatically going to switch and change the allowed cookies.
Firefox:
In the case of Firefox, open the Firefox and click on the gear icon from the default new tab page. From the icon, which is located at the top right corner of the page, click on it.
A new tab is going to open with the settings. Go to the Privacy and Security tab from the left menu. Go on to the Enhanced Tracking Protection section and click the Standard option. After that, continue Troubleshooting.
Safari:
From the Safari menu, choose the Preference option. Now you need to go to the Privacy tab. Then from the cookie and data option, block all cookies box, which is not checked. If it’s checked, click on it. The change is going to be saved automatically.
If still the issue is not gone, check the box again in case you don’t want your browser to save all the cookies. Then go to the Website tracking and Prevent all the cross-site tracking, which isn’t checked. If it is, then click on the option.
Edge:
Open your browser and then click on the hamburger icon from the top right corner and go to the settings. Then you need to go to the Site Permissions tab and find the Cookies from the site data button.
If it comes with the ” Blocked” under it, click on it. From the other side, check if it’s “Allowed” and go on for Troubleshooting.
Click on the toggle button from the Allow site and save the read cookie data. Then check if the issue is fixed or not.
If it’s already enabled, then check if the toggle button for the Block third-party cookies is disabled or not. In case the error is still happening, then click on the Add Button Beside Allow. Enter an address on the site, which is troubling. Then click on Add.
Double Check Your WordPress Site Address
The trouble sometimes can occur due to the problem with the saving of the WordPress login session, which is not saved due to the un-matching of the URL from the site address.
Here is a way how you can fix it by checking your WordPress settings and make sure that the Site Address and the WordPress Address fields are similar.
Log in to the site and go to the settings > General from the menu. Now you need to update the address as you need to ensure that they are correct.
There are probabilities that the position of the “www” prefix is wrong. Also, make sure that you are checking the “HTTPS” prefix if you are having an SSL certificate installed in your domain. After making the adjustments save the changes from the bottom of the page.
You can also manually update the WordPress address. Edit your wp-config.php file. Then you can use the SFTP for the details.
After establishing the connection with your site using the SFTP, you need to download and open the file. If you are using FileZilla, click on the file. Then right-click and select the View from the Edit list.
From the " happy blogging" line, enter the code:

define('WP_HOME','http://your-site.com');

define('WP_SITEURL','http://your-site.com');
Change the “http://your-site.com” to the actual domain. Make sure the checking of the use of “HTTP” or the “HTTPS” is correct or not. Choose the HTTPS Prefix in case of the SSL certificate.
Save the file and again upload it on your site in the main folder area. If you are using FileZilla, then go back to the client and click on Yes while prompting the overwrite from the new version of the file on the server.
WordPress Keeps Logging Me Out Nonetheless
If the problem still keeps happening, then you need to manually extend the time for the one which the user can remember while checking the ” Remember Me” box.
Also, it is going to solve the problem if the default is not much longer or the previous timing was changed and no longer works properly.
You need to create a child theme along with the functions.php file if you are doing it. You need to add the filter from the child theme’s functions.php file:
add_filter( 'auth_cookie_expiration', 'keep_me_logged_in_for_1_year' );

function keep_me_logged_in_for_1_year($expirein ) {

    return YEAR_IN_SECONDS; // 1 year in seconds

}
The filter is going to be remembered for one year. To change this, you can replace the “YEAR_ IN-SECONDS”:
DAY_IN -SECONDS- to remember the user for one day
WEEK_ IN_ SECONDS - to remember for one week
MONTH _ IN_ SECONDS - to remember for one month
In case you are developing locally, then the one-year remembering may impose security threats. However, you may not want to face this issue frequently, so one year is going to be fine if you have proper security measures.
If you are using WordPress as the main platform for your website and you are being logged out often, then you should know that this error is more as a result of session timeout.
Granted, that this can be frustrating, not to mention downright irritating especially if it occurs when you are trying to edit or save a post, but it has been known to happen for several reasons.
What’s more, each time you try to login to the admin dashboard, your WordPress site automatically locks you out and it can be hard, to make the requisite changes so that you can gain access back to your WordPress website.
As mentioned earlier, it can happen for several reasons, starting with external plugins to clearing caches and cookies; incidentally, you may want to restore your old version so that it works again correctly.
Just follow the directions listed below and you should be fine and remember to do a complete backup before you try out any of the steps listed here, just in case. Soon, you should be able to resolve the issue and regain access to your admin dashboard without a hassle.
Steps to Fix WordPress Keeps Logging Out Problem
Deactivate plugins:
The first thing that you need to do is to deactivate your plugins; just use your FTP client and the credentials that your web host had provided you with.
Login to your FTP account and access your root directory, you should see your root directory. Once you are in, you should be able to locate your plugins under wp-content folder and now, try to deactivate the whole plugin folder and see if it works.
If the issue is resolved at your end, then the plugins were the cause of the same and all that’s left is to locate the rogue plugin and deactivate it permanently.
Change the name of all the plugins that you are using at the moment, reload your website and then change it back. By trial and error, you should be able to locate the rogue plugin and all that’s left is for you to deactivate it permanently.
This happens more often than you would think, especially in the case of external plugins which is why you need to check out any external plugins carefully before installing the same on your website.
Additionally, you may also want to let your host and the plugin developer know about the issues that you were facing as a result of this plugin.
Related Post: Beginners guide to easily deactivate WordPress Plugins
Clearing caches and cookies:
You may also want to clear your caches and cookies; and this is especially true if you are using a cache plugin on your website to help improve the performance of your website.
If you do not clear your caches and cookies regularly, then chances are that your website could malfunction and could well lead to you getting logged out often. So make a point to clear all the cookies and caches and you should be fine.
Related Post: How to Create a Custom Login Page With WordPress
Restore from previous backups:
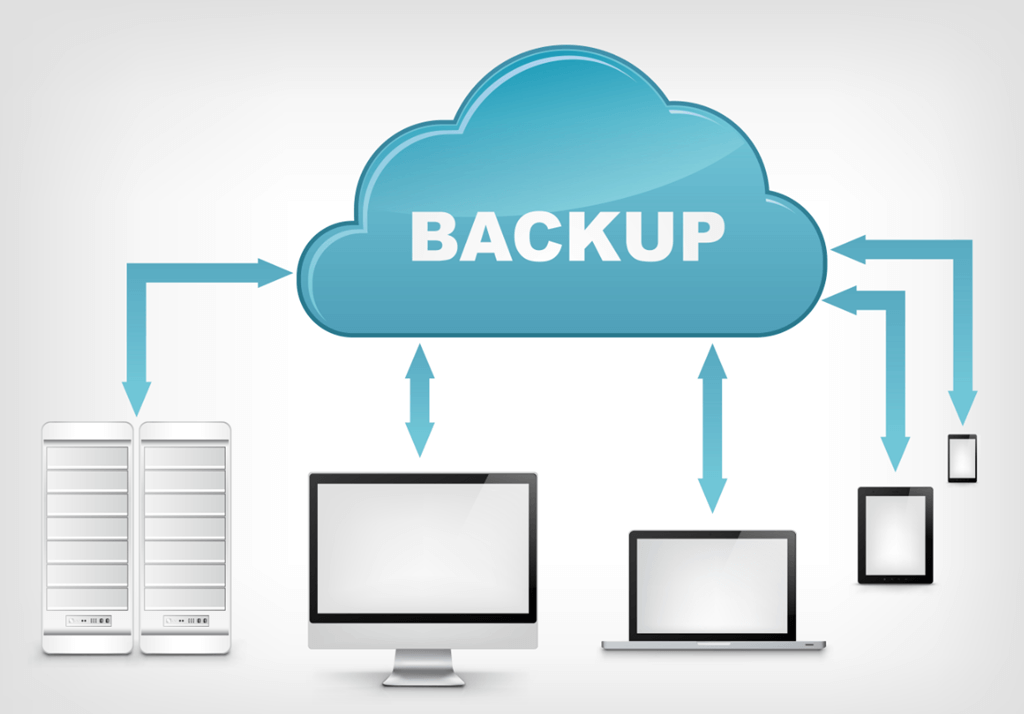
This is a little tricky than most; if any of the above steps had not worked, then you may want to restore your website from an earlier back up, when your website was working just fine and you had complete access to the same.
This is why you should always choose a web host who provides you with auto backups of your website so that you do not face this issue. All you would have to do is to restore your old version and that’s it.
In case, you were a tad overwhelmed with the same, just remember that WordPress makes it quite easy to restore old versions and you should be able to do the same here without a hassle.
Related Post: How To Use Restore WordPress Site Using UpdraftPlus Back Up?
URL issue:
If the above listed steps do not exactly work, then the issue could well be a URL mismatch. Chances are that you have entered the wrong address in the WordPress address and then, the site address which is why you are facing the issue at the moment.
What you need to do is to head back to your admin dashboard, and check out the address listed under settings. Both the addresses should match either with the ‘www’ or non www prefixes, and if they do not, then you need to get this fixed right away.
If WordPress keeps logging you out before you are able to affect any changes, then read on.
Wp-config.php:
If you are not able to login to your admin dashboard because your WordPress site keeps logging you out, then you need to access your root directory and manually change/edit wp-config file to resolve this issue.
Just head over to your wp-config file, you should be able to locate it with the other files such as wp-includes, wp-content etc. Once you have located the requisite file, you need to download it and save it on your system.
Now, open the file with the help of notepad or any text editor program. Now, you may want to check the entire file or just add a couple of lines of code in the last line – basically you are defining your website, for both the WordPress and site address and listing them as the same with either the ‘www’ prefix or non www.
Now, that you have carried out the edits, you would need to save the file back to your system and upload it back to your root directory using your FTP client. Try reloading your website and your error should be resolved right away.
These are some of the ways by which you can fix the “WordPress keeps logging me out” error; and as pointed out earlier, this error can happen for a lot of reasons.
That’s why you need to trouble shoot the error and it can help you determine as to why this error is occurring so that you can take effective measures to ensure that it does not happen again.
Even a simple address mismatch can result in you getting logged out often. The steps listed above do work and if you are still facing issues with logging in to your website, then perhaps it may be time to let your web host know about your issue so that they can help you resolve the same at the earliest.

