Search engine optimization (SEO) is a crucial part of building an effective website, and one of the most important factors in achieving SEO success is using the right tools to optimize your site. One such tool is the Robots.txt file, which controls how search engine crawlers access and index your content.
Table of Contents
Optimizing your WordPress Robots.txt file can help you achieve better search engine rankings, improve your website’s visibility, and increase your traffic.
However, despite its importance, many website owners are not familiar with how to properly configure their Robots.txt file. In this blog post, we’ll guide you through everything you need to know to master your WordPress Robots.txt for SEO and unlock the full potential of SEO for your website.
Understanding the role of WordPress robots.txt for SEO
Understanding the function of the robots.txt file in search engine optimization is essential to getting the most out of your WordPress website optimization efforts and generating the best possible results. A text file called Robots.txt, which may also be referred to as the Robots Exclusion Protocol, gives instructions to search engine crawlers on which areas of your website they should crawl and index.
When bots from search engines visit your website, the first thing they do is check in the root directory for a file called robots.txt. This file serves as a guide for the bots, advising them about the sites and files that they are permitted to visit as well as those that they are not.
You have complete control over the material that is shown to search engines and the stuff that is concealed from them if you configure your robots.txt file correctly.
The scanning effectiveness of your website should primarily be improved by using the robots.txt file. It helps search engine bots concentrate on crawling and indexing the most vital parts of your website, so avoiding wasting resources on non-essential sites or sensitive material that should not be made available to the general public.
What Exactly Is a Robots.txt File?
A simple text file known as Robots.txt directs the web crawlers used by search engines to certain web pages on your website. Additionally, it instructs the robots not to crawl certain sites.
It is essential that you comprehend the operation of a search engine before we proceed with the in-depth analysis of this article.
Crawling, indexing, and ranking are the three major activities that are performed by search engines.
The first thing search engines do is dispatch their web crawlers, which are also known as spiders or bots, all throughout the World Wide Web. These programs, known as bots, are intelligent pieces of software that crawl over the whole of the web in search of new connections, pages, and websites. Crawling is the term given to the process of searching through content on the web.
Your website’s pages will be organized into a data structure that may be used after the bots have discovered them. Indexing is the name given to this procedure.
And in the end, everything boils down to the rankings. When a user enters a search query, the search engine should offer the user with the best and most relevant information that it can find depending on what the user is looking for.
How does the Robots.txt File Appear to Be?
The robots.txt file is a vital component of a website’s structure and functionality, but have you ever wondered how it actually appears?
The file is applicable to all search engine robots that visit the website, as indicated by the asterisk that follows User-agent. Each search engine uses a different user-agent to explore the internet.
For instance, Google utilizes Googlebot to index the content of your website for Google search. These user-agents number in the hundreds. Custom instructions may be configured for every user-agent. For instance, the first line of your robots.txt file should be, “If you’d like to set specific instructions for the Googlebot, it will be known as User-agent: Googlebot.
What exactly is Crawl budget?
Crawl budget refers to the number of pages a search engine is willing to crawl on a website within a given timeframe. It is determined by various factors such as the website’s authority, popularity, and the server’s capacity to handle crawl requests. Additionally, you should make sure that the crawl budget is used as efficiently as possible for your website.
Your most important pages should surely be crawled by the bot first if your website has several pages. It is thus imperative that you specifically state this in your robots.txt file.
How to locate and edit the robots.txt file in WordPress?
Locating and editing the robots.txt file in WordPress is a crucial step in optimizing your website for search engines. By properly configuring this file, you can control what parts of your site are accessible to search engine crawlers, ensuring that they focus on the most important pages and content.
To locate and edit the robots.txt file in WordPress, follow these simple steps:
1. Log in to your WordPress dashboard.
2. Navigate to the “Settings” tab on the left-hand side menu.
3. Click on “Reading” to access the reading settings.
4. Scroll down until you find the “Search Engine Visibility” section.
5. Here, you will see an option that says “Discourage search engines from indexing this site.” Make sure this option is unchecked, as it will generate a basic robots.txt file that limits search engine access to your entire site.
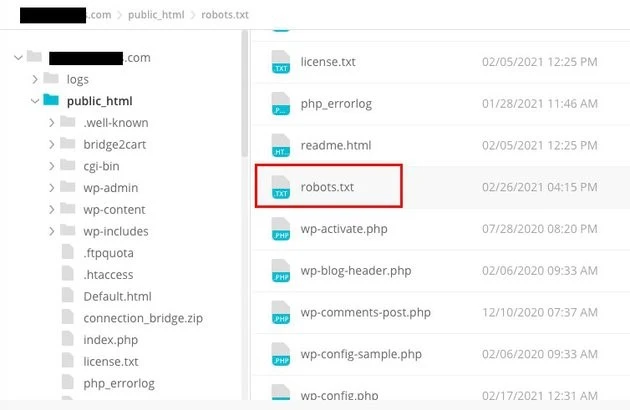
6. If you want to customize your robots.txt file further, you can do so by accessing your website’s root directory. This can typically be done through an FTP client or cPanel file manager.
7. Once you have located the root directory, look for the file named “robots.txt”.
8. Download a copy of the existing robots.txt file to your computer as a backup, in case any issues arise during editing.
9. Open the robots.txt file using a text editor.
10. Customize the file according to your needs. You can add specific directives to allow or disallow access to certain areas of your site. For example, you can prevent search engines from crawling your admin area by adding the following line:
1. Disallow: /wp-admin/
11. Save the changes to the robots.txt file and upload it back to your website’s root directory, replacing the previous version.
12. Finally, test your robots.txt file using Google’s robots.txt testing tool or other similar tools to ensure it is configured correctly.
Controlling how search engine crawlers interact with your website may be accomplished in WordPress by identifying and modifying the robots.txt file in the proper location. This will allow you to get the best possible outcomes in terms of your website’s visibility and ranking. If you invest the time to learn about and become an expert in this facet of search engine optimization (SEO), you will be well on your way to unlocking success for your WordPress site.
How to Create a Robots.txt File in WordPress?
Let’s go ahead and create a WordPress Robots.txt for SEO now that we’ve discussed what a robots.txt file is and why it’s so crucial. WordPress provides you with two distinct options for generating a robots.txt file. The first method involves the use of a WordPress plugin, while the second involves the manual uploading of the file to the root folder of your website.
Step 1: This is to use the Yoast SEO plugin to create a Robots.txt file
You may utilize SEO plugins to assist you in optimizing your website that is built on WordPress. The majority of these plugins provide their very own robots.txt file generator inside their installation package.
First, download and install the Plugin.
Navigate to the Plugins menu and click on “Add New.” The next step is to look for the Yoast SEO plugin, download it, and turn it on if you don’t already have it.
Create the robots.txt file as the second step
Create robots txt file using Yoast
You’ll notice the file created with some default directives.
The robots.txt file generator for Yoast SEO will automatically include the following directives:
User-agent: * Disallow: /wp-admin/ Allow: /wp-admin/admin-ajax.php
Add extra instructions to robots.txt. After editing robots.txt, click Save.
Enter your domain name and ‘/robots.txt.’ Your robots.txt file is complete if the browser displays the default directives, as seen below.
generated robots txt file
We also recommend that you add the sitemap URL in your robots.txt.
Default robots txt file
After the plugin has been enabled, go to Yoast SEO > Tools and choose File editor from the drop-down menu. Proceed to fill in your domain name, and then follow it up with ‘/robots.txt.’ If you look on the browser, you will notice some default directives shown.
Step 2: Using FTP to Manually Create the Robots.txt File
- Creating a robots.txt file on your local computer and then uploading it to the root folder of your WordPress website is the next step in the process.
- In addition to this, you will need access to your WordPress hosting via the use of an FTP program such as Filezilla. If you do not already have the credentials necessary to log in, they will be made accessible to you via the control panel for your hosting service. Consequently, you may check to verify whether the robots.txt file is present in the root folder of your website after logging in with your FTP program.
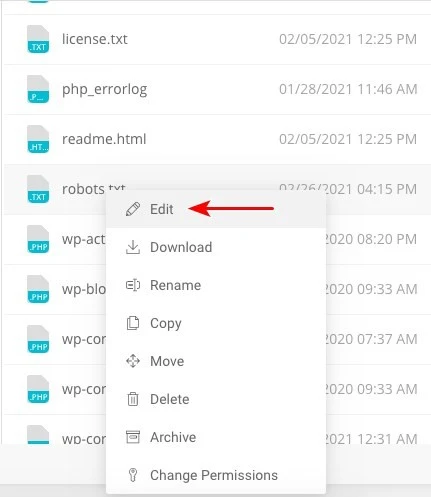
- Right-click the file and choose edit if it exists.
Therefore, when you have successfully signed in with your FTP client, you will be able to check to see whether the robots.txt file is there in the root folder of your website. Entering your domain name followed by ‘/robots.txt’ is the best way to determine whether or not your file was successfully uploaded.
After making your changes, click “Save.”
You will have to create the file if it does not already exist. One might be made by adding the directives to a file using a basic text editor like Notepad. Such as
User-agent: * Disallow: /wp-admin/ Allow: /wp-admin/admin-ajax.php
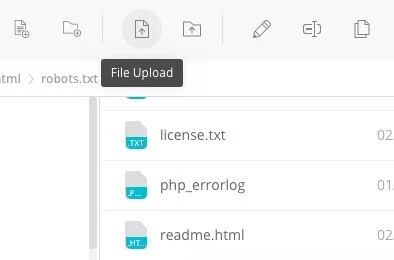
Click ‘File Upload’ in your FTP client to upload the file to the website’s root folder.
Type in your domain name and “/robots.txt” to see whether your file has been uploaded successfully.
This is the method for manually uploading the robots.txt file to your WordPress website!
Robots.txt: Knows its advantages and disadvantages
The benefits of using the robots.txt file
It instructs the search engine not to spend time on sites that you do not wish to be indexed, which helps to optimize the crawl budgets of the search engine. By doing so, you increase the likelihood that search engines will crawl the sites that are most essential to you.
Blocking the bots that are causing your web server’s resources to be wasted in this way contributes to the optimization of the server.
It is useful for hiding thank you pages, landing pages, login pages, and other pages that do not need to be indexed by search engines.
Negative aspects of the robots.txt file
You should now be able to view the robots.txt file on any website using the information provided here. It’s not too hard to understand. Simply type in the domain name, followed by “/robots.txt,” and hit enter.
However, there is a danger involved with this to some degree as well. There is a possibility that the WordPress Robots.txt for SEO file contains URLs to some of the internal pages of your website that you would want not to be indexed by search engines.
For instance, there may be a page for logging in that you don’t want indexed for whatever reason. However, the fact that it is mentioned in the robots.txt file makes it possible for attackers to see the website. If you are attempting to conceal certain sensitive info, the same thing applies.
Even if you make a single typo while writing the robots.txt file, it will throw off all of your search engine optimization (SEO) efforts. This is true even if the file is easy to create.
Where to Put the Robots.txt File
Suppose that at this point you are familiar with the location where the robots.txt file has to be inserted.
Your website’s robots.txt file should always be located in the website’s root directory. The URL of the robots.txt file on your website will be https://yourdomain.com/robots.txt if your domain name is yourdomain.com.
In addition to placing your robots.txt file in the root directory of your website, the following are some other recommended practices that should be adhered to:
- It is very necessary to give your file the name robots.txt.
- It is important to capitalize the name. Therefore, you need to get it properly, or else it won’t function.
- Each instruction need to be placed on a separate line.
- When a URL is complete, it should be marked with a “$” sign.
- Only one instance of each user-agent should be used.
- In order to provide humans with an explanation of the contents of your robots.txt file, use comments by beginning each line with a hash (#).
Testing and validating your robots.txt file
Testing and validating your robots.txt file is a crucial step in ensuring that search engines properly crawl and index your website. A well-optimized robots.txt file can prevent search engines from accessing sensitive or irrelevant pages, improve crawl efficiency, and ultimately enhance your website’s overall performance.
To begin testing your robots.txt file, you can utilize various online tools specifically designed for this purpose. These tools allow you to input your robots.txt directives and simulate how search engines interpret and follow them.
By analyzing the results, you can identify any potential issues or misconfigurations in your file. Regularly monitoring and updating your robots.txt file is crucial, especially when making changes to your website’s structure or content.
By staying vigilant, you can quickly identify and rectify any issues that may arise. This meticulous approach will ultimately contribute to your website’s perceptibility, indexing, and overall success in the digital landscape.
The tool we suggest here is Google Search Console
You may add your website to Google Search Console by going to the ‘Add property now’ link and following the simple on-screen instructions that appear. After you have finished, the dropdown menu labeled “Please select a property” will include your website among the options.
After selecting the website, the tool will automatically get the robots.txt file associated with your website and highlight any mistakes or warnings, if there are any.
Is a Robots.txt File Necessary for Your WordPress Website?
Indeed, your WordPress website does need a robots.txt file. Even if your website hasn’t got a robots.txt file, search engines will nonetheless crawl and index it. Now that we’ve discussed the purpose, workings, and crawl budget of robots.txt, why would you want to omit one?
Search engines are trained what to crawl and, more critically, what not to crawl via the robots.txt file.
Considering the negative consequences of the crawl budget is one of the main reasons to add the robots.txt.
As previously said, each website has a crawl budget. It all comes down to how many sites a bot visits in a single session. The bot will return and continue its crawling in the subsequent session if it doesn’t finish all the pages on your website in that session.
Also, this lowers the pace at which your website gets indexed.
You may save your crawl quota by quickly fixing this by preventing search bots from scanning media assets, theme directories, plugins, and extraneous sites.
Final words
We prioritize content optimization, keyword research, building backlinks, creating a sitemap.xml, and other SEO-related tasks while working on your website. WordPress Robots.txt for SEO one aspect that some webmasters overlook.
The robots.txt file may not be very important when your website is first launched. That being said, when your website becomes bigger and has more pages, it will pay off handsomely if we start using the recommended robots.txt file.


